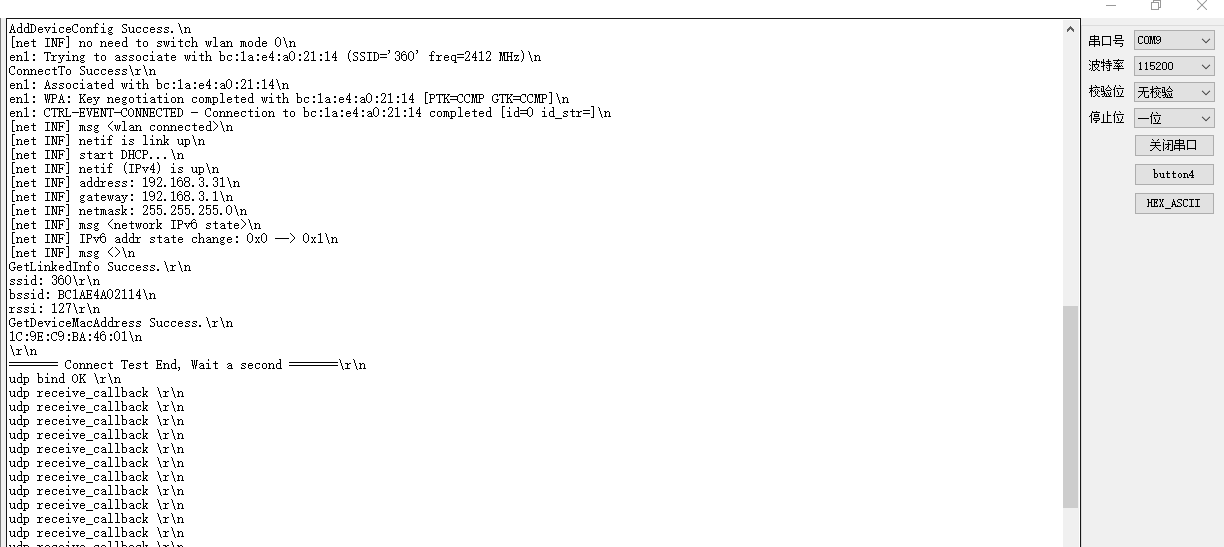
Navigation

    全志在线开发者论坛

    • Register
    • Login
    • Search
    • Categories
    • Tags
    • 在线文档
    • 社区主页
    1. Home
    2. zthzz
    Z
    • Profile
    • Following 0
    • Followers 0
    • my integral 195
    • Topics 3
    • Posts 3
    • Best 0
    • Groups 0

    zthzzLV 2

    @zthzz

    195
    integral
    0
    Reputation
    2
    Profile views
    3
    Posts
    0
    Followers
    0
    Following
    Joined Last Online

    zthzz Unfollow Follow

    Latest posts made by zthzz

    • 【XR806开发板试用】2、UDP控制的呼吸灯.

      【XR806开发板试用】1、UDP通信测试

      上篇文章测试了XR806的UDP通信.
      控制PWM控制相关的函数在device/xradio/xr806/adapter/hals/iot_hardware/wifiiot_lite文件夹下的iot_pwm.c 相关函数一共有一下四个.

          //port 指定输出引脚
          //duty 指定输出PWM占空比 范围1-99
          //freq 指定PWM输出频率
          unsigned int IoTPwmInit(unsigned int port);
          unsigned int IoTPwmDeinit(unsigned int port);
          unsigned int IoTPwmStart(unsigned int port, unsigned short duty,unsigned int freq);
          unsigned int IoTPwmStop(unsigned int port);
      

      驱动控制代码

          #include "iot_pwm.h"
          
          #define pwm_channl1         0U
          #define pwm_channl2         1U
          #define pwm_channl3         2U
          #define pwm_channl4         3U
          
          void udp_echoserver_init(void)
          {
          //略
          //在udp初始化结束后初始化PWM输出引脚.
                  IoTPwmInit(pwm_channl1);
                  IoTPwmInit(pwm_channl2);
                  IoTPwmInit(pwm_channl3);
                  IoTPwmInit(pwm_channl4);
          }
          
          void udp_echoserver_receive_callback(void *arg, struct udp_pcb *upcb,struct pbuf *p, const ip_addr_t *addr, u16_t port)
          {
              udp_connect(upcb, addr, UDP_CLIENT_PORT);
              udp_send(upcb, p);
              udpReceiveCallback(p->payload, p->len);        //recave call 
              udp_disconnect(upcb);
              pbuf_free(p);
          }
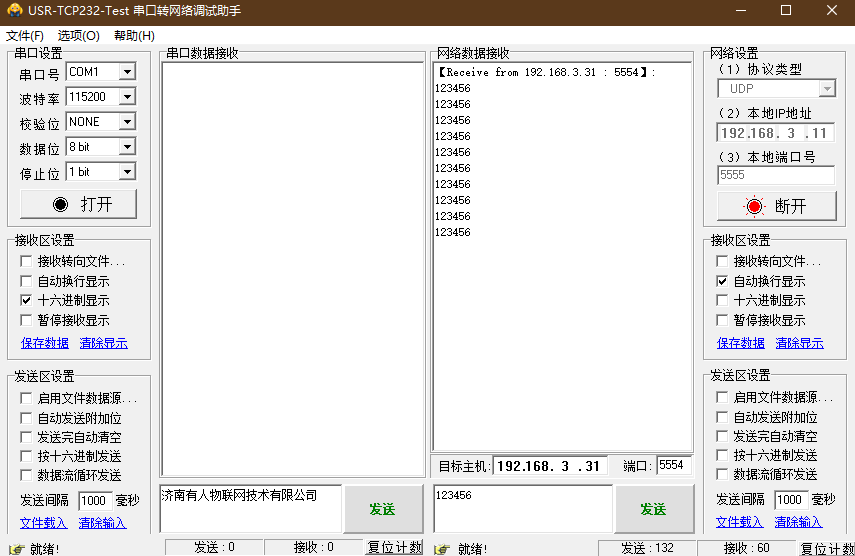
          //udp接收回调函数中根据接收到的数据控制PWM占空比.
          
          void udpReceiveCallback(char *p, int len)        //recave call 
          {
              if(len<42+5)
                  return;
              p+=42;
              //p[0]留作开关量控制.
              if(p[1]<5||p[1]>99)
                  IoTPwmStop(pwm_channl1);
              else
                  IoTPwmStart(pwm_channl1, p[1], 2000);
          
              if(p[2]<5||p[2]>99)
                  IoTPwmStop(pwm_channl2);
              else
                  IoTPwmStart(pwm_channl2, p[2], 2000);
          
              if(p[3]<5||p[3]>99)
                  IoTPwmStop(pwm_channl3);
              else
                  IoTPwmStart(pwm_channl3, p[3], 2000);
          
              if(p[4]<5||p[4]>99)
                  IoTPwmStop(pwm_channl4);
              else
                  IoTPwmStart(pwm_channl4, p[4], 2000);
      

      1.gif

      2.gif

      posted in XR系列-无线互联
      Z
      zthzz
    • 【XR806开发板试用】1、UDP通信测试

      XR806官方工程里已经给了WiFi连接的demo,基于这个demo可以很方便的添加代码实现UDP通信。
      代码目录结构如下.

      ohosdemo
      ├── BUILD.gn
      ├── hello_demo
      ├── iot_peripheral
      ├── LED
      └── wlan_demo
          ├── BUILD.gn
          ├── main.c
          ├── test_case.c
          ├── test_case.h
          ├── udpechoserver.c
          └── udpechoserver.h
      

      wlan_demo/BUILD.gn文件内容.

      import("//device/xradio/xr806/liteos_m/config.gni")
      
      static_library("app_WlanTest") {
         configs = []
         sources = [
            "main.c",
            "test_case.c",
            "udpechoserver.c"
         ]
      
         cflags = board_cflags
      
         include_dirs = board_include_dirs
         include_dirs += [
             ".",
             "//utils/native/lite/include",
             "//foundation/communication/wifi_lite/interfaces/wifiservice",
             "//third_party/lwip/src/include",
         ]
      }
      
      //udpechoserver.c
      #include <udpechoserver.h>
      
      //#include "main.h"
      #include "lwip/pbuf.h"
      #include "lwip/udp.h"
      #include "lwip/tcp.h"
      #include <string.h>
      #include <stdio.h>
      
      #define UDP_SERVER_PORT    5554   /* define the UDP local connection port */
      #define UDP_CLIENT_PORT    5555   /* define the UDP remote connection port */
      
      void udp_echoserver_receive_callback(void *arg, struct udp_pcb *upcb,struct pbuf *p, const ip_addr_t *addr, u16_t port);
      
      void udp_echoserver_init(void)
      {
      	struct udp_pcb *upcb;
      	err_t err;
      	/* Create a new UDP control block  */
      	upcb = udp_new();
      	if (upcb)
      	{
      		/* Bind the upcb to the UDP_PORT port */
      		/* Using IP_ADDR_ANY allow the upcb to be used by any local interface */
      		err = udp_bind(upcb, IP_ADDR_ANY, UDP_SERVER_PORT);
      		if (err == ERR_OK)
      		{
      			/* Set a receive callback for the upcb */
      			udp_recv(upcb, udp_echoserver_receive_callback, NULL);
      			printf("udp bind OK \r\n");
      		}else	
      			printf("udp bind error \r\n");
      	}
      }
      
      void udp_echoserver_receive_callback(void *arg, struct udp_pcb *upcb,struct pbuf *p, const ip_addr_t *addr, u16_t port)
      {
      	printf("udp receive_callback \r\n");
      	/* Connect to the remote client */
      	udp_connect(upcb, addr, UDP_CLIENT_PORT);
      	/* Tell the client that we have accepted it */
      	udp_send(upcb, p);
      	/* free the UDP connection, so we can accept new clients */
      	udp_disconnect(upcb);
      	/* Free the p buffer */
      	pbuf_free(p);
      }
      

      然后在void wifi_device_connect_test()函数里连接WiFi成功后调用udp_echoserver_init()就可以了.

      	if (WIFI_SUCCESS != GetDeviceMacAddress(get_mac_res)) {
      		printf("Error: GetDeviceMacAddress Fail\r\n");
      		return;
      	}
      	printf("GetDeviceMacAddress Success.\r\n");
      	for (int j = 0; j < WIFI_MAC_LEN - 1; j++) {
      		printf("%02X:", get_mac_res[j]);
      	}
      	printf("%02X\n", get_mac_res[WIFI_MAC_LEN - 1]);
      	printf("\r\n======= Connect Test End, Wait a second =======\r\n");
      
      	//udp初始化;
      	udp_echoserver_init();
      
      	//死循环.让线程停在这个位置.
      	while (1)
      	{
      		OS_Sleep(100);
      	}
      
      	i = 800;
      	while (i > 0) {
      		OS_Sleep(1);
      		printf("%d\n", i);
      		i -= 1;
      	}
      
      	printf("\r\n=========== DisConnect Test Start ===========\r\n");
      

      运行后串口调试助手显示
      1.png
      udp网络调试工具界面。后期准备实现一个udp的上位机来处理数据。
      2.png

      posted in XR系列-无线互联
      Z
      zthzz