【R128】外设模块配置——USB外设功能配置
-
基于R128-S2设计的全套开发板已上线淘宝百问网韦东山老师个人店进行售卖,包含黑色的DshanMCU-R128s2-R16N16模组和全套的DshanMCU-R128s2-DEVKIT。
- DshanMCU-R128s2-R16N16模组:39.9元
- DshanMCU-R128s2-DEVKIT开发板:59.9元
R128开发板购买链接:https://item.taobao.com/item.htm?spm=a21n57.1.0.0.46b0523cMfarLo&id=736154682975&ns=1&abbucket=5#detail
USB 外设功能配置
USB 功能简介
USB 功能模块包括了USB Host,USB Device 和OTG 功能。
USB Host 目前已经支持上的功能有:Mass Storage,UVC。
USB Device 目前已经支持上的功能有:ADB,UAC。
OTG 主要用作Host 与Device 的切换,如当板子通过 USB 线连接到 USB 主机 (PC) 上时,
此时 OTG 是加载成 USB Device;若当前板子是通过 OTG 线连接一个USB 设备,此时 OTG 则加载
成 USB Host。USB 外设特性
- Complies with USB 2.0 Specification
- Supports High-Speed (HS, 480-Mbps), Full-Speed (FS, 12-Mbps), and Low-Speed (LS, 1.5-Mbps) in Host mode
- Supports High-Speed (HS, 480 Mbps), Full-Speed (FS, 12 Mbps) in Device mode
- Supports the UTMI+ Level 3 interface. The 8-bit bidirectional data buses are used
- Supports bi-directional endpoint0 for Control transfer
- Supports up to 8 User-Configurable Endpoints for Bulk, Isochronous and Interrupt bi-directional transfers (Endpoint1, Endpoint2, Endpoint3, Endpoint4)
- Supports up to (4KB+64Bytes) FIFO for EPs (Including EP0)
- Supports High-Bandwidth Isochronous & Interrupt transfers
- Automated splitting/combining of packets for Bulk transfers
- Supports point-to-point and point-to-multipoint transfer in both Host and Peripheral mode
- Includes automatic ping capabilities
- Soft connect/disconnect function
- Performs all transaction scheduling in hardware
- Power Optimization and Power Management capabilities
- Includes interface to an external Normal DMA controller for every Eps
USB 配置介绍
sys_config.fex配置说明sys_config.fex 中主要是对 OTG 功能进行配置,各个配置的含义可如下所示:
Key Value [usbc0] 控制器0的配置。 usb_used: USB使能标志。置1,表示系统中USB模块可用,置0,则表示系统USB禁用。 usb_port_type USB端口的使用情况。 0: device only;1: host only;2: OTG;usb_detect_type: USB usb_detect_mode USB端口的检查方式。0: 线程轮询;1: id中断触发 usb_id_gpio USB ID pin脚配置。具体请参考gpio配置说明。 usb_det_vbus_gpio USB DET_VBUS pin脚配置。具体请参考gpio配置说明。 usb_drv_vbus_gpio USB DRY_VBUS pin脚配置。具体请参考gpio配置说明。 usb_drv_vbus_type vbus设置方式。0: 无; 1: gpio; 2: axp。 usb_det_vbus_gpio "axp_ctrl",表示axp 提供。 usbh_driver_level usb驱动能力等级 usbh_irq_flag usb中断标志 示例:
;--------------------------------
;---       USB0控制标志
;--------------------------------
[usbc0]
usb_used                = 1
usb_port_type           = 2
usb_detect_type         = 1
usb_detect_mode         = 0
usb_id_gpio             = port:PB04<0><0><default><default>
usb_det_vbus_gpio       = port:PA24<0><0><default><default>
usb_drv_vbus_gpio       = port:PA29<1><0><default><default>
usb_drv_vbus_type       = 1
usbh_driver_level       = 5
usbh_irq_flag           = 0
rtos menuconfig 配置说明
- 使能USB 驱动
‑> Drivers Options ‑> soc related device drivers ‑> USB Drivers [*] USB- 使能OTG
‑> Drivers Options ‑> soc related device drivers ‑> USB Drivers [*] USB_MANAGER- 使能USB Host
使能完USB Host 之后,还需要选择:OHCI 与EHCI(一共有0 和1 两组,对于R128 来说,只需要使能USB0)。另外,还要选择功能驱动(Mass Storage,UVC),不然只是使能USB Host 则无法正常运行USB Host 的功能。
USB Host 控制器驱动配置如下:
USB Host ‑> Drivers Options ‑> soc related device drivers ‑> USB Drivers [*] USB_HOST OHCI ‑> Drivers Options ‑> soc related device drivers ‑> USB Drivers ‑> USB HOST [*] USB_OHCI_0 EHCI ‑> Drivers Options ‑> soc related device drivers ‑> USB Drivers ‑> USB HOST [*] USB_EHCI_0- 使能USB Device
USB Device 除了UDC 的使能之外,也需要选择对应的功能驱动Gadget 以及功能驱动对应的上层应用。
USB Device 控制器驱动配置如下:
USB Device
‑> Drivers Options
    ‑> soc related device drivers
        ‑> USB Drivers
            [*] USB_DEVICE

USB Device使能dma通信
‑> Drivers Options
    ‑> soc related device drivers
        ‑> USB Drivers
            ‑> USB DEVICE
                [*] UDC_USE_DMA
USB 源码结构
lichee/rtos‑hal/hal/source/usb ├── common/ ├── core/ ├── gadget/ │ ├── function/ ├── hid/ │ ├── Class/ │ ├── Client/ │ │ ├── KeyBoard/ │ │ └── Mouse/ │ ├── Include/ ├── host/ ├── include/ ├── manager/ ├── platform/ ├── storage/ │ ├── Class/ │ ├── Disk/ │ ├── include/ │ └── Misc/ ├── udc/ └── uvc/ ├── Class/ ├── drv_webcam/ │ ├── dev_cfg/ │ └── webcam_core/ ├── Include/ ├── Misc/ └── Webcam/- common: USB 驱动初始化公用文件。
- core: USB Host 驱动框架层文件。
- gadget: USB Deivce 功能驱动gadget 驱动总入口文件,function 则是各个功能驱动的驱动文件。
- hid: USB Host HID 协议及驱动文件。
- host: USB Host 硬件控制器驱动。
- include: USB 公用头文件。
- manager: USB OTG 驱动。
- platform: 不同平台的配置文件。
- storage: USB Host Mass Storage 协议及驱动文件。
- udc: USB Deivce 硬件控制器驱动。
- uvc: USB Host UVC 协议及驱动文件。
详细说明请见:HAL USB
USB 常用功能说明
配置OTG 功能
OTG 功能下,需要根据USB ID 脚去进行Device/Host 模式的切换;如果需要支持NULL 模式(既不加载Device 也不加载Host 驱动), 那么还需要VBUS 状态检测引脚。
涉及到的主要改动点:
在sys_config.fex,修改如下配置:
usb_port_type配置为2,即OTG模式。
usb_id_gpio配置对应的USB ID引脚。
usb_det_vbus_gpio, 需要根据实际情况进行配置:

1.如果需要检测VBUS状态,则按下面情况进行配置:
配置成对应的gpio即可。

2.如果不需要检测VBUS状态(缺少NULL模式)
那么直接填写USB ID的gpio配置(也就是VBUS与ID状态一致)。
USB OTG 驱动,会根据ID 和VBUS 的状态,自动切换成对应的模式。ID 和VBUS 的对应关系如下表:
ID VBUS 模式 0 0 Host 1 0 Null 0 1 Host 1 1 Device - ID 脚一般情况下为高电平,只有接入OTG 线时会拉低;
- VBUS 为1 表示micro USB 口有接入外部电源;
- 一般不会出现ID 为0,VBUS 为1 的情况。这表示接入OTG 线,但是还检测到VBUS;
- 如果没有VBUS 检测,ID 只有0 和1 的两种情况, 也就是说要么加载device 驱动,要么加载host 驱动; 这会带来一些影响:usb 相关时钟一直被打开,导致有一定功耗,以及硬件射频。
USB Gadget 功能配置
USB Gadget 支持众多功能,它们的配置方法比较类似,只需要在mrtos_menuconfig 中选上对应的Gadget 功能驱动即可在系统初始化时自动加载。与Linux 不一样的是,RTOS 的gadget 功能配置全部hardcode 在功能驱动里,无需像Linux 一样需要在应用层手动进行gadget 配置。
另外,目前RTOS 的USB 驱动还不支持composite gadget,因此只能支持加载单一的gadget 功能驱动,无法同时多个功能。
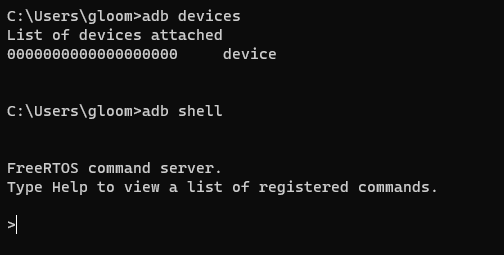
ADB 功能
adb 的全称为Android Debug Bridge,就是起到调试桥的作用。通过ADB,可以直接在PC 上通过命令行控制小机端的控制台;也可以通过ADB 进行文件传输。
menuconfig 驱动相关配置:
‑> Drivers Options
    ‑> soc related device drivers
        ‑> USB Drivers
            ‑> USB DEVICE
                [*] DRIVERS_USB_GADGET_ADB
menuconfig ADBD 应用相关配置:
‑> System components
    ‑> aw components
        ‑> USB Components Support
            ‑> USB Gadget Support
                [*] adbd service
在RTOS 的USB 框架中,一旦加载了adb gadget,就会自动启用adbd 服务,直接连上PC 就可以使用了。
adb 正常启动的相关log:
[usb0] insmod device driver!
adbd version:AW‑V1.1.6, compiled on: Apr 11 2023 10:33:24
adbd service init successful
PC 运行效果图如下图所示:
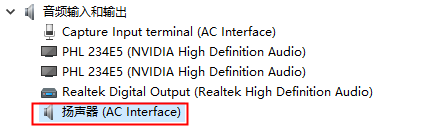
UAC 功能
UAC 全称为USB Audio Class,USB 音频类。
通过UAC,可以实现实时获取音频设备的音频数据,并且通过UAC 实现操控设备音量,采样率,等参数。UAC 实现对外接音频操作,从用户功能来说,主要包括USB 麦克风、USB 声卡和其它音频设备的功能控制和接口标准。
menuconfig 驱动相关配置:
‑> Drivers Options
    ‑> soc related device drivers
        ‑> USB Drivers
            ‑> USB DEVICE
                [*] DRIVERS_USB_GADGET_UAC
menuconfig UACD 应用相关配置:
‑> System components
    ‑> aw components
        ‑> USB Components Support
            ‑> USB Gadget Support
                [*] uacd service

‑> System components
    ‑> aw components
        ‑> USB Components Support
            ‑> USB Gadget Support
                ‑> uacd audio function
                    [*] AudioSystem local audio
uacd 正常启动的相关log:
[usb0] insmod device driver!
uacd version:AW‑V0.5, compiled on: Apr 27 2023 10:44:02
[UACD‑INFO][u_audio_init] line:167 stream=1, rate=48000, ch=2, bits=16, audio_buf_size=192
[UACD‑INFO][u_audio_init] line:167 stream=0, rate=16000, ch=2, bits=16, audio_buf_size=64
[UACD‑INFO][u_audio_stop_capture] line:320
[UACD‑INFO][u_audio_stop_playback] line:457
[UACD‑INFO][u_audio_stop_capture] line:320
[UACD‑INFO][u_audio_stop_playback] line:457
启动成功之后,能够在PC 端看到新增了一个音频输入和输出的设备,如下图:
USB Host 功能配置
接入OTG 线后,成功切换成 USB Host 的log 可参考如下:
[ehci‑usb0] insmod host driver!
calibration finish, val:0x19, usbc_no:0
ehci insmod status = 1
[usbh core]: add gen_dev SW USB2.0 'Enhanced' Host Controller (EHCI) Driver
[D(rv.)] devops: register dev(sunxi_timer) ok
USB 0.0 started, EHCI 1.00
[usbh core]: adding sub dev (config #1, interface 0)
usb match id suceessfull
[hub]: usb hub probe
[hub]: 1 port detected
[usbh hub]: local power source is good
[E(rv.)] pm device sunxi_ehci0(00000000082AE1D0) has already registered
[ohci‑usb0] insmod host driver!
calibration finish, val:0x19, usbc_no:0
[usbh core]: add gen_dev SW USB2.0 'Open' Host Controller (OHCI) Driver
[usbh core]: adding sub dev (config #1, interface 0)
usb match id suceessfull
[hub]: usb hub probe
[hub]: 1 port detected
[usbh hub]: local power source is good
[D(rv.)] devops: register dev(sunxi_ohci0) ok
U 盘功能
选上以下配置:
Mass Storage
‑> Drivers Options
    ‑> soc related device drivers
        ‑> USB Drivers
            ‑> USB HOST
                [*] Mass Storage support
                [*] USB CD support
等待U 盘挂载成功,可以发现根目录下多了一个usb_msc 的文件夹,这个即是U 盘挂载的文件夹。可以通过该文件夹与U 盘进行读取/传输文件。
- 目前R128 只支持fat32 文件系统的U 盘,其他文件系统U 盘会挂载失败。
- 只支持挂载单分区的U 盘,如果U 盘被分解成了多个分区的话,只能挂载上第一个分区。
接入U 盘后,系统开始识别U 盘。成功识别到U 盘的log 信息如下:
ehci_irq: highspeed device connect
port debounce 0...
port debounce 0...
port debounce 25...
port debounce 50...
port debounce 75...
hub_port_init: udev address = 0
[hub_port_init]: new high speed USB device address 0
usb hub set new address(2)
[usbh core]: adding sub dev (config #1, interface 0)
usb match id suceessfull
mscDevProbe begin
[msc]: GetMaxLUN successful, max lun is 0
begin mscLunAdd
disk, send last lun msg.........
mscLun‑>LunNo=0
mscLun‑>mscDev‑>MaxLun=1
BlkDev‑>last_lun=1
Wrn: short transfer, urb_state(0), want_len(192), real_len(70)
Wrn: short transfer, urb_state(0), want_len(192), real_len(24)
‑‑‑‑‑‑‑‑‑‑‑‑‑‑‑‑‑Disk Information‑‑‑‑‑‑‑‑‑‑‑‑‑‑‑‑‑
WriteProtect = 0
MediaPresent = 1
WCE = 0
RCD = 0
capacity = 29532M, sector number = 60481536
sector_size = 512
DevNo = 0
ClassName =
DevName = SCSI_DISK_000
‑‑‑‑‑‑‑‑‑‑‑‑‑‑‑‑‑‑‑‑‑‑‑‑‑‑‑‑‑‑‑‑‑‑‑‑‑‑‑‑‑‑‑‑‑‑‑‑‑‑
hub_port = 1
cnt = 0
Classname = DISK
DevName = SCSI_DISK_000
DeviceName = SCSI_DISK_000
Vender = TOSHIBA USB FLASH DRIVE PMAP
Product = USB FLASH DRIVE PMAP
Serial = PMAP
HubPortNo = 1
DeviceType = 2
DiskRead: block(0, 1) is adjacence max capacity(39ae000), can't use special write
mount usb mass storage successull!!
..............................................................................
[USB Disk]: Register new device, class = [DISK], dev = [SCSI_DISK_000]
..............................................................................
end mscLunAdd
mscDevScanThread end...
然后通过ls 查看usb_msc,可以看到U 盘里的文件:
c906>ls
dev data usb_msc

c906>ls usb_msc
System Volume Information 3.txt
USB 摄像头
选上以下配置:
UVC
‑> Drivers Options
    ‑> soc related device drivers
        ‑> USB Drivers
            ‑> USB HOST
                [*] USB_CAMERA
接上USB 摄像头后,成功识别出摄像头后会出现以下log:
ehci_irq: highspeed device connect
port debounce 0...
port debounce 0...
port debounce 25...
port debounce 50...
port debounce 75...
hub_port_init: udev address = 0
[hub_port_init]: new high speed USB device address 0
usb hub set new address(3)
[hub] :skipped 1 descriptor after configuration
skipped 6 descriptors after interface
skipped 1 descriptor after endpoint
skipped 26 descriptors after interface
num_ep:0
skipped 1 descriptor after endpoint
skipped 4 descriptors after interface
num_ep:0
num_ep:0
skipped 2 descriptors after interface
skipped 1 descriptor after endpoint
[usbh core]: adding sub dev (config #1, interface 0)
usb match id suceessfull
UVCDevProbe begin
Probing generic UVC device
device quirks 0x0
Found format MJPEG.
‑ 1920x1080 (30.0 fps)
‑ 1280x720 (30.0 fps)
‑ 640x480 (30.0 fps)
‑ 640x360 (30.0 fps)
‑ 352x288 (30.0 fps)
‑ 320x240 (30.0 fps)
‑ 320x180 (30.0 fps)
‑ 176x144 (30.0 fps)
‑ 160x120 (30.0 fps)
‑ 1920x1080(30.0 fps)
Found format YUV 4:2:2 (YUYV).
‑ 1920x1080 (5.0 fps)
‑ 1280x720 (10.0 fps)
‑ 640x480 (30.0 fps)
‑ 640x360 (30.0 fps)
‑ 352x288 (30.0 fps)
‑ 320x240 (30.0 fps)
‑ 320x180 (30.0 fps)
‑ 176x144 (30.0 fps)
‑ 160x120 (30.0 fps)
‑ 1920x1080 (5.0 fps)
Found UVC 1.00 device USB 2.0 Camera (0c45:6366)
num_altsetting=7
UVC device initialized.
DRV_WEBCAM_MInit
webcam plug in message...
[usbh core]: adding sub dev (config #1, interface 1)
[usbh core]: adding sub dev (config #1, interface 2)
[usbh core]: adding sub dev (config #1, interface 3)
通过log 信息能够看到,在识别出USB 摄像头后,会打印出该摄像头支持的格式以及分辨率。
接着通过uvc 测试命令,对UVC 功能进行测试:
usb uvc_test测试命令调用完成之后,会在/data 目录下生成5 张名为/data/source_frame_x.jpg 的图片。通过adb pull 将图片拉到PC 端,然后在PC 端打开图片即可看到USB 摄像头拍下的照片。
USB 调试方法
USB OTG 功能调试
除了OTG 的自动切换功能,还可以进行手动的切换,需要使用到USB 命令。
USB Device/Host 的手动切换方法:
输入usb ‑h 能够看见usb 的全部命令。
- USB Device 的相关命令
usb udc {‑i|‑r} [<port>] ‑i:指的是指定需要进行切换的USB口。目前R128芯片只有USB0是支持Device模式的。 ‑r:指的是remove,注销当前的Device模式。 比如说将USB0切换成Device模式,则运行: usb udc ‑i 0- USB Host 的相关命令
usb hci {‑i|‑r} [<port>]
‑i:指的是指定需要进行切换的USB口。
‑r:指的是remove,注销当前的Host模式。

比如说将USB0切换成Host模式,则运行:
usb hci ‑i 0
USB 相关工具
ADB
ADB 功能是从Android 移植过来的,设备端会运行adbd 服务,而Host 端(一般为PC) 通过adb工具进行调试,如adb shell, adb push/pull 等。
ADB 功能说明
adb shell 功能
PC端执行adb shell,可进入控制台。
PC端执行adb shell + command, 例如adb shell ls /可以直接将结果输出到终端。
adb push/pull 功能
推送文件到小机端:
adb push test.bin /data

从小机端拉取文件:
adb pull /data/test.bin .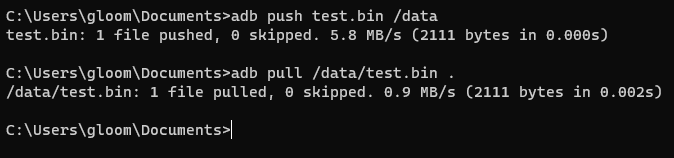
adb 网络连接
如果需要用此功能,需要额外进行menuconfig 的配置,配置方法如下:
‑> System components
    ‑> aw components
        ‑> USB Components Support
            ‑> USB Gadget Support
                [*] adb local transport
                (5555) adb local transport port
adb local transport port 是用于配置端口号的,用于在adb 网络连接时匹配端口的,默认为5555。
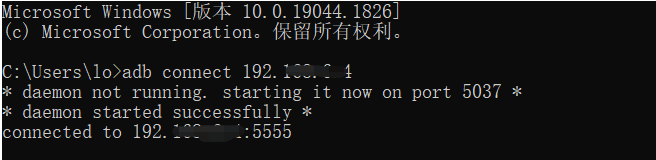
在进行网络adb 连接之前,需要保证PC 和小机端在同一个局域网中,并且可以ping 通。
小机端运行ifconfig,查看当前小机端的IP,假设IP为192.168.1.101。
则PC端执行adb connect 192.168.1.101建立连接,然后就可以开始执行adb shell等命令了。
-
后期有计划支持rndis吗?
Copyright © 2024 深圳全志在线有限公司 粤ICP备2021084185号 粤公网安备44030502007680号