【转载】毕昇JDK 11 for RV64GC在D1开发板构建过程
-
文章转自 知乎
原文链接 https://zhuanlan.zhihu.com/p/386123758?utm_source=wechat_timeline&utm_medium=social&s_r=0&wechatShare=1
作者 阿翔与山海经
前言
作为嵌入式开发的初学者,这个构建过程对我来说,受益匪浅。。。
特别感谢大神 @Bamboo 的倾情支援,泪目。。
另外记录了开发过程遇到的一些问题
https://github.com/openjdk-riscv/jdk11u/issues/156
1、开发板的前期准备
1.1 技术指导
关于D1开发板,目前我拿到手是没有具体的开发说明书(产品盒子上给的是二维码),只提供了开发者交流论坛:
由于某些原因,我们有时候需要科学上网才能登陆
https://www.rvboards.org/forum/cn/topic/61/rvboards-哪吒-d1-debian系统镜像和安装方法/3
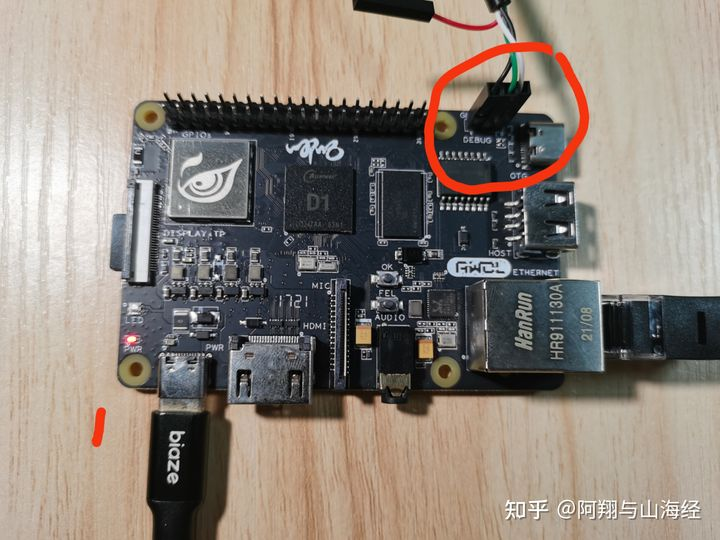
1.2 板子介绍
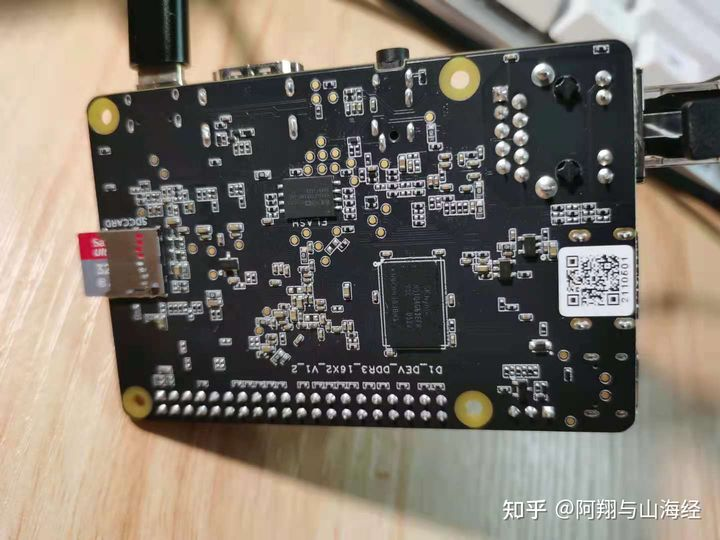
第一个图比较简单,主要是插了个32g的内存卡(具体作用下文介绍)
主要注意第二个图:板子上有两个usb接口,“1”处是电源接口(也就是靠近HDMI接口的),另一个USB接口暂时没开发到。
目前我是通过串口链接的,所以需要关注红圈处的串口顺序"黑绿白"(沿着DEBUG方向),另注意接好网线。
1.3 烧录过程
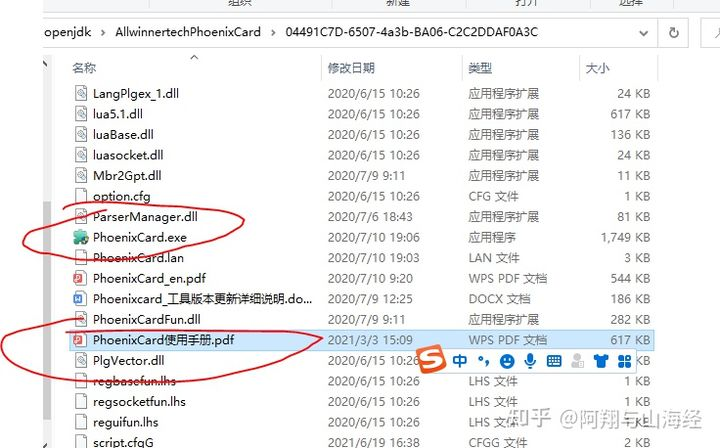
我拿到的板子的内存卡是空的,所以需要进行烧录,全志的网站提供了比较详细的教程了,基本上属于一键式傻瓜操作。
其中需要下载相关的软件,下载地址需要先浏览上文的开发论坛:
安装好烧录工具,解压
1.4 连接
下载对应串口驱动:
安装完后进入“我的电脑->管理->串口”进行查看。
本人使用的xshell连接工具,建一个链接,协议采用“serial”,串口出现的端口号与上文中的串口显示应该一致。
毕昇jdk的构建
在服务器上进行毕昇jdk的构建(交叉编译),具体编译过程参考
https://zhuanlan.zhihu.com/p/302421409
https://zhuanlan.zhihu.com/p/372067562
2、交叉编译开始
2.1 前提准备:
ubuntu 18.04
需要的安装包
apt install autoconf automake autotools-dev curl libmpc-dev libmpfr-dev libgmp-dev gawk build-essential bison flex texinfo gperf libtool patchutils bc zlib1g-dev libexpat-dev git libglib2.0-dev libfdt-dev libpixman-1-dev libncurses5-dev libncursesw5-dev ninja-build python3 autopoint pkg-config zip unzip screen make libxext-dev libxrender-dev libxtst-dev libxt-dev libcups2-dev libfreetype6-dev mercurial libasound2-dev cmake libfontconfig1-dev git vim gettext rysnc wget2.2 交叉工具链 riscv-gnu-toolchain
TIPS:这个过程是关键过程,由于D1的板子不支持2.33版本的glibc,导致在后续移植jdk时一直会报错,显示glibc的版本不支持。
$ git clone https://github.com/riscv/riscv-gnu-toolchain
$ cd riscv-gnu-toolchain
#回退版本
git checkout 6f498c63c9333d396b07dd572d2770b422e338a8
$ git submodule update --init --recursive
#子模块的回退处理
cd  riscv-gcc
git checkout riscv-gcc-10.2.0

#进入子模块riscv-binutils 回退到24a16d8b93774234148bcb7d40b7ba7f00cb7991
cd riscv-binutils
git checkout 24a16d8b93774234148bcb7d40b7ba7f00cb7991

#进入子模块riscv-gdb回退到 24a16d8b93774234148bcb7d40b7ba7f00cb7991
cd riscv-gdb
git checkout 24a16d8b93774234148bcb7d40b7ba7f00cb7991

#进入子模块riscv-glibc回退到git checkout riscv-glibc-2.29:
cd riscv-glibc
git checkout riscv-glibc-2.29

#进入子模块riscv-newlib 回退到47e698cc04109a188d8bba6be8f7fe2e307410a4:
cd riscv-newlib
git checkout 47e698cc04109a188d8bba6be8f7fe2e307410a4
2.3 编译安装
$ PREFIX="/path/to/riscv"
$ cd riscv-gnu-toolchain
$ ./configure --prefix="${PREFIX}"
$ make newlib -j $(nproc)
$ make linux -j $(nproc)
$ export PATH="$PATH:$PREFIX/bin"
$ export RISCV="$PREFIX"
结束之后可以上述第一行以及最后两行加入到~/.bashrc中,并执行$ source ~/.bashrc方便以后的工作。
3. 编译 QEMU(此过程在本次构建中的目的仅限于验证,所以安装成功与否意义不是很大)
3.1 下载源码
$ wget https://download.qemu.org/qemu-5.1.0.tar.xz
$ tar xvJf qemu-5.1.0.tar.xz
3.2 编译和安装
$ cd qemu-5.1.0/
$ ./configure --target-list=riscv64-softmmu,riscv64-linux-user --prefix=/path/to/qemu
$ make -j $(nproc)
$ sudo make install
3.3 验证安装是否正确:
$ /path/to/qemu/bin/qemu-system-riscv64 --version出现类似如下输出,则安装成功
QEMU emulator version 5.1.0
Copyright (c) 2003-2020 Fabrice Bellard and the QEMU Project developers
安装额外的库文件(脚本来源 https://zhuanlan.zhihu.com/p/372067562)
在进入到工具链安装目录
/path/to/riscv,直接执行下面的脚本(vimxxx.sh复制粘贴下面的内容,然后sh xxx.sh执行脚本)#!/bin/bash mkdir build_ext_libs_riscv64 && cd build_ext_libs_riscv64 git clone --depth=1 https://github.com/libffi/libffi git clone --depth=1 https://github.com/apple/cups git clone --depth=1 https://github.com/libexpat/libexpat git clone --depth=1 https://github.com/madler/zlib git clone --depth=1 https://github.com/glennrp/libpng wget https://download.savannah.gnu.org/releases/freetype/freetype-2.10.4.tar.gz && tar -xzvf freetype-2.10.4.tar.gz && mv freetype-2.10.4 freetype2 && rm -f freetype-2.10.4.tar.gz git clone -b json-c-0.13 --depth=1 https://github.com/json-c/json-c git clone --depth=1 https://gitlab.freedesktop.org/fontconfig/fontconfig git clone --depth=1 https://github.com/alsa-project/alsa-lib git clone --depth=1 https://github.com/karelzak/util-linux mkdir xorg && cd xorg && wget https://gitee.com/zdlgv5/jdk-riscv/raw/riscv/dev-riscv/toolchain/xorg_modules && git clone --depth=1 -b riscv64 https://gitee.com/zdlgv5/xorg-util-modular.git util/modular cd ..接着,之后在
/path/to/riscv/build_ext_libs_riscv64目录下保存下述脚本为build_ext_libs_64.sh,执行脚本时输入工具链的路径作为参数:sh build_ext_libs_64.sh /path/to/riscv(注意这里不需要配置到/path/to/riscv/bin目录,且/path/to/riscv后不能带有/,脚本会自动配置环境变量$PATH)#!/bin/bash # exit on error set -e if [ ! -n "$1" ];then echo "Please designate riscv toolchain path" exit 1 else riscvpath=$1 echo "riscv toolchian path was set as: $riscvpath" fi export PATH=$riscvpath/bin:$PATH export sysroot=$riscvpath/sysroot export prefix=$sysroot/usr # libffi cd libffi && ./autogen.sh && ./configure --host=riscv64-unknown-linux-gnu --prefix=$prefix make && make install cd - # cups cd cups && ./configure --host=riscv64-unknown-linux-gnu --disable-ssl --disable-gssapi --disable-avahi --disable-libusb --disable-dbus --disable-systemd make CFLAGS="-Wno-error=sign-conversion -Wno-error=format-truncation" CXXFLAGS="-Wno-error=sign-conversion -Wno-error=format-truncation" && make install DSTROOT=$sysroot cd - # libexpat cd libexpat/expat && ./buildconf.sh &&./configure --host=riscv64-unknown-linux-gnu --prefix=$prefix make && make install cd - # zlib cd zlib && CHOST=riscv64 CC=riscv64-unknown-linux-gnu-gcc AR=riscv64-unknown-linux-gnu-ar RANLIB=riscv64-unknown-linux-gnu-ranlib ./configure --prefix=$prefix make && make install cd - # libpng cd libpng && ./configure --host=riscv64-unknown-linux-gnu --prefix=$prefix make && make install cd - # freetype2 cd freetype2 && ./autogen.sh && ./configure --host=riscv64-unknown-linux-gnu --prefix=$prefix --with-brotli=no --with-harfbuzz=no --with-bzip2=no make && make install cd - # json-c cd json-c && ./autogen.sh && ./configure --host=riscv64-unknown-linux-gnu --prefix=$prefix make && make install cd - # fontconfig cd fontconfig && PKG_CONFIG_PATH=$prefix/lib/pkgconfig ./autogen.sh --host=riscv64-unknown-linux-gnu --prefix=$prefix make && make install cd - # alsa-lib cd alsa-lib && libtoolize --force --copy --automake && aclocal && autoheader && automake --foreign --copy --add-missing && autoconf && ./configure --host=riscv64-unknown-linux-gnu --prefix=$prefix make && make install cd - # util-linux cd util-linux && ./autogen.sh && ./configure --host=riscv64-unknown-linux-gnu --prefix=$prefix --disable-all-programs --enable-libuuid make && make install || true cd - # xorg cd xorg && CONFFLAGS="--host=riscv64-unknown-linux-gnu --disable-malloc0returnsnull" ./util/modular/build.sh --modfile ./xorg_modules --clone $prefix echo "Success. exit"tips:注意相比较原文,这里的脚本稍作修改了,主要是32-->64;
4、编译JDK
4.1获取毕昇JDK11 for RISCV的源码
可以在gitee上获取毕昇JDK11 for RISCV的源码:
$ git clone -b risc-v https://gitee.com/openeuler/bishengjdk-11.git也可以从软件所的github repo中获取(mirror):
$ git clone -b risc-v https://github.com/isrc-cas/bishengjdk-11-mirror.git4.2 下载openJDK10:
$ wget https://download.java.net/openjdk/jdk10/ri/jdk-10_linux-x64_bin_ri.tar.gz4.3 解压
$ tar -xzvf jdk-10_linux-x64_bin_ri.tar.gz4.4 开始构建JDK
bash configure \
--openjdk-target=riscv64-unknown-linux-gnu \
--disable-warnings-as-errors \
--with-sysroot=/path/to/riscv/sysroot \
--x-includes=/path/to/riscv/sysroot/usr/include \
--x-libraries=/path/to/riscv/sysroot/usr/lib \
--with-boot-jdk=/path/to/jdk-10

$ make images
4.5 验证
在/path/to/bishengjdk-11/build/linux-riscv64-normal-server-release/images/jdk/bin下输入
/path/to/qemu/bin/qemu-riscv64 -L /path/to/riscv/sysroot ./java -version出现下述即成功
root@5a51df28def0:/path/to/bishengjdk-11/build/linux-riscv64-normal-server-release/images/jdk/bin# /root/path/to/qemu/bin/qemu-riscv64 -L /root/path/to/riscv/sysroot ./java -version
openjdk version "11.0.11-internal" 2021-04-20
OpenJDK Runtime Environment (build 11.0.11-internal+0-adhoc..bishengjdk-11)
OpenJDK 64-Bit Server VM (build 11.0.11-internal+0-adhoc..bishengjdk-11, mixed mode)
root@5a51df28def0:/path/to/bishengjdk-11/build/linux-riscv64-normal-server-release/images/jdk/bin#
至此,在服务器上毕昇jdk11的构建即完成,下面准备移植到D1开发板上
5. 移植
5.1 打包镜像
注意路径,在/path/to/bishengjdk-11/build/linux-riscv64-normal-server-release/下
$ tar -zcvf openjdk.tar.gz images/5.2 拷贝镜像
5.2.1连接设置
利用windows的powershell进行镜像的复制移动
在windows 的C:\Users\zx.ssh路径下找到秘钥

在config目录下,添加D1以及服务器的信息设置
# Read more about SSH config files: https://linux.die.net/man/5/ssh_config
Host p9//编译毕昇jdk的服务器
    HostName xxxxxx  //ip地址
    User xxxxx  //登录名
    Port 22
    TCPKeepAlive yes
    ServerAliveInterval 15
    ServerAliveCountMax 6
    StrictHostKeyChecking no
    ForwardAgent yes
    Compression yes
    IPQoS throughput

Host D1
    HostName  xxxxxx  //ip地址,通过命令“ifconfig”查询
    User  xxxxx  //登录名
    Port 22
    TCPKeepAlive yes
    ServerAliveInterval 15
    ServerAliveCountMax 6
    StrictHostKeyChecking no
    ForwardAgent yes
    Compression yes
    IPQoS throughput
在D1以及服务器的”~/.ssh/authorized_keys“添加C:\Users\zx.ssh路径下的authorized_keys,直接空一行添加,不用覆盖原秘钥(如果有)。
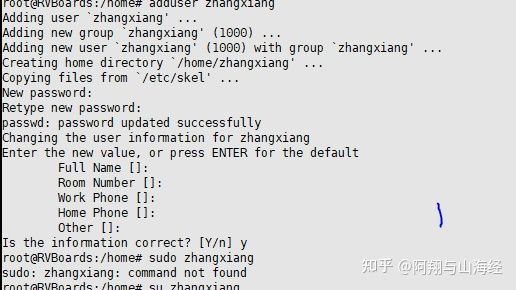
Tips: 用powershell链接D1时,需要注意默认情况下ssh默认root用户不能登录(服务器本来就不是root用户)
所以需要在D1上增加一个普通用户,用windows登录普通用户
5.2.2 传输镜像

5.2.3 解压镜像
$ tar -xzvf zxopenjdk.tar.gz注意镜像所在的路径
zhangxiang@RVBoards:~$ ls
bishengjdk.tar  jdk            jdk.tar      zxjdk.tar
home            jdk-11.0.10+9  zxd1.tar.gz  zxopenjdk.tar.gz
zhangxiang@RVBoards:~$ tar -xzvf zxopenjdk.tar.gz
5.2.4 解压获得images文件
cd  images/jdk/bin
./java -version
5.2.5 出现下面情况即表示构建成功
zhangxiang@RVBoards:~/images/jdk/bin$ ./java -version openjdk version "11.0.11-internal" 2021-04-20 OpenJDK Runtime Environment (build 11.0.11-internal+0-adhoc..bishengjdk-11) OpenJDK 64-Bit Server VM (build 11.0.11-internal+0-adhoc..bishengjdk-11, mixed mode)注意:如果出现

解决办法:
sudo apt install zlib1g-dev
Copyright © 2024 深圳全志在线有限公司 粤ICP备2021084185号 粤公网安备44030502007680号