创龙T3开发板使用体验--基本开发环境搭建
-
创龙T3开发板:https://bbs.aw-ol.com/topic/2228/
1. 建立连接,测试基本功能。
1.1. 用上位机建立连接
开箱,熟悉资料,总体感觉做工工整(尤其是电源部分,用料很足),资料详实,有其他linux开发板经验的玩家上手很容易。
基本连接和测试主要参考用户手册--2.1评估板测试手册, 网络连接,LED/UART/USB测试等等
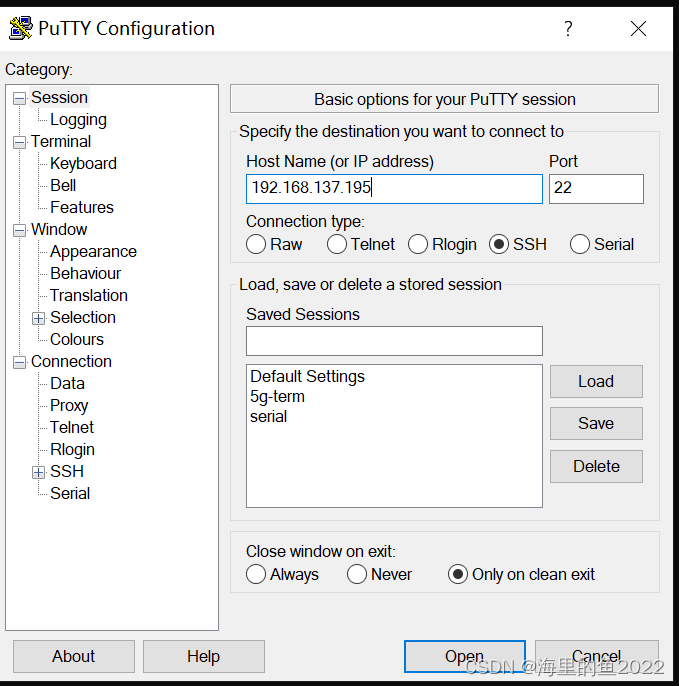
首先要做的就是用上位机连接开发板,参考前一篇文章的方法:
Windows网线直连linux开发板或树莓派-超详细_海里的鱼2022的博客-CSDN博客
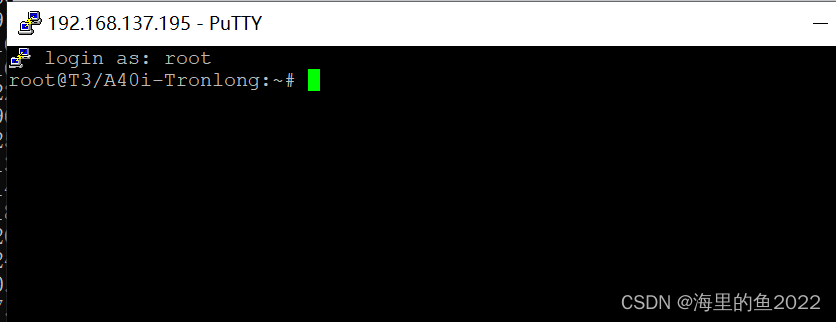
顺利连接,默认用户为root

如此,便是登录成功

查看下文件和存储空间使用情况:
root@T3/A40i-Tronlong:~# cd ../
root@T3/A40i-Tronlong:/# ls
CameraUI         home             proc             tmp
G2dDemo          init             qt5.9.sh         usr
Launcher         lib              recordTest       var
MediaUI          lib32            root             video_serv
adb.sh           libexec          run              wave
bin              linuxrc          sbin             xplayerdemo
core             lost+found       sdktest          xplayerdemoH264
dbusrun.sh       media            storage.sh
dev              mnt              sys
etc              opt              system
root@T3/A40i-Tronlong:/# df -h
Filesystem                Size      Used Available Use% Mounted on
/dev/root                 1.9G    509.2M      1.3G  27% /
devtmpfs                358.8M         0    358.8M   0% /dev
tmpfs                   375.0M         0    375.0M   0% /dev/shm
tmpfs                   375.0M     12.0K    375.0M   0% /tmp
tmpfs                   375.0M     12.0K    375.0M   0% /run
/dev/mmcblk0p2            7.0M      4.2M      2.7M  61% /mnt/emmc/mmcblk0p2
/dev/mmcblk0p7            1.9G    509.1M      1.3G  27% /mnt/emmc/mmcblk0p7
/dev/mmcblk1p2            7.0M      4.2M      2.7M  61% /mnt/sdcard/mmcblk1p2
/dev/mmcblk1p7            1.9G    509.2M      1.3G  27% /mnt/sdcard/mmcblk1p7
cgroup                  375.0M         0    375.0M   0% /sys/fs/cgroup
root@T3/A40i-Tronlong:/#
上位机和开发板之间传输文件:
1)ftp方法
上位机安装filezilla, 然后可以远程连接后直接查看文件目录或进行文件传输

2)scp方法
现在目标板上新建hy目录
root@T3/A40i-Tronlong:/# mkdir hy
在上位机ubuntu虚拟机下
拷贝单个文件:
hy@ubuntu:~/t3dev/samples/python-demos/key_test$ sudo scp *.*  root@192.168.137.48:/hy
key_test.py                                             100% 2819  67.6KB/s   00:00
拷贝整个文件夹
hy@ubuntu:~/t3dev/samples$ sudo scp -r python-demos/  root@192.168.137.48:/hy
led_flash.py                                             100% 3005   886.0KB/s   00:00
key_test.py                                              100% 2819    72.7KB/s   00:00
1.2测试板载资源,LED, KEY等

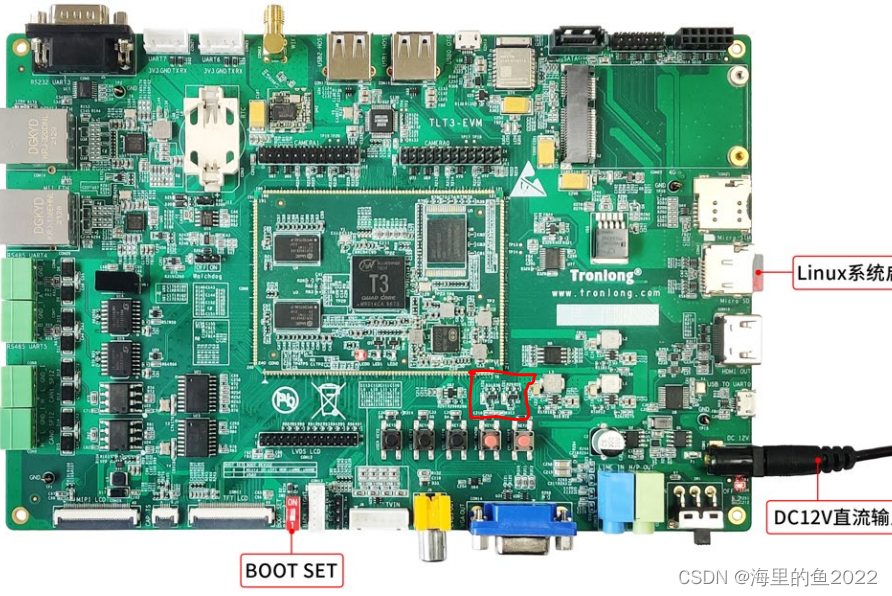
BOOT-SET选项打到OFF位置(向板外方向)为EMMC启动,ON位置为SD卡启动,试过都是OK的。
测试LED,板载的LED0/LED1见上图红框位置
命令行测试命令:
root@T3/A40i-Tronlong:/# echo 0 > /sys/class/leds/user-led0/brightness
root@T3/A40i-Tronlong:/# echo 1 > /sys/class/leds/user-led0/brightness
root@T3/A40i-Tronlong:/# echo 0 > /sys/class/leds/user-led1/brightness
root@T3/A40i-Tronlong:/# echo 1 > /sys/class/leds/user-led1/brightness
以上分别测试LED0/LED1的亮(1)/灭(0),板载LED正常受控。
测试按键,板载共有KEY3/4/5三个用户定义按键,可以用命令查看对应事件
root@T3/A40i-Tronlong:/# cat /proc/bus/input/devices
I: Bus=0019 Vendor=0001 Product=0001 Version=0100
N: Name="sunxi-ths"
P: Phys=sunxiths/input0
S: Sysfs=/devices/virtual/input/input0
U: Uniq=
H: Handlers=event0
B: PROP=0
B: EV=9
B: ABS=100 0

I: Bus=0019 Vendor=0001 Product=0001 Version=0100
N: Name="sunxi-keyboard"
P: Phys=sunxikbd/input0
S: Sysfs=/devices/virtual/input/input1
U: Uniq=
H: Handlers=kbd event1
B: PROP=0
B: EV=3
B: KEY=10000 c00 0 300800 40040 0 0 10000000

I: Bus=0019 Vendor=0001 Product=0001 Version=0100
N: Name="sunxi-keypad"
P: Phys=Keypad/input2
S: Sysfs=/devices/virtual/input/kp0
U: Uniq=
H: Handlers=sysrq kbd event2
B: PROP=0
B: EV=3
B: KEY=ffffffff fffffffe

I: Bus=0019 Vendor=0001 Product=0001 Version=0100
N: Name="all_key"
P: Phys=sunxi_ts/input0
S: Sysfs=/devices/platform/sunxi-ts/input/input3
U: Uniq=
H: Handlers=event3
B: PROP=0
B: EV=b
B: KEY=400 0 0 0 0 0 0 0 0 0 0
B: ABS=610000 0

I: Bus=0019 Vendor=0001 Product=0001 Version=0100
N: Name="axp22-powerkey"
P: Phys=m1kbd/input2
S: Sysfs=/devices/soc.0/1c2ac00.twi/i2c-0/0-0034/axp22-powerkey/input/input4
U: Uniq=
H: Handlers=kbd event4
B: PROP=0
B: EV=7
B: KEY=100000 0 0 0
B: REL=0

I: Bus=0019 Vendor=0001 Product=0001 Version=0100
N: Name="gpio-keys.21"
P: Phys=gpio-keys/input0
S: Sysfs=/devices/gpio-keys.21/input/input5
U: Uniq=
H: Handlers=kbd event5
B: PROP=0
B: EV=100003
B: KEY=400 0 0 0 0 0 0
KEY3/4对应event1, KEY5对应event5
通过命令可以查看事件响应消息:
root@T3/A40i-Tronlong:/# od -x /dev/input/event1
0000000 5197 386d 29ed 0004 0001 0094 0001 0000
0000020 5197 386d 29ed 0004 0000 0000 0000 0000
0000040 5197 386d 2b5f 0009 0001 0094 0000 0000
0000060 5197 386d 2b5f 0009 0000 0000 0000 0000
0000100 5199 386d cae8 000b 0001 0094 0001 0000
0000120 5199 386d cae8 000b 0000 0000 0000 0000
0000140 519b 386d 0e99 000e 0001 0094 0000 0000
0000160 519b 386d 0e99 000e 0000 0000 0000 0000
0000200 519e 386d ec83 0003 0001 0094 0001 0000
0000220 519e 386d ec83 0003 0000 0000 0000 0000
0000240 51a1 386d e8be 000b 0001 0094 0000 0000
0000260 51a1 386d e8be 000b 0000 0000 0000 0000
0000300 51a2 386d 9fc6 000c 0001 0094 0001 0000
0000320 51a2 386d 9fc6 000c 0000 0000 0000 0000
0000340 51a3 386d 940e 000d 0001 0094 0000 0000
0000360 51a3 386d 940e 000d 0000 0000 0000 0000
0000400 51a4 386d a4f3 0009 0001 0094 0001 0000
0000420 51a4 386d a4f3 0009 0000 0000 0000 0000
0000440 51a5 386d 3196 000b 0001 0094 0000 0000
0000460 51a5 386d 3196 000b 0000 0000 0000 0000
// 以上为KEY3按下
// 以下为KEY4按下
0000500 51aa 386d 1cfc 000e 0001 0095 0001 0000
0000520 51aa 386d 1cfc 000e 0000 0000 0000 0000
0000540 51ac 386d c2e3 0000 0001 0095 0000 0000
0000560 51ac 386d c2e3 0000 0000 0000 0000 0000
0000600 51ad 386d 30e6 0002 0001 0095 0001 0000
0000620 51ad 386d 30e6 0002 0000 0000 0000 0000
0000640 51ae 386d e820 0002 0001 0095 0000 0000
0000660 51ae 386d e820 0002 0000 0000 0000 0000
0000700 51ae 386d dfbf 000d 0001 0095 0001 0000
0000720 51ae 386d dfbf 000d 0000 0000 0000 0000
0000740 51b0 386d 1e41 0001 0001 0095 0000 0000
0000760 51b0 386d 1e41 0001 0000 0000 0000 0000


//测试KEY5按下
root@T3/A40i-Tronlong:/# od -x /dev/input/event5
0000000 51e1 386d 3cc7 0004 0001 00ca 0001 0000
0000020 51e1 386d 3cc7 0004 0000 0000 0000 0000
0000040 51e1 386d 0853 0008 0001 00ca 0002 0000
0000060 51e1 386d 0853 0008 0000 0000 0001 0000
0000100 51e1 386d a48d 0008 0001 00ca 0002 0000
0000120 51e1 386d a48d 0008 0000 0000 0001 0000
0000140 51e1 386d b7e0 0008 0001 00ca 0000 0000
0000160 51e1 386d b7e0 0008 0000 0000 0000 0000
0000200 51e2 386d 75ab 0008 0001 00ca 0001 0000
0000220 51e2 386d 75ab 0008 0000 0000 0000 0000
0000240 51e2 386d 2702 000c 0001 00ca 0002 0000
0000260 51e2 386d 2702 000c 0000 0000 0001 0000
0000300 51e2 386d c334 000c 0001 00ca 0002 0000
0000320 51e2 386d c334 000c 0000 0000 0001 0000
0000340 51e2 386d 5f74 000d 0001 00ca 0002 0000
0000360 51e2 386d 5f74 000d 0000 0000 0001 0000
0000400 51e2 386d fbbc 000d 0001 00ca 0002 0000
0000420 51e2 386d fbbc 000d 0000 0000 0001 0000
0000440 51e2 386d 97fc 000e 0001 00ca 0002 0000
0000460 51e2 386d 97fc 000e 0000 0000 0001 0000
手册2.1还有其他外设的测试方法和例子,就不一一列出了
2. 建立开发环境, 测试交叉编译和简单的应用开发
主要参考文档2-2linux应用开发手册,代码包位于软件资料-demo目录下, 开发包提供了python和C的案例。
2.1 python应用案例
板载系统预装了python2.7, 3.7是不是支持不太确定,有机会再尝试编译安装。
例子有两个,以led_flash.py为例来测试
#!/usr/bin/env python
# -*- encoding: utf-8 -*-
'''
@File    :   tl_led_flash.py
@Time    :   2020/04/26 09:05:54
@Desc    :   None
'''

# here put the import lib
import signal, time
import os, sys, getopt

version = "1.0"

class Led(object):
    quit_flag = False

    def __init__(self, led_path):
        self.led_path = led_path    # Led path
        self.leds     = []          # Save the led found

    """ enumerate all led """
    def enumerate_led(self):
        led_name = "user-led"

        """ find led """
        for filename in os.listdir(self.led_path):
            if led_name in filename:
                self.leds.append(os.path.join(self.led_path, filename))

        if len(self.leds) == 0:
            return False

        """
        led sort, e.g.
        /sys/class/leds/user-led0
        /sys/class/leds/user-led1
        /sys/class/leds/user-led2
        """
        self.leds.sort()

        print "find leds:"
        for led in self.leds:
            print led

        return True

    """ control led flash """
    def flash_led(self):
        led_num = len(self.leds)

        while not Led.quit_flag:
            """ Turn on leds """
            for i in range(led_num):
                """ Set the led brightness value to 1 to turn on the led """
                ret = os.system("echo 1 > %s/brightness" % (self.leds[i]))

                if ret != 0:
                    print "Error: Failed to turn on %s" % self.leds[i]

            """ Keep the leds on for 500 ms """
            time.sleep(0.5)

            for i in range(led_num):
                """ Set the led brightness value to 0 to turn off the LED """
                os.system("echo 0 > %s/brightness" % (self.leds[i]))

            """ Keep the leds off for 500 ms """
            time.sleep(0.5)

    @classmethod
    def stop(cls):
        cls.quit_flag = True

def sig_handle(signum, frame):
    print "ctrl + c ..."
    Led.stop()

def usage():
    print "Usage: %s [options]\n" \
            "Options: \n" \
            "   -v | --version Display version information\n" \
            "   -h | --help    Display help\n" \
            % sys.argv[0]

if __name__ == '__main__':
    """ parse parameter """
    try:
        options, remainder = getopt.getopt(sys.argv[1:], 'vh', ['version', 'help'])
        for opt, arg in options:
            if opt in ('-v', '--version'):
                print 'version: %s' % version
                exit(0)
            elif opt in('-h', '--help'):
                usage()
                exit(0)

    except getopt.GetoptError as err:
        print 'ERROR: %s' % err
        exit(1)

    """ Ctrl+c handler """
    signal.signal(signal.SIGINT, sig_handle)

    led = Led("/sys/class/leds/")

    """ enumerate all led """
    ret = led.enumerate_led()
    """ can not find led """
    if not ret:
        print "can not find led!"
        exit(3)

    """ control flash all led """
    print "\nflash led ..."
    led.flash_led()
基本原理和前面单独测试led差不多,运行后,板载的两个led会闪烁。
用于写一些的简单的调试脚本应用还是挺好的,但是更有价值的库,像tcp/udp, mqtt及其他可能用到的库官方例子太少,实用性不高。
2.2嵌入式C的开发环境建立
嵌入式C开发才是主打模式,首先要建立交叉编译环境。
手册里只提到要先建立SDK编译环境,但是太重了,其实只要安装了gcc工具链就可以完成基本开发了。
hy@ubuntu:~/T3$ wget http://releases.linaro.org/components/toolchain/binaries/5.3-2016.02/arm-linux-gnueabihf/gcc-linaro-5.3-2016.02-x86_64_arm-linux-gnueabihf.tar.xz
// 解压
tar -xzf gcc-linaro-5.3-2016.02-x86_64_arm-linux-gnueabihf/

// 进入代码目录,进行编译
(py39) hy@ubuntu:~/t3dev/samples/base-demos/led_flash$ cd src
(py39) hy@ubuntu:~/t3dev/samples/base-demos/led_flash/src$ dir
led_flash  led_flash.c	makefile
(py39) hy@ubuntu:~/t3dev/samples/base-demos/led_flash/src$ CC=~/T3/gcc-linaro-5.3-2016.02-x86_64_arm-linux-gnueabihf/bin/arm-linux-gnueabihf-gcc make
make: 'led_flash' is up to date.
编译成功,可以copy到目标开发板, 运行验证下
上位机运行
cd ../bin
sudo scp led_flash  root@192.168.137.48:/hy
目标开发板直接运行,带上-h查看运行帮助
root@T3/A40i-Tronlong:/hy# ./led_flash -h
Usage: led_flash [options]

Options:
 -n | --number        Number of LEDs, range of 1 to 4
 -v | --version       Display version information
 -h | --help          Show help content
带参数,让LED1闪起来
root@T3/A40i-Tronlong:/hy# ./led_flash -n 1

System leds :
/sys/class/leds/disk
/sys/class/leds/heartbeat
/sys/class/leds/user-led0
/sys/class/leds/user-led1

Flashing leds :
/sys/class/leds/user-led0
至此,交叉编译环境顺利建立。
-
锁定自
 xiaowenge
 -
解锁自
 xiaowenge
 -
Moved from 其它全志芯片讨论区 by
 xiaowenge
Copyright © 2024 深圳全志在线有限公司 粤ICP备2021084185号 粤公网安备44030502007680号