【XR806开发板试用】移植st7789屏幕驱动
-
前言
很高兴有机会参加本次极术社区举办的“「免费试用」搭载安谋科技STAR-MC1的全志XR806 Wi-Fi+BLE 开发板试用活动”。
去年就对全志的mcu芯片感兴趣了,一直没有机会接触,看到本次极术社区提供的全志wifi + BLE开发板试用,就马上参加了。板子拿到手之后,很快就搭建好了环境,由于自己时间安排的问题,一直没有空搞,这两天赶紧搞了一下。SDK下载和环境搭建
git clone https://sdk.aw-ol.com/git_repo/XR806/xr806_sdk/xr806_sdk.git -b xr806_sdk如果提示 Username for 'https://sdk.aw-ol.com': 请输入 全志在线开发者论坛 的用户名和密码。(注:需要全志在线开发者论坛LV2等级以上用户才有权限拉取 SDK,随便注册个账户,灌灌水就到了)
由于 SDK 普遍较大,拉取可能需要一定的时间。
接下来安装环境依赖(我用Buildroot的docker容器,都装过了,就不需要再搞了)
sudo apt-get install build-essential subversion git libncurses5-dev zlib1g-dev gawk flex bison quilt libssl-dev xsltproc libxml-parser-perl mercurial bzr ecj cvs unzip lsof kconfig-frontends android-tools-mkbootimg python2 libpython3-dev gcc-multilib libc6:i386 libstdc++6:i386 lib32z1然后配置工具链,直接下载gcc-arm-none-eabi-8-2019-q3-update-linux.tar.bz2 压缩包并解压缩到~/.bin目录下,并修改gcc.mk文件
# ----------------------------------------------------------------------------
# cross compiler
# ----------------------------------------------------------------------------
CC_DIR := /home/vuser/.bin/gcc-arm-8.3/bin/
CC_PREFIX := ccache $(CC_DIR)/arm-none-eabi-
这样就配置好了。看了一下project/example目录下,有个spi工程,适合拿来修改,就是它了。
移植st7789驱动
ST7789是一款高度集成的彩色TFT液晶显示屏控制器芯片,通常用于驱动小到中等尺寸的液晶屏。例如淘宝上常见的1.4寸、1.47寸、1.69寸屏幕等等。
现在就开始吧,首先新建st7789.c和st7789.h文件。然后创建用于初始化st7789芯片的命令序列表。static lcd_init_cmd_t st7789_init_cmds[] = { {0x01, {0}, 0x80, 120}, /* Sleep Out */ {0x11, {0}, 0x80, 120}, /* Memory Data Access Control, MX=MV=1, MY=ML=MH=0, RGB=0 */ {0x36, {0x00}, 1}, /* Interface Pixel Format, 16bits/pixel for RGB/MCU interface */ {0x3A, {0x05}, 1}, #if 0 {0x30, {0x00,0x50,0x01,0x3F}, 4}, {0x12, {0x00}, 0}, #endif /* Porch Setting */ {0xB2, {0x0c, 0x0c, 0x00, 0x33, 0x33}, 5}, /* Gate Control, Vgh=13.65V, Vgl=-10.43V */ {0xB7, {0x35}, 1}, /* VCOM Setting, VCOM=1.35V */ {0xBB, {0x32}, 1}, // /* LCM Control, XOR: BGR, MX, MH */ // {0xC0, {0x2C}, 1}, /* VDV and VRH Command Enable, enable=1 */ {0xC2, {0x01, 0xFF}, 2}, /* VRH Set, Vap=4.4+... */ {0xC3, {0x15}, 1}, /* VDV Set, VDV=0 */ {0xC4, {0x20}, 1}, /* Frame Rate Control, 60Hz, inversion=0 */ {0xC6, {0x0F}, 1}, /* Power Control 1, AVDD=6.8V, AVCL=-4.8V, VDDS=2.3V */ {0xD0, {0xA4, 0xA1}, 1}, /* Positive Voltage Gamma Control */ {0xE0, {0xD0, 0x08, 0x0E, 0x09, 0x09, 0x05, 0x31, 0x33, 0x48, 0x17, 0x14, 0x15, 0x31, 0x34}, 14}, /* Negative Voltage Gamma Control */ {0xE1, {0xD0, 0x08, 0x0E, 0x09, 0x09, 0x15, 0x31, 0x33, 0x48, 0x17, 0x14, 0x15, 0x31, 0x34}, 14}, /* Display On */ {0x21, {0}, 0}, {0x29, {0}, 0}, {0, {0}, 0xff}};这个序列表使用的是这样的数据结构
/*The LCD needs a bunch of command/argument values to be initialized. They are
 * stored in this struct. */
typedef struct {
  # 指令
  uint8_t cmd;
  # 数据
  uint8_t data[16];
  # 数据长度和类型,一般初始化数据不会很长,使用部分做其他用。
  # 例如 0x80代表需要延时,延时时间由delaytime指定,0xFF代表结束
  uint8_t databytes; // No of data in data; bit 7 = delay after set; 0xFF =
                     // end of cmds.
  uint8_t delaytime; // delaytime
} lcd_init_cmd_t;
然后编写初始化函数,这里把gpio和spi的初始化都放在里面了。
  printf("ST7789 initialization.\n");

  int ret = dirver_spi_init();
  if (ret != 0) {
    printf("SPI dev init fail!\n");
  }

  gpio_init(disp_pin_dc);
  gpio_init(disp_pin_rst);
  gpio_init(disp_pin_bckl);

  HAL_SPI_CS(DEMO_SPI_PORT, 1);
  // Reset the displayc
  gpio_set_level(disp_pin_rst, 1);
  OS_MSleep(1);
  gpio_set_level(disp_pin_rst, 0);
  OS_MSleep(100);
  gpio_set_level(disp_pin_rst, 1);
  OS_MSleep(100);

  st7789_enable_backlight(true);
  OS_MSleep(100);

  // Send all the commands
  uint16_t cmd = 0;
  while (st7789_init_cmds[cmd].databytes != 0xff) {
    printf("Send command 0x%02x\n", st7789_init_cmds[cmd].cmd);
    st7789_send_cmd(st7789_init_cmds[cmd].cmd);
    if ((st7789_init_cmds[cmd].databytes & 0x1F) != 0) {
      st7789_send_data(st7789_init_cmds[cmd].data,
                       st7789_init_cmds[cmd].databytes & 0x1F);
    }
    if (st7789_init_cmds[cmd].databytes & 0x80) {
      OS_MSleep(st7789_init_cmds[cmd].delaytime);
    }
    cmd++;
  }
  printf("init finish.\n");
  st7789_set_orientation(DISPLAY_ORIENTATION);
硬件连接如图所示
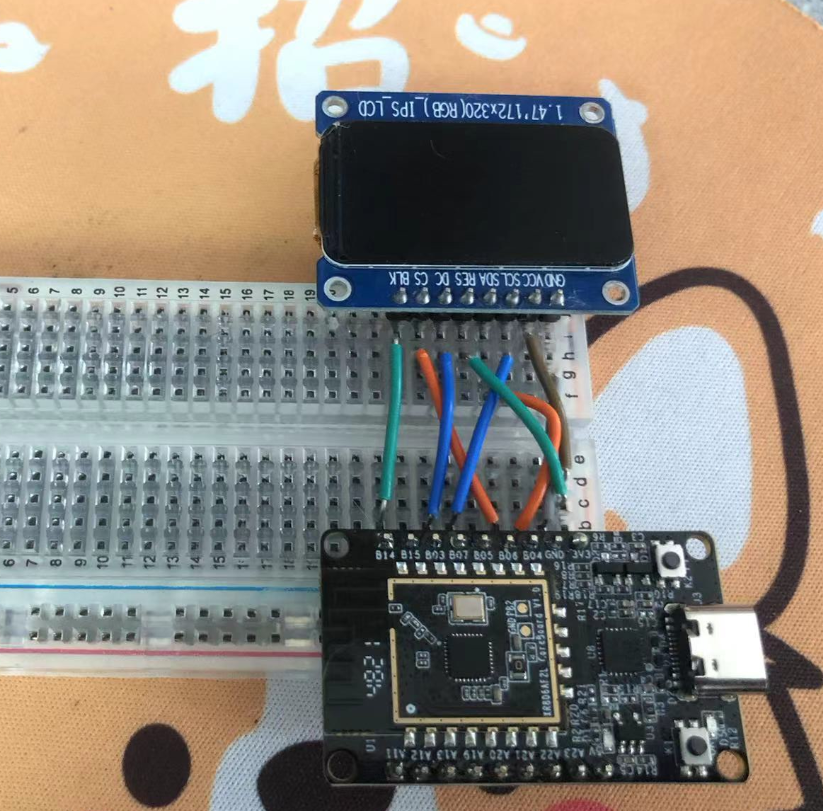
屏幕 开发板 BLK B14 CS B06 DC B03 RES VCC SDA B04 SCL B07 为什么RES引脚直接接的VCC,因为不知道是这个芯片的问题还是什么问题。RES引脚接到推挽输出的IO引脚后,屏幕也能点亮,但是亮度莫名其妙很低。手上几个屏都测试了一下,都这样。
然后就是编写一下写命令和写数据的函数,写命令时需要设置一下DC引脚,然后写完立即将DC引脚切换回高电平。
static void st7789_send_cmd(uint8_t cmd) {
  gpio_set_level(disp_pin_dc, 0);
  dirver_spi_send_data(&cmd, 1);
  gpio_set_level(disp_pin_dc, 1);
}
static void st7789_send_data(void *data, uint16_t length) {
  dirver_spi_send_data(data, length);
}
然后就是编写屏幕翻转配置函数
static void st7789_set_orientation(uint8_t orientation) {
  // ESP_ASSERT(orientation < 4);

  const char *orientation_str[] = {"PORTRAIT", "PORTRAIT_INVERTED", "LANDSCAPE",
                                   "LANDSCAPE_INVERTED"};

  printf("Display orientation: %s\n", orientation_str[orientation]);

  uint8_t data[] = {0xC0, 0x00, 0x60, 0xA0};

  printf("0x36 command value: 0x%02X\n", data[orientation]);

  st7789_send_cmd(ST7789_MADCTL);
  st7789_send_data((void *)&data[orientation], 1);
}
最后再写一下写屏函数即可,这里为了快速刷屏,设置了比较大的缓存区。目前还不会使用XR806的DMA,学会了可以减少缓存RAM的大小。
/* The ST7789 display controller can drive 320*240 displays, when using a
 * 240*240 display there's a gap of 80px, we need to edit the coordinates to
 * take into account that gap, this is not necessary in all orientations. */
void st7789_flush(uint16_t x1, uint16_t x2, uint16_t y1, uint16_t y2,
                  uint16_t color) {
  uint8_t data[4] = {0};

  uint16_t offsetx1 = x1;
  uint16_t offsetx2 = x2;
  uint16_t offsety1 = y1;
  uint16_t offsety2 = y2;

#if (TFT_DISPLAY_OFFSETS)
  offsetx1 += TFT_DISPLAY_X_OFFSET;
  offsetx2 += TFT_DISPLAY_X_OFFSET;
  offsety1 += TFT_DISPLAY_Y_OFFSET;
  offsety2 += TFT_DISPLAY_Y_OFFSET;

#elif (LV_HOR_RES_MAX == 320) && (LV_VER_RES_MAX == 320)
#if (DISPLAY_ORIENTATION_PORTRAIT)
  offsetx1 += 80;
  offsetx2 += 80;
#elif (DISPLAY_ORIENTATION_LANDSCAPE_INVERTED)
  offsety1 += 80;
  offsety2 += 80;
#endif
#endif

  /*Column addresses*/
  st7789_send_cmd(ST7789_CASET);
  data[0] = (offsetx1 >> 8) & 0xFF;
  data[1] = offsetx1 & 0xFF;
  data[2] = (offsetx2 >> 8) & 0xFF;
  data[3] = offsetx2 & 0xFF;
  st7789_send_data(data, 4);

  /*Page addresses*/
  st7789_send_cmd(ST7789_RASET);
  data[0] = (offsety1 >> 8) & 0xFF;
  data[1] = offsety1 & 0xFF;
  data[2] = (offsety2 >> 8) & 0xFF;
  data[3] = offsety2 & 0xFF;
  st7789_send_data(data, 4);

  /*Display On*/
  st7789_send_cmd(ST7789_DISPON);
  /*Memory write*/
  st7789_send_cmd(ST7789_RAMWR);

  uint32_t size = (y2 - y1) * (x2 - x1);

  uint32_t buffsize = (x2 - x1) * 80;
  unsigned char *burst_buffer = (unsigned char *)malloc(buffsize * 2);

  for (uint32_t i = 0; i < size + buffsize; i += buffsize) {
    for (uint32_t j = 0; j < buffsize; j++) {
      burst_buffer[2 * j] = color >> 8;
      burst_buffer[2 * j + 1] = color;
    }
    st7789_send_data(burst_buffer, buffsize * 2);
  }

  free(burst_buffer);
}
还需要添加一个刷屏函数作为测试,现在补一下。
由于1.69寸屏幕不需要设置屏幕窗口偏移量,就直接按满屏来刷了。void lcd_clear(uint16_t color) { st7789_flush(0, 240, 0, 320, color); }然后在main.c里调用屏幕初始化和刷屏函数就可以啦。
#include "common/framework/platform_init.h"
#include "kernel/os/os.h"
#include <stdio.h>

extern void st7789_init();
extern void st7789_flush(uint16_t x1, uint16_t x2, uint16_t y1, uint16_t y2,
                         uint16_t color);
extern void lcd_clear(uint16_t color);

int main(void) {

  platform_init();

  printf("gpio demo started.\n");

  st7789_init();
  printf("flush color.\n");
  // st7789_flush(0, 240, 0, 280, 0xFFFF);

  while (1) {
    lcd_clear(0x0000);
    OS_MSleep(1000);
    lcd_clear(0xFFFF);
    OS_MSleep(1000);
    lcd_clear(0xEF5D);
    OS_MSleep(1000);
    lcd_clear(0xF800);
    OS_MSleep(1000);
    lcd_clear(0x07E0);
    OS_MSleep(1000);
    lcd_clear(0x001F);
    OS_MSleep(1000);
  }

  printf("never run here.\n");
  return 0;
}

# 清除错误用
void main_cmd_exec(char *cmd) {}
刷屏效果如图

经过测试,手上的1.47寸屏幕和1.69寸st7789屏幕都可以正常驱动。
就是偏移值和屏幕分辨率设置需要再优化一下代码,过几天再说吧。
详细的代码在文章末尾下载,放到example目录应该就可以了。参考资料
最新SDK下载链接
环境搭建参考教程
基于STM32 HAL库硬件SPI的ST7789驱动(TFT-LCD 240*320)
附件源码 ,解压缩到project/example目录下即可 -
@walker2048 很不错的文章,感谢分享。
-
大佬牛,跟着复现一下。然后去交作业。
Copyright © 2024 深圳全志在线有限公司 粤ICP备2021084185号 粤公网安备44030502007680号