飞凌 OK113i-C 全志T113-i开发板 CAN 通信C代码测试
-
飞凌官方手册中关于CAN测试部分使用的是命令行进行的简单测试,实际开发过程中还是要使用C代码去操作CAN设备,本帖主要讲解怎么使用C代码对CAN设备进行读写的收发操作。
First of all ,先查看所有网卡信息,看看板上是否有CAN设备网络:
root@ok113i:/# ifconfig -a
can0      Link encap:UNSPEC  HWaddr 00-00-00-00-00-00-00-00-00-00-00-00-00-00-00-00
          NOARP  MTU:16  Metric:1
          RX packets:0 errors:0 dropped:0 overruns:0 frame:0
          TX packets:0 errors:0 dropped:0 overruns:0 carrier:0
          collisions:0 txqueuelen:10
          RX bytes:0 (0.0 B)  TX bytes:0 (0.0 B)

can1      Link encap:UNSPEC  HWaddr 00-00-00-00-00-00-00-00-00-00-00-00-00-00-00-00
          NOARP  MTU:16  Metric:1
          RX packets:0 errors:0 dropped:0 overruns:0 frame:0
          TX packets:0 errors:0 dropped:0 overruns:0 carrier:0
          collisions:0 txqueuelen:10
          RX bytes:0 (0.0 B)  TX bytes:0 (0.0 B)
          Interrupt:1

eth0      Link encap:Ethernet  HWaddr BA:E9:F2:1C:9D:87
          inet addr:192.168.0.232  Bcast:0.0.0.0  Mask:255.255.255.0
          inet6 addr: fe80::b8e9:f2ff:fe1c:9d87/64 Scope:Link
          UP BROADCAST RUNNING MULTICAST  MTU:1500  Metric:1
          RX packets:421 errors:0 dropped:14 overruns:0 frame:0
          TX packets:9 errors:0 dropped:0 overruns:0 carrier:0
          collisions:0 txqueuelen:1000
          RX bytes:27272 (26.6 KiB)  TX bytes:726 (726.0 B)
          Interrupt:39

ip6tnl0   Link encap:UNSPEC  HWaddr 00-00-00-00-00-00-00-00-00-00-00-00-00-00-00-00
          NOARP  MTU:1452  Metric:1
          RX packets:0 errors:0 dropped:0 overruns:0 frame:0
          TX packets:0 errors:0 dropped:0 overruns:0 carrier:0
          collisions:0 txqueuelen:1000
          RX bytes:0 (0.0 B)  TX bytes:0 (0.0 B)

lo        Link encap:Local Loopback
          inet addr:127.0.0.1  Mask:255.0.0.0
          inet6 addr: ::1/128 Scope:Host
          UP LOOPBACK RUNNING  MTU:65536  Metric:1
          RX packets:0 errors:0 dropped:0 overruns:0 frame:0
          TX packets:0 errors:0 dropped:0 overruns:0 carrier:0
          collisions:0 txqueuelen:1000
          RX bytes:0 (0.0 B)  TX bytes:0 (0.0 B)

sit0      Link encap:IPv6-in-IPv4
          NOARP  MTU:1480  Metric:1
          RX packets:0 errors:0 dropped:0 overruns:0 frame:0
          TX packets:0 errors:0 dropped:0 overruns:0 carrier:0
          collisions:0 txqueuelen:1000
          RX bytes:0 (0.0 B)  TX bytes:0 (0.0 B)

wlan0     Link encap:Ethernet  HWaddr 2C:C3:E6:67:4D:3B
          BROADCAST MULTICAST  MTU:1500  Metric:1
          RX packets:0 errors:0 dropped:0 overruns:0 frame:0
          TX packets:0 errors:0 dropped:0 overruns:0 carrier:0
          collisions:0 txqueuelen:1000
          RX bytes:0 (0.0 B)  TX bytes:0 (0.0 B)
1. CAN组网前的准备,设置CAN通信服务的通信速率。
使用如下命令分别设置CAN0和CAN1的通信速率:
root@ok113i:/home/forlinx# ip link set can0 up type can bitrate 500000
[ 4075.425084] IPv6: ADDRCONF(NETDEV_CHANGE): can0: link becomes ready
root@ok113i:/home/forlinx# ip link set can1 up type can bitrate 500000
[ 4086.037967] IPv6: ADDRCONF(NETDEV_CHANGE): can1: link becomes ready
以上设置can0 和 can1 通信速率均为500kbps,这个速率值务必记住,所有接入组网的的can节点都是以这个速率通信。
2. 使用C语言写一个CAN通信的发送接收测试程序,主要验证CAN发送和接收数据是否正常。
#include <unistd.h>
#include <stdio.h>
#include <stdlib.h>
#include <pthread.h>
#include <signal.h>
#include <string.h>

#include "can_apply.h"


#define MASTR_CAN1_ID      0x100
#define MASTR_CAN2_ID      0x101

#define RX_MSG_NUM           16
#define MAX_BUF_LEN          64

typedef enum
{
	CAN_1,
	CAN_2,
	CAN_RES
}can_type;

typedef struct{
	int can_id;
	unsigned char can_dlc;
	unsigned char data[MAX_BUF_LEN];
}can_msg_t;


static int bexit = 0;
static int can0_sock,can1_sock;
can_msg_t can_rx_msg[RX_MSG_NUM];
unsigned int can1_id = 0;
unsigned int can2_id = 0;


void signal_handler(int signo)
{

    printf("signal %d(%s) received\n", signo, strsignal(signo));


	bexit = 1;

}

int can_send_data(can_type type, unsigned char *buf, int len)
{
    int i, j;
    int cnt;
    int sock;
    int ret = 0;
    struct can_frame frame;

    if(type == CAN_1)
    {
        sock = can0_sock;
        frame.can_id = can1_id;
    }
    else {
        sock = can1_sock;
        frame.can_id = can2_id;
    }

    for(i = 0; i < len; i += 8)
    {
        cnt = len - i;

        if(cnt > 8)
            frame.can_dlc =  8;
        else
            frame.can_dlc = cnt;

        for(j=0; j<frame.can_dlc; j++)
        {
            frame.data[j] = buf[i+j];
        }

        if(can_send(sock, frame) < 0)
        {
            ret = -1;
            break;
        }
    }

    return ret;
}

void can_recv_data(int sock)
{
    static unsigned char tail = 0;
    int i;
    int can_id;
    unsigned char can_dlc;
    unsigned char *data;
    struct can_frame frame;
    int index = can0_sock == sock ? 0 : 1;

    if(can_recv(sock, &frame) < 0)
        return ;


    can_id = frame.can_id;
    can_dlc = frame.can_dlc;
    data = frame.data;

    printf("CAN%d dlc = %d, can_id = %x\ndata:", index,frame.can_dlc, frame.can_id);
    for(i=0; i<frame.can_dlc; i++)
        printf("0x%02x ", frame.data[i]);
    printf("\n");


}

void *can_proc_start(void *arg)
{
    int nready;
    int maxfd;
    fd_set readfds;
    int sock = *(int *)arg;

    FD_ZERO(&readfds);
    FD_SET(sock, &readfds);
    maxfd = sock;
    while(!bexit)
    {
        nready = select(maxfd+1, &readfds, NULL, NULL, NULL);
        if(nready < 0)
        {
            perror("can select");
            break;
        }
        else if(nready == 0)
        {
            continue;
        }

        /* data is ready */
        if(FD_ISSET(sock, &readfds))
        {
            can_recv_data(sock);
        }
        else { ; }
    }

    close(sock);
    pthread_detach(pthread_self());
    pthread_exit(0);
}

// 初始化CAN0和CAN1设备,并创建两个接收数据处理线程
static void can_sock_init()
{
    pthread_t tid;


    can0_sock = can_open("can0");
    if(can0_sock < 0)
        return ;

    can1_sock = can_open("can1");
    if(can1_sock < 0)
        return ;

    if (0 != pthread_create(&tid, NULL, can_proc_start, (void *)&can0_sock))
    {
        return ;
    }

    if (0 != pthread_create(&tid, NULL, can_proc_start, (void *)&can1_sock))
    {
        return ;
    }


    can1_id = MASTR_CAN1_ID;
    can2_id = MASTR_CAN2_ID;


    printf("can open sucess can0_sock:%d, can1_sock:%d\n", can0_sock, can1_sock);
}


int main(int argc, char *argv[])
{

    char *send_data = "hello,can!";
    signal(SIGINT, signal_handler);
    signal(SIGPIPE, signal_handler);
    signal(SIGTERM, signal_handler);
    can_sock_init(); // 初始化CAN0和CAN1设备数据,并创建接收线程
    do {
        sleep(1);
        can_send_data(CAN_1, (unsigned char *)send_data, strlen(send_data) - 1);
    } while (!bexit);

    return 0;
}
测试程序主要实现了如下功能:
- 建立两个接收数据线程接收CAN设备的数据并打印CAN网络上的数据。
- 通过CAN0设备定时1秒发送一串"hello,can!"数据到CAN网络。
3. 运行并验证程序功能。
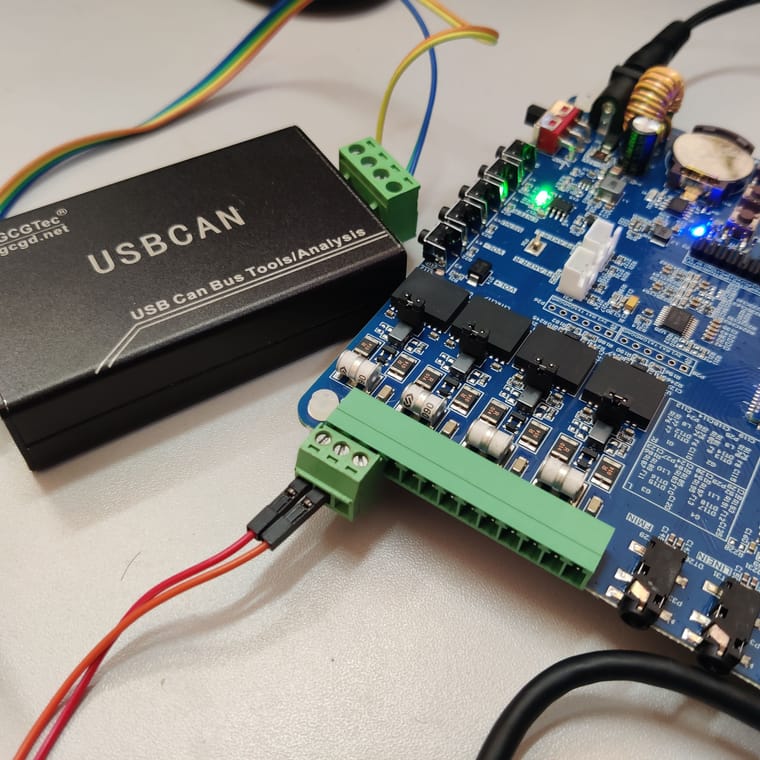
PC上使用CAN分析工具按下图接好线
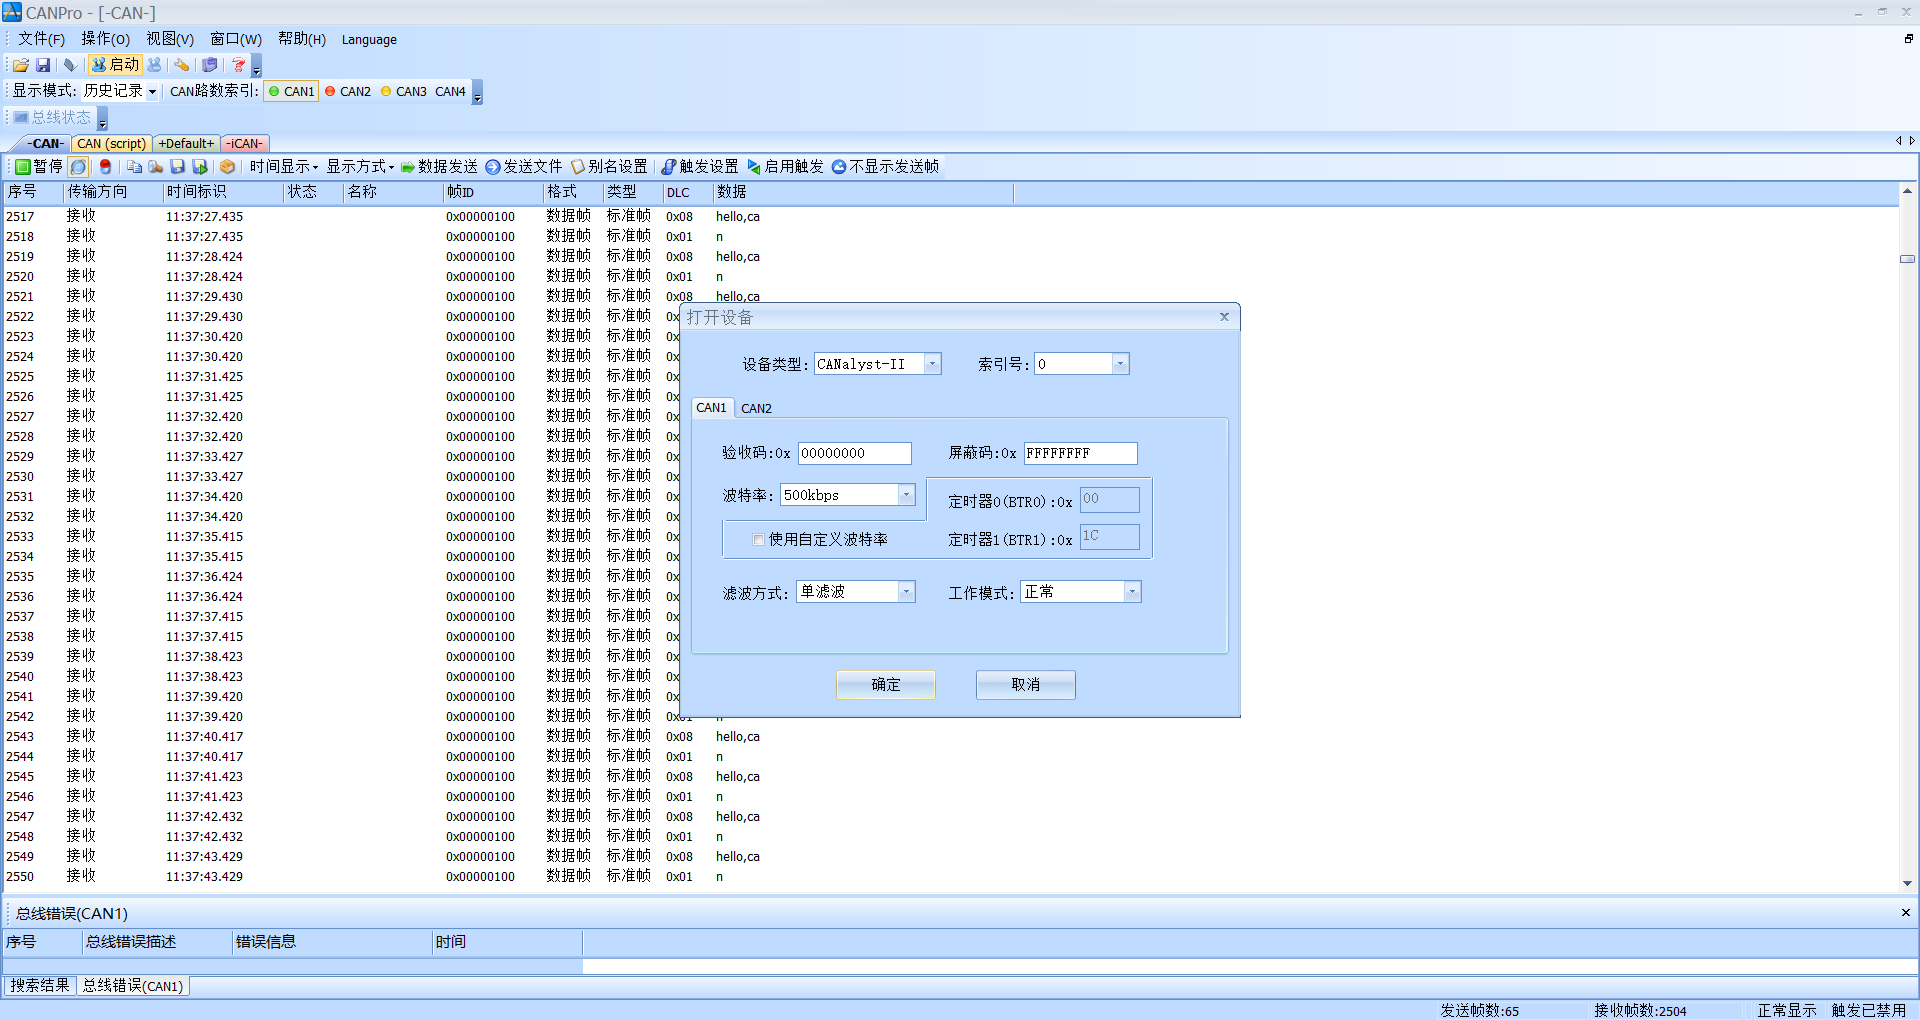
打开CAN调试软件,配置成500kbps的速率并打开设备,如下:
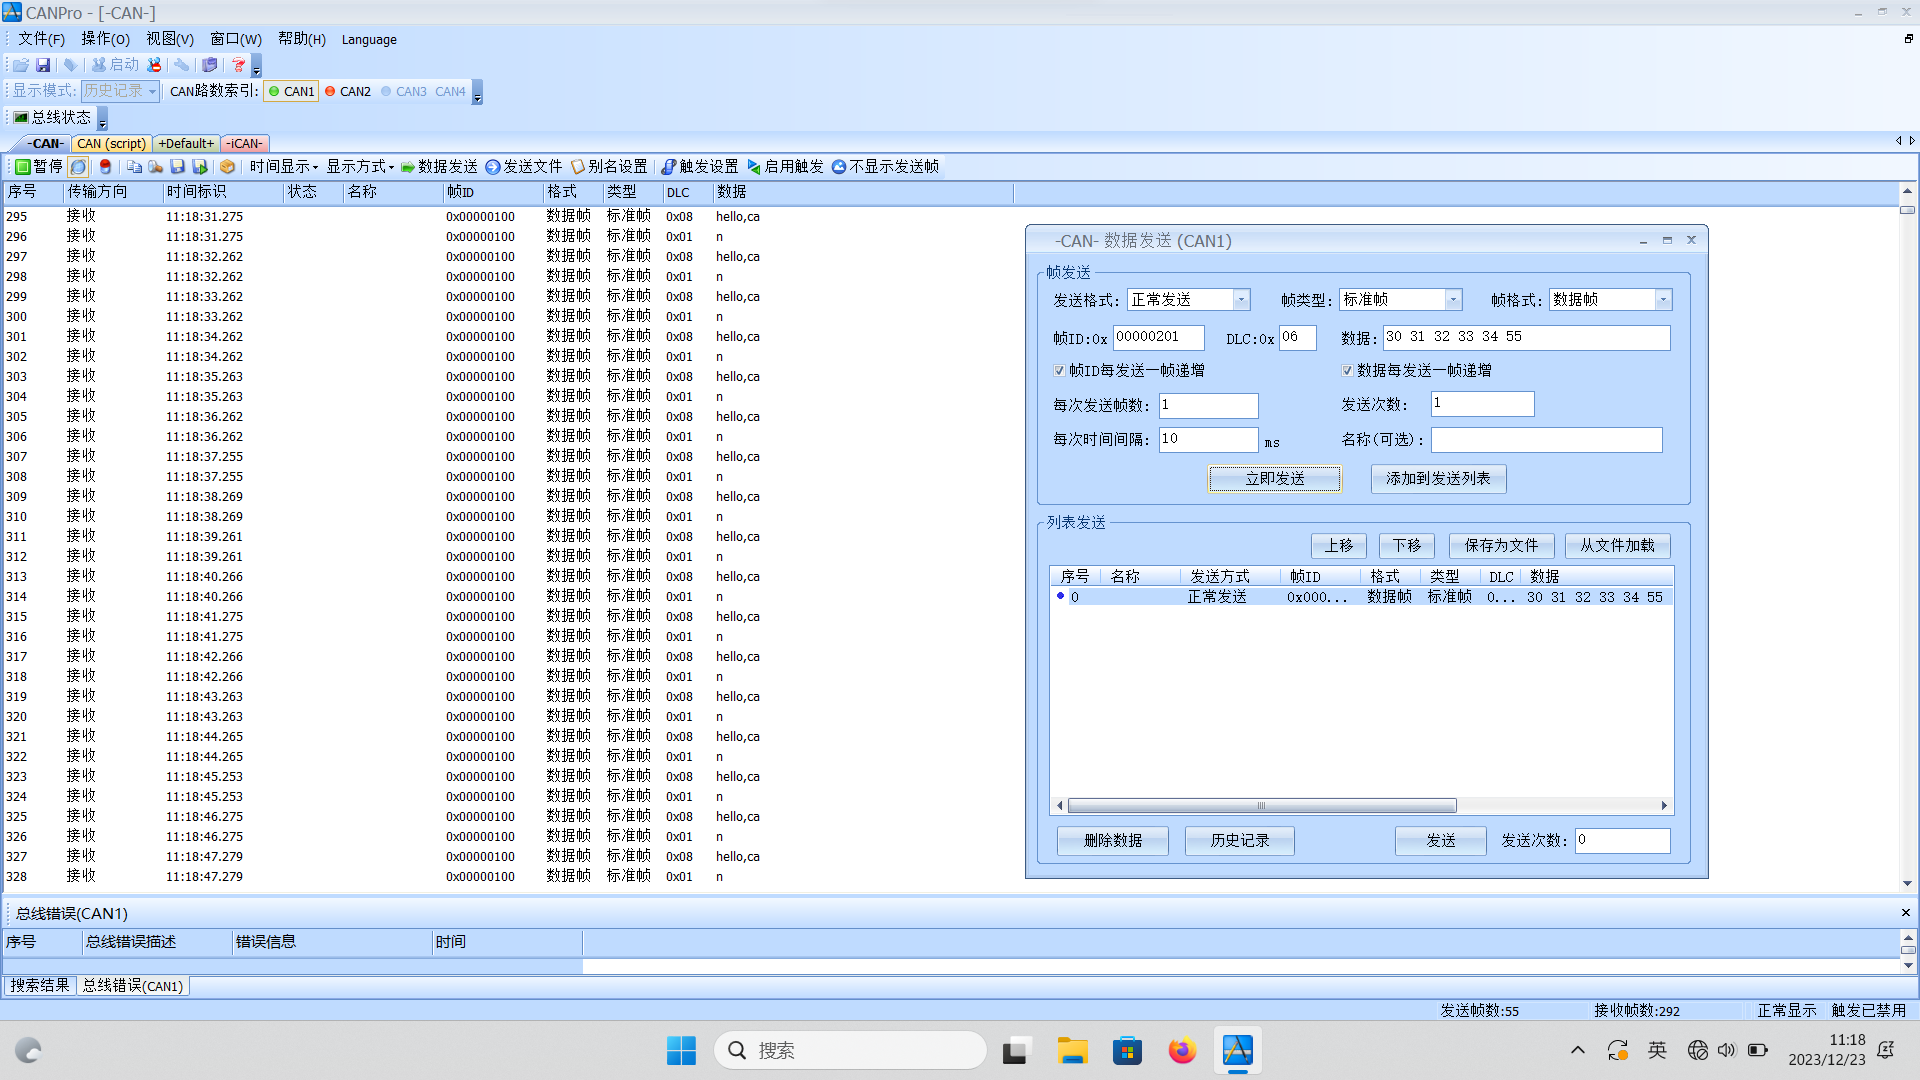
使用CAN调试软件给设备发送数据,如下:
将编译好的程序上传到板子上并运行,以下是正常收到数据后程序的打印信息:
root@ok113i:/home/forlinx# ./can_test
can open sucess can0_sock:3, can1_sock:4
## PC往CAN0口发送测试数据接收打印
CAN0 dlc = 6, can_id = 201
data:0x30 0x31 0x32 0x33 0x34 0x55
CAN0 dlc = 6, can_id = 201
data:0x30 0x31 0x32 0x33 0x34 0x55
CAN0 dlc = 6, can_id = 201
data:0x30 0x31 0x32 0x33 0x34 0x55
CAN0 dlc = 6, can_id = 201
data:0x30 0x31 0x32 0x33 0x34 0x55
CAN0 dlc = 6, can_id = 201
data:0x30 0x31 0x32 0x33 0x34 0x55
CAN0 dlc = 6, can_id = 201
data:0x30 0x31 0x32 0x33 0x34 0x55
CAN0 dlc = 6, can_id = 201
data:0x30 0x31 0x32 0x33 0x34 0x55
CAN0 dlc = 6, can_id = 201
data:0x30 0x31 0x32 0x33 0x34 0x55
CAN0 dlc = 6, can_id = 201
data:0x30 0x31 0x32 0x33 0x34 0x55
## PC往CAN1 口发送测试数据接收打印
CAN1 dlc = 6, can_id = 201
data:0x30 0x31 0x32 0x33 0x34 0x55
CAN1 dlc = 6, can_id = 201
data:0x30 0x31 0x32 0x33 0x34 0x55
CAN1 dlc = 6, can_id = 201
data:0x30 0x31 0x32 0x33 0x34 0x55
CAN1 dlc = 6, can_id = 201
data:0x30 0x31 0x32 0x33 0x34 0x55
CAN1 dlc = 6, can_id = 201
data:0x30 0x31 0x32 0x33 0x34 0x55
CAN1 dlc = 6, can_id = 201
data:0x30 0x31 0x32 0x33 0x34 0x55
CAN1 dlc = 6, can_id = 201
data:0x30 0x31 0x32 0x33 0x34 0x55
CAN1 dlc = 6, can_id = 201
data:0x30 0x31 0x32 0x33 0x34 0x55
CAN1 dlc = 6, can_id = 201
data:0x30 0x31 0x32 0x33 0x34 0x55
CAN1 dlc = 6, can_id = 201
data:0x30 0x31 0x32 0x33 0x34 0x55
测试程序工程结构
├── build # 编译目录
├── can_apply.c                           # CAN 操作简单封装C源码
├── can_apply.h                           # CAN 操作简单封装头文件
├── CMakeLists.txt                      # cmake 编译规则文件
├── cross-t113-i.cmake               # CMake嵌入式交叉编译工具链文件
└── main.c                                   # 测试程序主体源代码
工程源代码编译
cd build
cmake .. -DCMAKE_TOOLCHAIN_FILE=../cross-t113-i.cmake
make
Scanning dependencies of target can_test
[ 33%] Building C object CMakeFiles/can_test.dir/main.c.o
[ 66%] Building C object CMakeFiles/can_test.dir/can_apply.c.o
[100%] Linking C executable can_test
[100%] Built target can_test
工程使用cmake进行编译,需要注意的是要根据实际情况修改
cross-t113-i.cmake中的GCC交叉编译工具的路径。# # CMake Toolchain file for crosscompiling on ARM. # # This can be used when running cmake in the following way: # cd build-t113/ # cmake .. -DCMAKE_TOOLCHAIN_FILE=../cross-t113-i.cmake # or set(CROSS_PATH /home/luoyang/Dev/sdk/T113-i/OK113i-linux-sdk/out/t113_i/ok113i/longan/buildroot/host) # Target operating system name. set(CMAKE_SYSTEM_NAME Linux) set (CMAKE_C_FLAGS "-std=gnu11" CACHE STRING "Set C Compiler Flags" FORCE) # Name of C compiler. set(CMAKE_C_COMPILER "${CROSS_PATH}/bin/arm-linux-gnueabi-gcc") set(CMAKE_CXX_COMPILER "${CROSS_PATH}/bin/arm-linux-gnueabi-g++") set (CMAKE_C_FLAGS "-std=gnu11 -mcpu=cortex-a7 -mfloat-abi=softfp -mfpu=neon-vfpv4 -mno-unaligned-access -fno-aggressive-loop-optimizations -ffunction-sections" CACHE STRING "Set C Compiler Flags" FORCE) set (CMAKE_CXX_FLAGS "-mcpu=cortex-a7 -mfloat-abi=softfp -mfpu=neon-vfpv4 -mno-unaligned-access -fno-aggressive-loop-optimizations -ffunction-sections" CACHE STRING "Set C++ Compiler Flags" FORCE) # link flags set(CMAKE_LINK_FLAGS "${CMAKE_LINK_FLAGS} -mcpu=cortex-a7 -mfloat-abi=softfp -mfpu=neon-vfpv4 -mno-unaligned-access -fno-aggressive-loop-optimizations" CACHE STRING "Set link Flags" FORCE) SET(CMAKE_SYSTEM_PROCESSOR "armv7-a_hardfp") add_definitions(-fPIC) add_definitions(-DARMLINUX) add_definitions(-D__gnu_linux__) # Where to look for the target environment. (More paths can be added here) set(CMAKE_FIND_ROOT_PATH "${CROSS_PATH}/arm-buildroot-linux-gnueabi/sysroot") # Adjust the default behavior of the FIND_XXX() commands: # search programs in the host environment only. set(CMAKE_FIND_ROOT_PATH_MODE_PROGRAM NEVER) # Search headers and libraries in the target environment only. set(CMAKE_FIND_ROOT_PATH_MODE_LIBRARY ONLY) set(CMAKE_FIND_ROOT_PATH_MODE_INCLUDE ONLY)测试工程源代码
can-test.tar.gz -
Copyright © 2024 深圳全志在线有限公司 粤ICP备2021084185号 粤公网安备44030502007680号