T113开发板TINA5平台TVIN接口的测试(使用trecorderdemo)
-
T113平台tina5使用TVIN接口开发连载
T113平台具有两个TVIN接口,在全志内部通常把 TNIN 模块称为 TVD 或者 TVIN 模块,是一种用于采集模拟 CVBS视频的硬件模块,可将输入的 CVBS 信号或 YPbPr 信号转换成 YUV 信号。T113平台(sun8iw20p1)双通道共用一个ADC,使用时需切换,因此配置时也认为该平台只有单通道。以下是它内核层的总体框架:
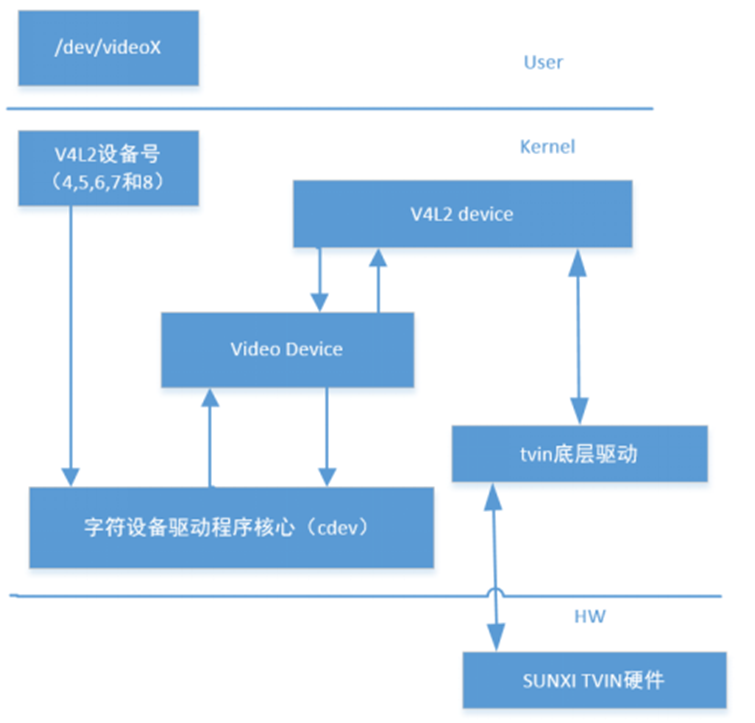
从以上框架得知,tvd 驱动只是负责把 tvd 的硬件描述完成并注册进 V4L2 框架,具体对 tvd 的使用还是放在用户态的应用层。也就说,在软件层面,使用V4L2的相关程序即可。因此V4L2的相关驱动在内核上务必选择上,否则无法工作。这里归纳关于用户态操作使用 tvd 模块的流程。 演示程序的操作过程(操作单路 tvd):- 用 open 打开/dev/videox 节点,执行执行Ioctl:VIDIOC_S_INPUT 完成通道和 ADC 的 mapping,然后执行 Ioctl:VIDIOC_G_INPUT 确认通道和 ADC mapping 正确
- 执行 ioctl:VIDIOC_G_FMT,用于初始化 format以及获取当前 tvd 的锁状态
- 执行 ioctl:VIDIOC_S_FMT,定制 format,包括颜色空间,一般来说 V4L2_PIX_FMT_NV61 要好于 V4L2_PIX_FMT_NV12,多路拼接的时候,在这个 ioctl 中检测锁信号
- 执行 ioctl:VIDIOC_REQBUFS,通过 V4L2 框架申请 buffer
- 执行 ioctl:VIDIOC_QUERYBUF,获取 buffer
- 执行 ioctl:VIDIOC_QBUF,将获取到的 buffer 入列,供 tvd 模块写入数据
- 执行 ioctl:VIDIOC_STREAMON,使能 tvd 模块工作采集输入数据
- 通过 poll/select 的方式查询 dev/videox 节点,如有数据更新,执行 ioctl:VIDIOC_DQBUF 取出已经写好数据的 buffer
- 执行 ioctl:VIDIOC_QBUF,将步骤 9 中已经取出数据的 buffer 重新入列,供 tvd 模块写入数据
- 循环步骤 9‑10,直至需要停止tvd模块,执行ioctl:VIDIOC_STREAMOFF,关闭tvd模块
- 用 close 释放获取的 fd
以下我们以盈鹏飞嵌入式SBC-T113S主板为例(该主板运行tina5.0),
SBC-T113S产品特性:
-
采用Allwinner公司Cortex-A7双核T113-S3/S4处理器,运行最高速度为1.2GHZ;
-
内置64-bit XuanTie C906 RISC-V协处理器(仅T113-S4支持);
-
支持JPEG/MJPEG视频编码,最大分辨率1080p@60fps;支持多格式1080P@60fps视频解码 (H.265,H.264, MPEG-1/2/4);
-
支持RGB666/LVDS/MIPI-DSI,分辨率最高1920x1080;
-
支持128-256M Bytes DDR3 SDRAM,其中T113-S3内置128MB;T113-S4内置256MB;
-
支持SPI NAND存储和启动(默认:256MB)或者EMMC启动(默认:4GB,最大32GB);
-
支持一路USB2.0 OTG(设计为TYPE-A接口);支持二路USB2.0 HOST;
-
支持七路RS232通信或者6路RS232和1路RS485(非隔离);
-
支持一路CAN BUS通信(非隔离);
-
支持一路10/100M以太网;
-
稳定的操作系统的支持,可预装LINUX 5.4(Preempt)或者OpenWRT;
-
经典尺寸主板,尺寸为120*100MM;
SBC-T113S产品功能评估图:
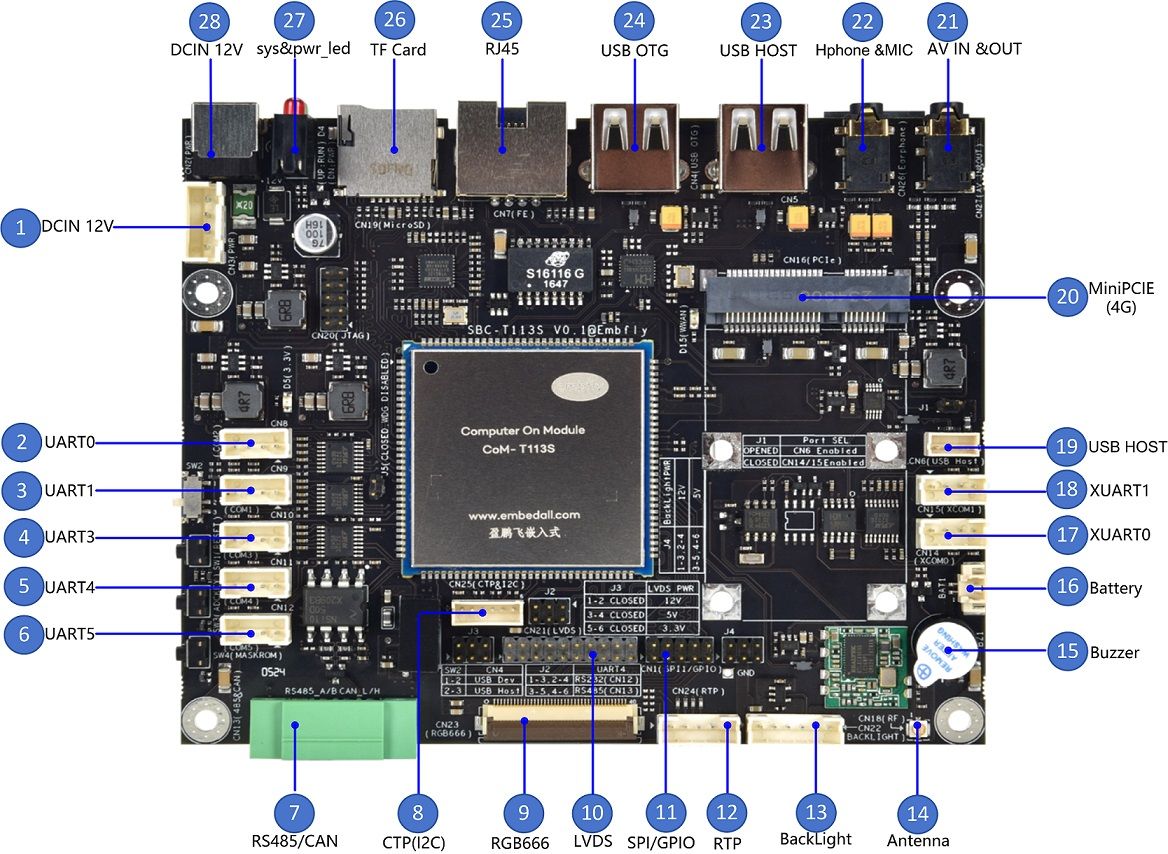
从内核配置到演示程序一一介绍;首先按照如下连接线路把SBC-T113S和摄像头连接起来:
SBC-T113S主板可选配CVBS摄像头模块,配套转接线可接入CN27端口中,原理图如下:
以下是SBC-T113S主板与摄像头的连接示意图:
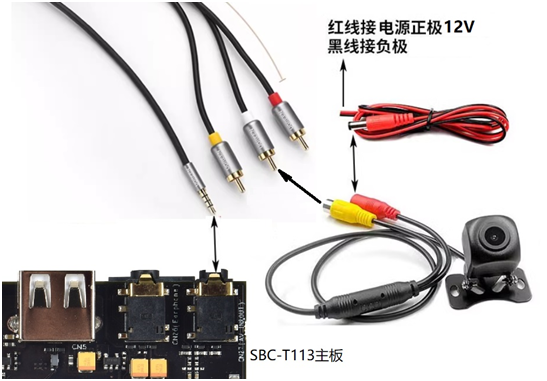
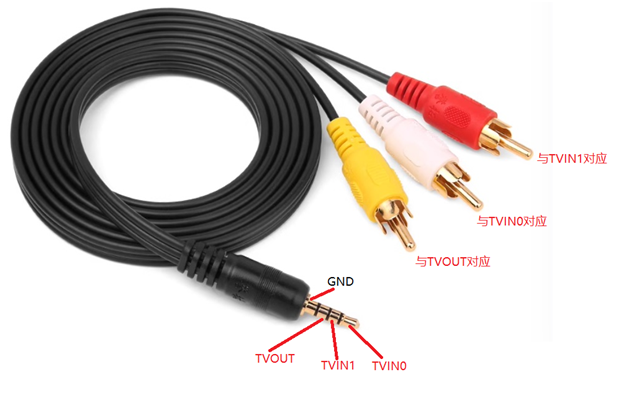
说明:AV视频线的3.5mm一端插入主板的CN27,AV视频线的RCA白色莲花头是TVIN0信号输入;RCA红色莲花头是TVIN1信号输入;RCA黄色莲花头是TVOUT信号输出。
图片中的AV一拖三音视频线是非标准的,线序定义是不统一的,用户获得连接线后最好用万用表测量下,保证线路连接的正确。以下是我司提供的AV一拖三音视频线的定义:
-
内核相关配置
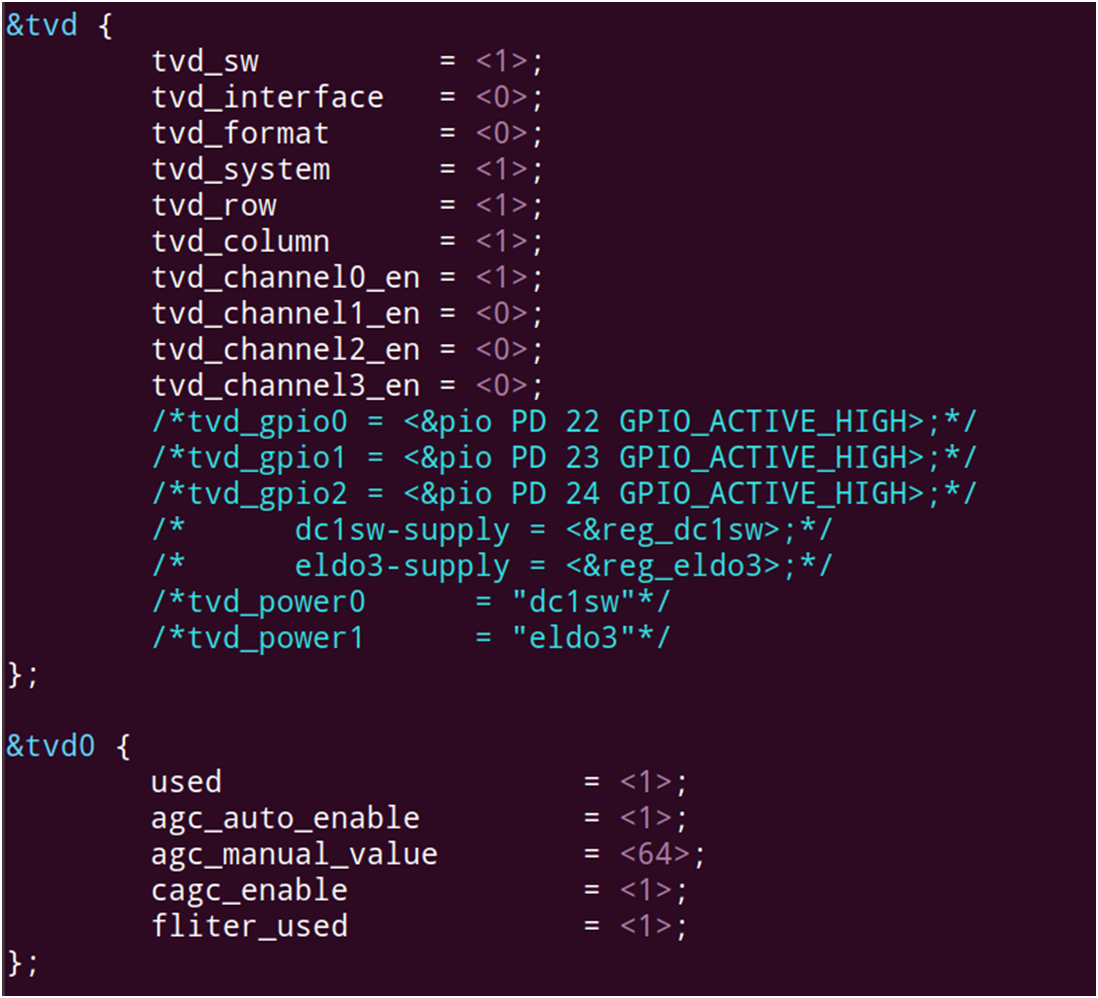
- 内核设备树配置:
SDK根目录/device/config/chips/t113_s4/configs/sbc_t113s4_nand/linux-5.4/board.dts
- 内核驱动的配置:
SDK根目录/kernel/linux-5.4
在SDK根目录下执行:makekernel_menuconfigmakekernel_menuconfig -> Device Drivers -> Multimedia support (MEDIA_SUPPORT [=y])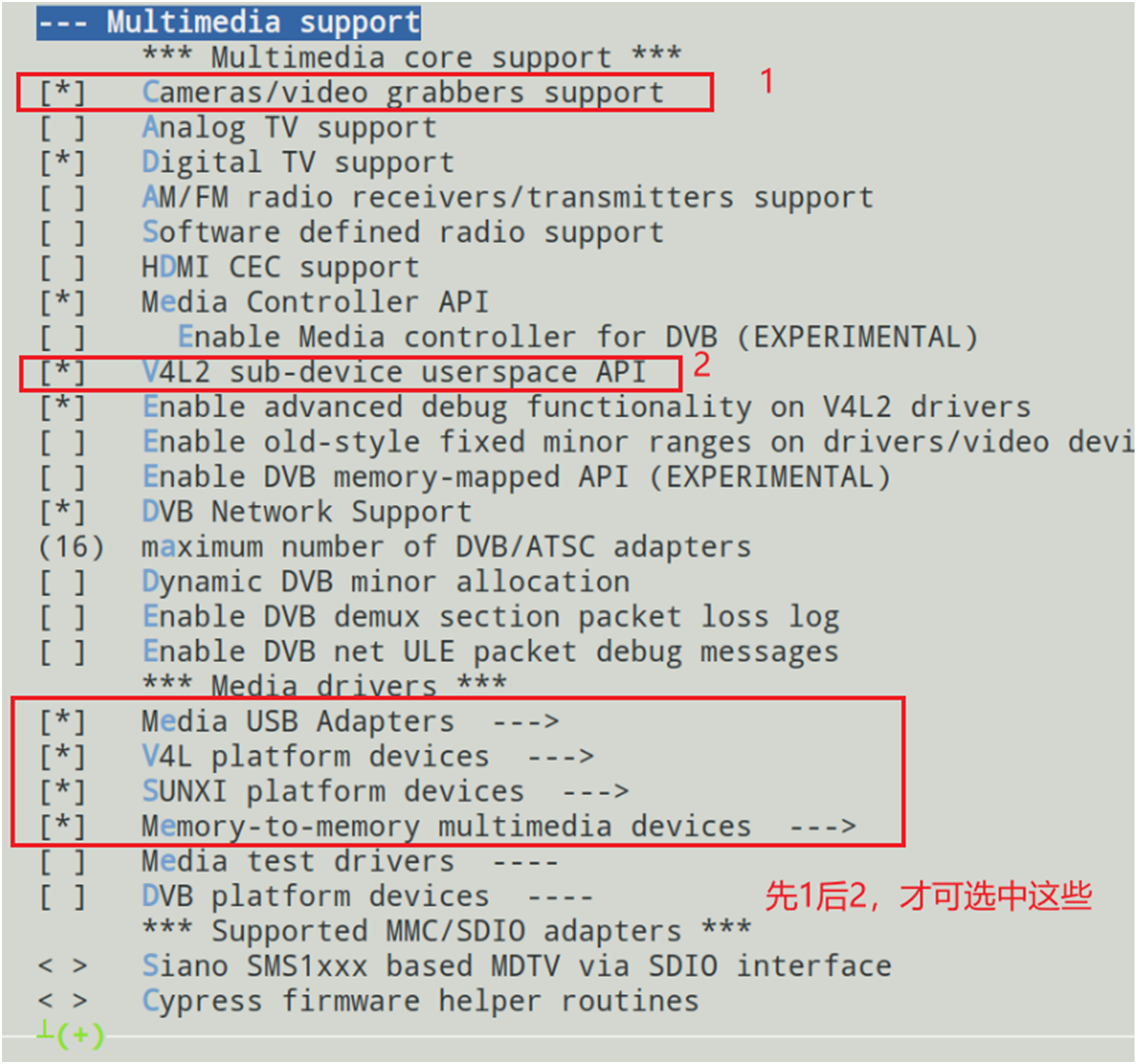
重要说明:Cameras/video grabbers support驱动是抓取摄像头抓取视频的重要驱动,另外,还要选择V4L2 sub-device userspace API,这个是访问Camera设备的重要接口,只有选择以上两个驱动,才能选择Media USB Adapters等后续驱动。
-> Device Drivers
	-> Multimedia support (MEDIA_SUPPORT [=y])
		-> Media USB Adapters (MEDIA_USB_SUPPORT [=y])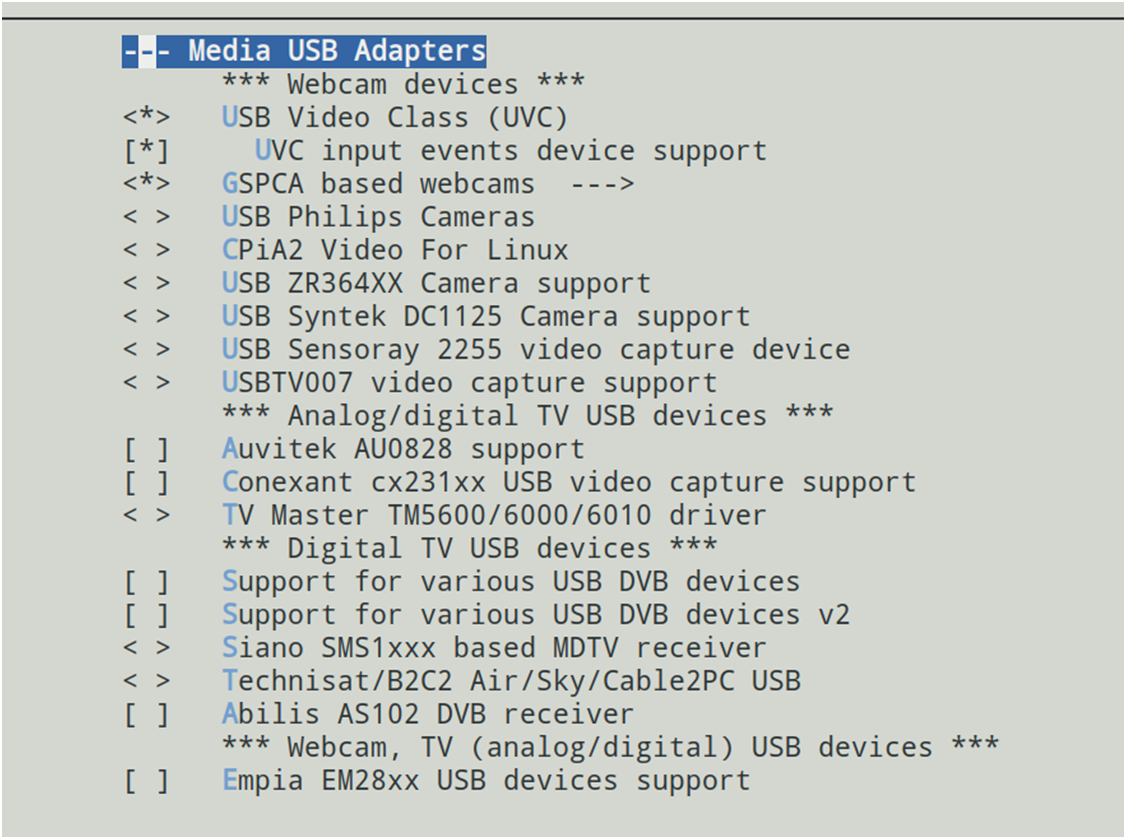
-> Device Drivers
	-> Multimedia support (MEDIA_SUPPORT [=y])
		-> V4L platform devices (V4L_PLATFORM_DRIVERS [=y])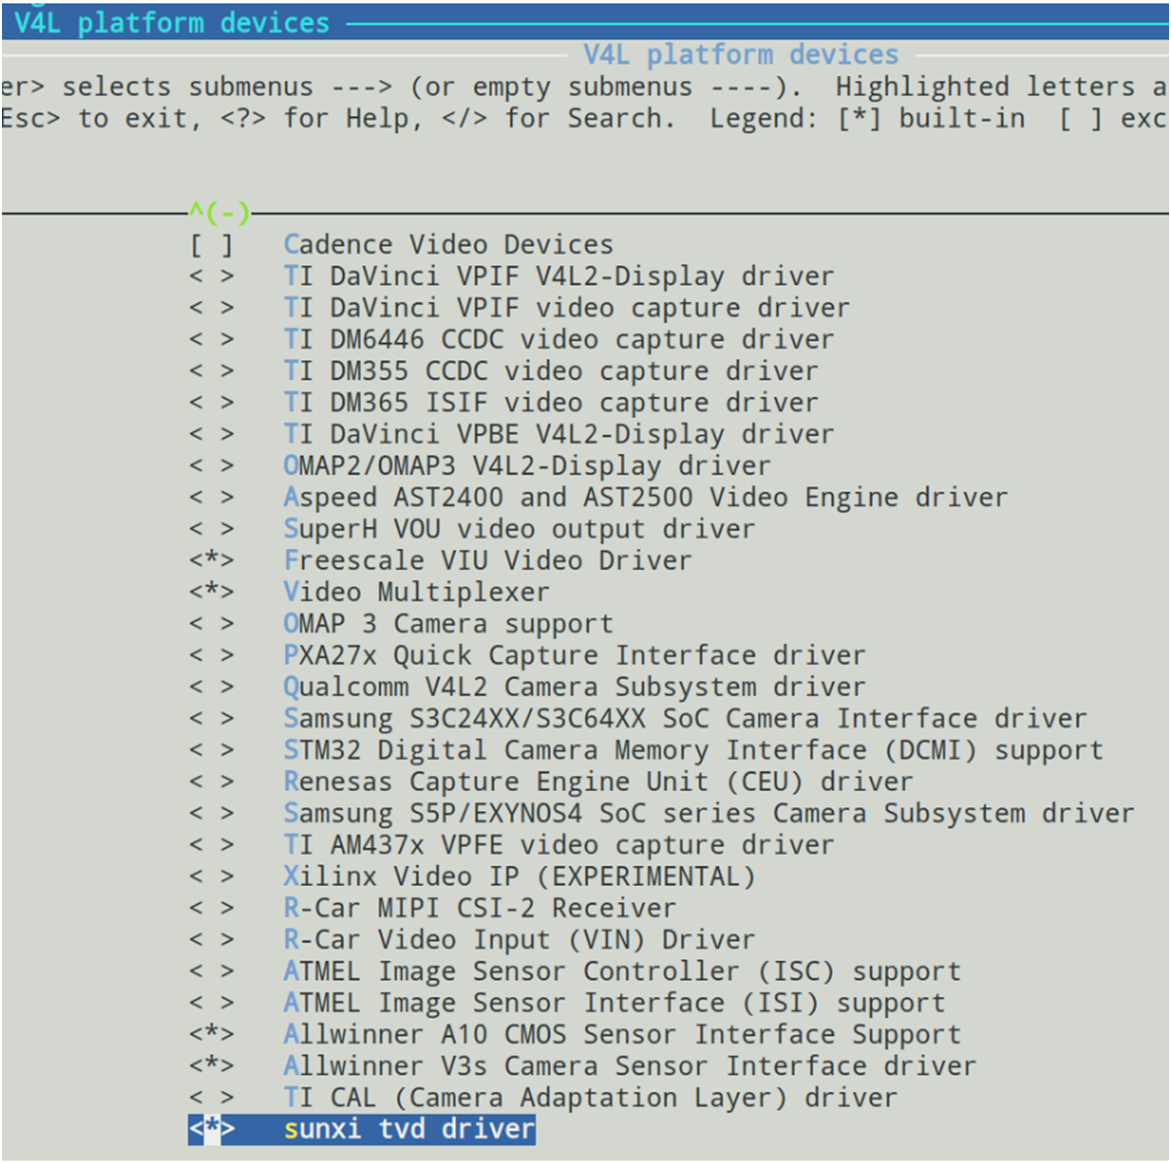
-> Device Drivers
	-> Multimedia support (MEDIA_SUPPORT [=y])
		-> SUNXI platform devices (SUNXI_PLATFORM_DRIVERS [=y])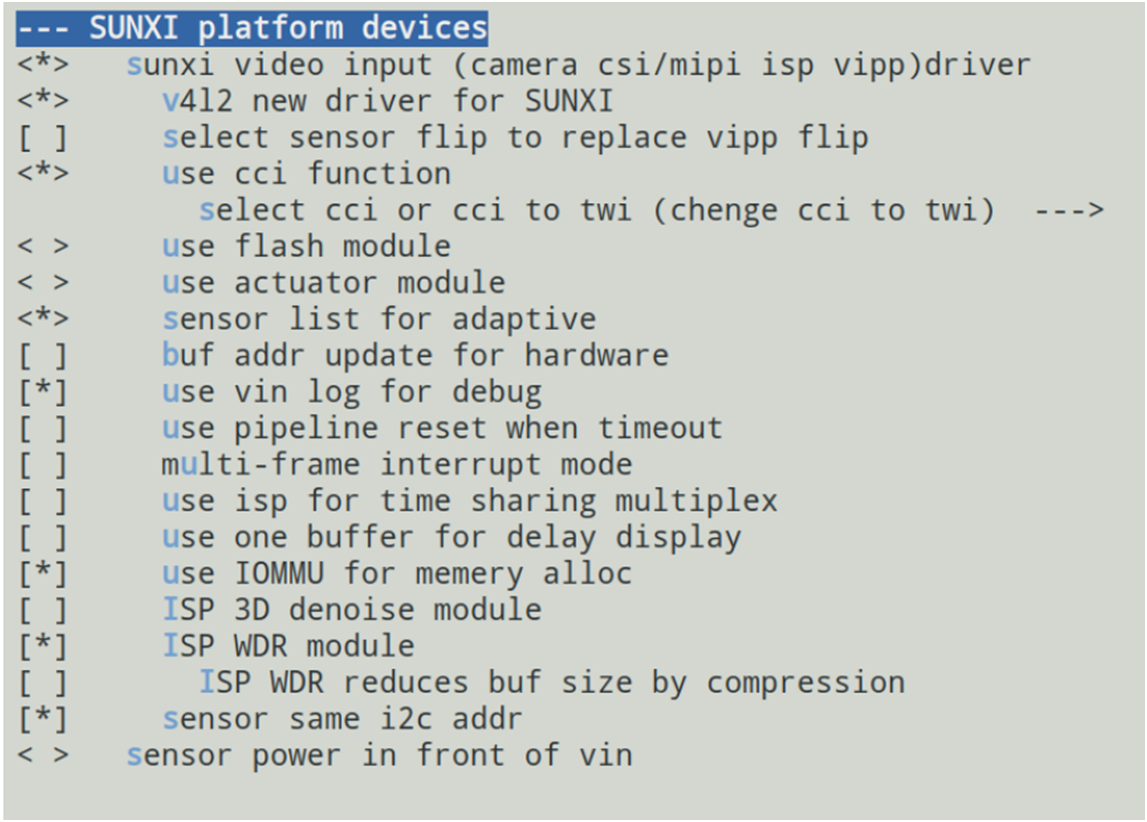
-> Device Drivers
	-> Multimedia support (MEDIA_SUPPORT [=y])
		-> Memory-to-memory multimedia devices (V4L_MEM2MEM_DRIVERS [=y])
			->Deinterlace support [=y]必须选择上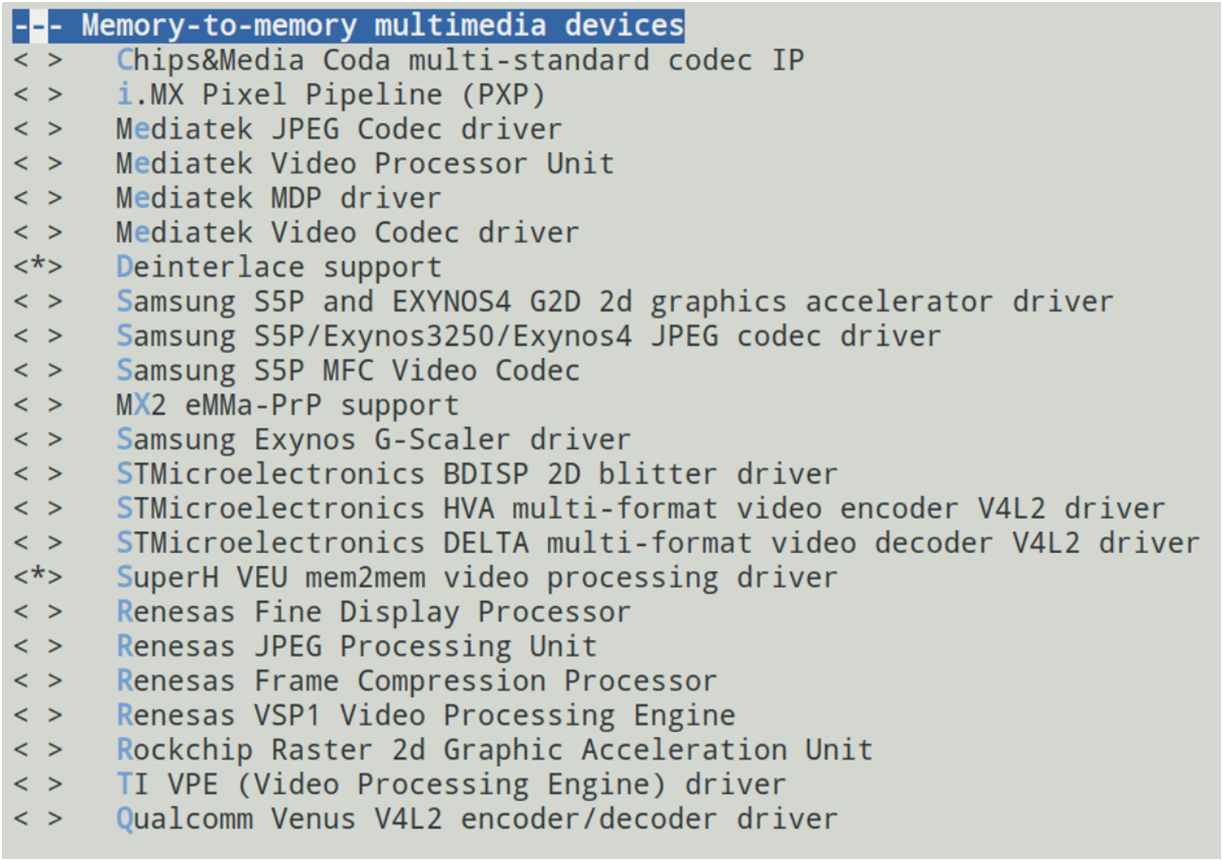
-
Openwrt演示程序的配置
为了演示TVIN接口的使用,在Tina5平台上必须选择以下两个APP,一个是camerademo程序,一个是trecorderademo程序。camerademo程序是一个摄像头视频截图的程序,可以通过它实现摄像头视频的截图,另外,它还具备摄像头属性的判断功能,我们主要是用它来判断camera摄像头的属性,比如输出数据是什么格式(NTSC/PAL,分辨率等)等。trecorderdemo是全志提供的摄像头使用的重要例子,该程序可以实现预览、录音、录像等功能。另外选择的时候务必要注意相关配套库的配置。例如:选择camerademo时,勾选Enable ion support。
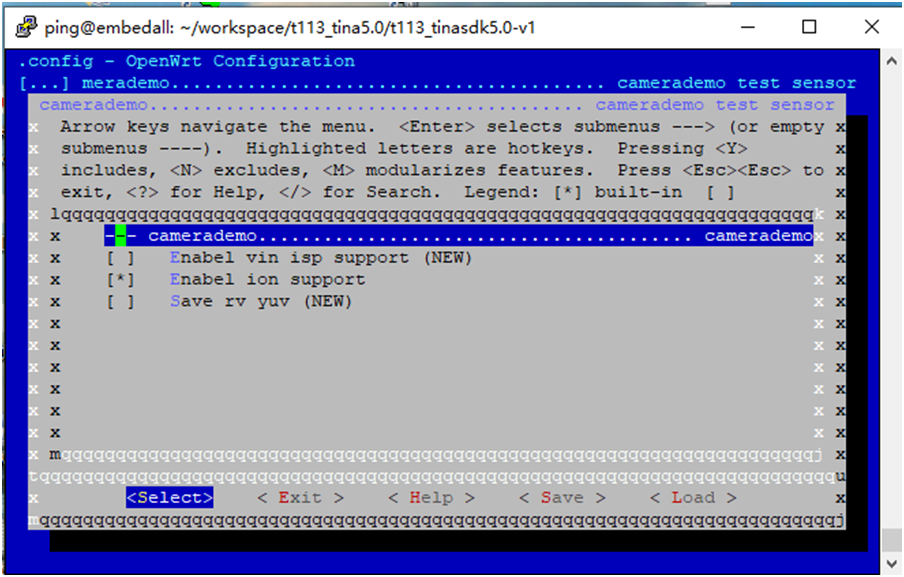

配置完,编译打包,烧录。
配置完成后,务必判断以上驱动是否正确工作,把固件烧写到主板后,通过查看/dev目录下的设备是否存在即可。如果以上驱动都正常,那么/dev目录下务必有如下驱动:
/dev/deinterlace,该驱动时视频后端处理使用;
/dev/fb0,framebuffer驱动,液晶屏显示使用;
/dev/cedar_dev,视频编码驱动;
/dev/ion,应用程序申请内存用的驱动;
/dev/video4,TVIN接口的驱动,这里务必要注意,它并不是video0。 -
通过camerademo判断摄像头的属性
camerademo程序可以用来对摄像头视频进行截图,也可以用来对摄像头进行调试。当使用它进行摄像头调试的时候,务必是针对/dev/video0设备。我们先看看它的帮助说明,执行camerademo–help指令如下:
root@TinaLinux:/dev# camerademo --help
[CAMERA]**********************************************************
[CAMERA]*                                                        *
[CAMERA]*              this is camera test.                      *
[CAMERA]*                                                        *
[CAMERA]**********************************************************
[CAMERA]******************** camerademo help *********************
[CAMERA] This program is a test camera.
[CAMERA] It will query the sensor to support the resolution, output format and test frame rate.
[CAMERA] At the same time you can modify the data to save the path and get the number of photos.
[CAMERA] When the last parameter is debug, the output will be more detailed information
[CAMERA] There are eight ways to run:
[CAMERA]    1.camerademo --- use the default parameters.
[CAMERA]    2.camerademo debug --- use the default parameters and output debug information.
[CAMERA]    3.camerademo setting --- can choose the resolution and data format.
[CAMERA]    4.camerademo setting debug --- setting and output debug information.
[CAMERA]    5.camerademo NV21 640 480 30 bmp /tmp 5 --- param input mode,can save bmp or yuv.
[CAMERA]    6.camerademo NV21 640 480 30 bmp /tmp 5 debug --- output debug information.
[CAMERA]    7.camerademo NV21 640 480 30 bmp /tmp 5 Num --- /dev/videoNumparam input mode,can save bmp or yuv.
[CAMERA]    8.camerademo NV21 640 480 30 bmp /tmp 5 Num debug --- /dev/videoNum output debug information.
[CAMERA]    8.camerademo NV21 640 480 30 bmp /tmp 5 Num 1 --- 1/2: chose memory: V4L2_MEMORY_MMAP/USERPTR
[CAMERA]**********************************************************
root@TinaLinux:/dev#
通过以上提示,可以看到该程序可以进行摄像头的配置、调试、以及截图。正常来说,截图正常就证明摄像头工作正常。
为了做TVIN摄像头的调试,我们务必先要执行指令:ln–sf /dev/video4 /dev/video0,因为camerademo程序做调试的时候,只能针对video0;root@TinaLinux:/dev# camerademo debug [CAMERA]********************************************************** [CAMERA]* * [CAMERA]* this is camera test. * [CAMERA]* * [CAMERA]********************************************************** [CAMERA]********************************************************** [CAMERA] open /dev/video0! [CAMERA]********************************************************** [CAMERA_DEBUG] Querey device capabilities succeed [CAMERA_DEBUG] cap.driver=sunxi-tvd [CAMERA_DEBUG] cap.card=sunxi-tvd [CAMERA_DEBUG] cap.bus_info=tvd_v4l2_dev0 [CAMERA_DEBUG] cap.version=0x00010000 [CAMERA_DEBUG] cap.capabilities=0x85200001 [CAMERA]********************************************************** [CAMERA] The path to data saving is /tmp. [CAMERA] The number of captured photos is 5. [CAMERA] save bmp format [CAMERA_DEBUG]********************************************************** [CAMERA_DEBUG] enumerate image formats [CAMERA_DEBUG] format index = 0, name = NV12 [CAMERA_DEBUG] format index = 1, name = NV21 [CAMERA_DEBUG] format index = 2, name = NV16 [CAMERA_DEBUG] format index = 3, name = NV61 [CAMERA_DEBUG]********************************************************* [CAMERA_DEBUG] The sensor supports the following formats : [CAMERA_DEBUG] Index 0 : NV12. [CAMERA_DEBUG] Index 1 : NV21. [CAMERA_DEBUG] Index 2 : NV16. [CAMERA_DEBUG] Index 3 : NV61. [ 69.731859] [tvd] vidioc_s_fmt_vid_cap:1623 [ 69.731859] interface=0 [ 69.731859] system=NTSC [ 69.731859] format=0 [ 69.731859] output_fmt=YUV420 [CAMERA_DEBUG]********************************************************** [CAMERA_DEBUG] The NV12 supports the following resolut[ 69.750104] [tvd] vidioc_s_fmt_vid_cap:1627 [ 69.750104] row=1 [ 69.750104] column=1 [ 69.750104] ch[0]=0 [ 69.750104] ch[1]=0 [ 69.750104] ch[2]=0 [ 69.750104] ch[3]=0 ions: [CAMERA_DEBUG] Index 0 : 720 * 480 [CAMERA_DEBUG] Index 1 : 720 * 576 [CAMERA_DEBUG]***********************************[ 69.779945] [tvd] vidioc_s_fmt_vid_cap:1629 [ 69.779945] width=720 [ 69.779945] height=480 [ 69.779945] dev->sel=0 *********************** [CAMERA_DEBUG] The NV21 supports the following resolutions: [CAMERA_DEBUG] Index 0 : 720 * 480 [CAMER[ 69.803870] [tvd] tvd_cagc_and_3d_config:1481 tvd0 agc auto mode A_DEBUG] Index 1 : 720 * 576 [CAMERA_DEBUG]********************************************************** [CAMERA_DEBUG] The NV16 [ 69.821636] [tvd] tvd_cagc_and_3d_config:1490 tvd0 CAGC enable:0x1 supports the following resolutions: [CAMERA_DEBUG] Index 0 : 720 * 480 [CAMERA_DEBUG] Index 1 : 720 * 576 [CAMERA_DEBUG]*****[ 69.843758] [tvd] tvd_cagc_and_3d_config:1517 tvd0 3d enable :0x4f900000 ***************************************************** [CAMERA_DEBUG] The NV61 supports the following resolutions: [CAMERA_DEBU[ 69.860018] [tvd] vidioc_streamon:1712 Out vidioc_streamon:0 G] Index 0 : 720 * 480 [CAMERA_DEBUG] Index 1 : 720 * 576 [CAMERA]********************************************************** [CAMERA] Using format parameters NV21. [CAMERA_ERR] sensor not support 640 * 480 [CAMERA] use support for the first resolution [CAMERA] camera pixelformat: NV21 [CAMERA] Resolution size : 720 * 480 [CAMERA] The photo save path is /tmp. [CAMERA] The number of photos taken is 5. beginion_alloc_open pid: 1543, g_alloc_context = 0xc97158 [CAMERA] Camera captur[ 69.914962] [tvd] tvd_isr:810 In tvd_isr eframerate is 0/0 [CAMERA] VIDIOC_S_FMT succeed [CAMERA] fmt.type = 1 [CAMERA] fmt.fmt.pix.width = 720 [CAMERA] fmt.fmt.pix.height = 480 [CAMERA] fmt.fmt.pix.pixelformat = NV21 [CAMERA] fmt.fmt.pix.field = 1 [CAMERA_DEBUG] reqbuf number is 3 [CAMERA_DEBUG] map buffer index: 0, mem: 0xb6d27000, len: 7e900, offset: 0 [CAMERA_DEBUG] map buffer index: 1, mem: 0xb6ca8000, len: 7e900, offset: 7f000 [CAMERA_DEBUG] map buffer index: 2, mem: 0xb6c29000, len: 7e900, offset: fe000 [CAMERA] stream on succeed [CAMERA] camera0 capture num is [0] [CAMERA_DEBUG]*****DQBUF[0] FINISH***** [CAMERA_PROMPT] the time interval from the start to the first frame is 73 ms [CAMERA_DEBUG] the interval of two frames is 0 ms [CAMERA_DEBUG]************QBUF[0] FINISH************** [CAMERA] camera0 capture num is [1] [CAMERA_DEBUG]*****DQBUF[1] FINISH***** [CAMERA_DEBUG] the interval of two frames is 161 ms [CAMERA_DEBUG]************QBUF[1] FINISH************** [CAMERA] camera0 capture num is [2] [CAMERA_DEBUG]*****DQBUF[2] FINISH***** [CAMERA_DEBUG] the interval of two frames is 161 ms [CAMERA_DEBUG]************QBUF[2] FINISH************** [CAMERA] camera0 capture num is [3] [CAMERA_DEBUG]*****DQBUF[0] FINISH***** [CAMERA_DEBUG] the interval of two frames is 162 ms [CAMERA_DEBUG]************QBUF[0] FINISH************** [CAMERA] camera0 capture num is [4] [CAMERA_DEBUG]*****DQBUF[1] FINISH***** [CAMERA_DEBUG] the interval of two frames is 161 ms [CAMERA_DEBUG]************QBUF[1] FINISH************** [CAMERA] Capture thread finish [CAMERA_DEBUG]*************************************************************** [CAMERA_DEBUG] Query the actual frame rate. [CAMERA_DEBUG] camera fps = 31.2. [ 72.853618] [tvd] vidioc_s_fmt_vid_cap:1623 [ 72.853618] interface=0 [ 72.853618] system=NTSC [ 72.853618] format=0 [ 72.853618] output_fmt=YUV420 [CAMERA_DEBUG]*************************************************************** [CAMERA] close /dev/video0 ion_alloc_close pid[ 72.870400] [tvd] vidioc_s_fmt_vid_cap:1627 [ 72.870400] row=1 [ 72.870400] column=1 [ 72.870400] ch[0]=0 [ 72.870400] ch[1]=0 [ 72.870400] ch[2]=0 [ 72.870400] ch[3]=0 : 1543, release g_alloc_context = 0xc97158 [CAMERA_DEBUG]*************************************************************** [CAM[ 72.900202] [tvd] vidioc_s_fmt_vid_cap:1629 [ 72.900202] width=720 [ 72.900202] height=480 [ 72.900202] dev->sel=0 ERA_DEBUG] Performance Testing---format:NV21 size:720 * 480 [ 72.924121] [tvd] tvd_cagc_and_3d_config:1481 tvd0 agc auto mode [ 72.936083] [tvd] tvd_cagc_and_3d_config:1490 tvd0 CAGC enable:0x1 [ 72.945822] [tvd] tvd_cagc_and_3d_config:1517 tvd0 3d enable :0x4f900000 [ 72.954767] [tvd] vidioc_streamon:1712 Out vidioc_streamon:0 [CAMERA_DEBUG] The interval from open to streaming is 148 ms. [CAMERA_DEBUG]*************************************************************** root@TinaLinux:/dev#通过该信息分析,该摄像头是NTSC制式,分辨率是720x480,另外,它输出的格式是YUV420,这个信息为我们配置trecorderdemo提供的重点技术支撑。
camerademo也可以进行摄像头的视频截图,对于TVIN来说,指令如下:camerademo NV21 720 480 30 bmp /tmp 5 4最后一个数字4表示使用/dev/video4。截图后图片正常表示硬件和驱动正常。
-
配置trecorderdemo
trecorderdemo要想正确运行,必须先进行配置,配置文件是recorder.cfg,它位于/etc/目录下。
- 修改recorder.cfg
;-------------------------------------------------------------------------------
number_of_camera = 2
screen_width = 1024
screen_height = 600
camera_id = 0
;-------------------------------------------------------------------------------
; 3 for cvbs sensor
; 2 for usb sensor
; 1 for raw sensor (need isp)
; 0 for yuv sensor
;-------------------------------------------------------------------------------
camera_type = 3

video_enable = 1
video_width = 720
video_height = 480
video_framerate = 30
video_format = YUV420SP
video_memory = MMAP
video_rotation = 0
video_use_wm = 0
video_wm_pos_x = 0
video_wm_pos_y = 0
;-------------------------------------------------------------------------------
; scale down need isp
;-------------------------------------------------------------------------------
video_scale_down_enable = 0
video_sub_width =
video_sub_height =
video_buf_num = 3

audio_enable = 0
audio_format = PCM
audio_channels = 2
audio_samplerate = 8000
audio_samplebits = 16
audio_bitrate = 128000

display_enable = 1
display_rect_x = 0
display_rect_y = 0
display_rect_width = 720
display_rect_height = 480
;-------------------------------------------------------------------------------
; 0 ZORDER_TOP
; 1 ZORDER_MIDDLE
; 2 ZORDER_BOTTOM
;-------------------------------------------------------------------------------
display_zorder = 0
;-------------------------------------------------------------------------------
; 0 ROTATION_ANGLE_0
; 1 ROTATION_ANGLE_90
; 2 ROTATION_ANGLE_180
; 3 ROTATION_ANGLE_270
;-------------------------------------------------------------------------------
display_rotation = 0
主要修改如下:
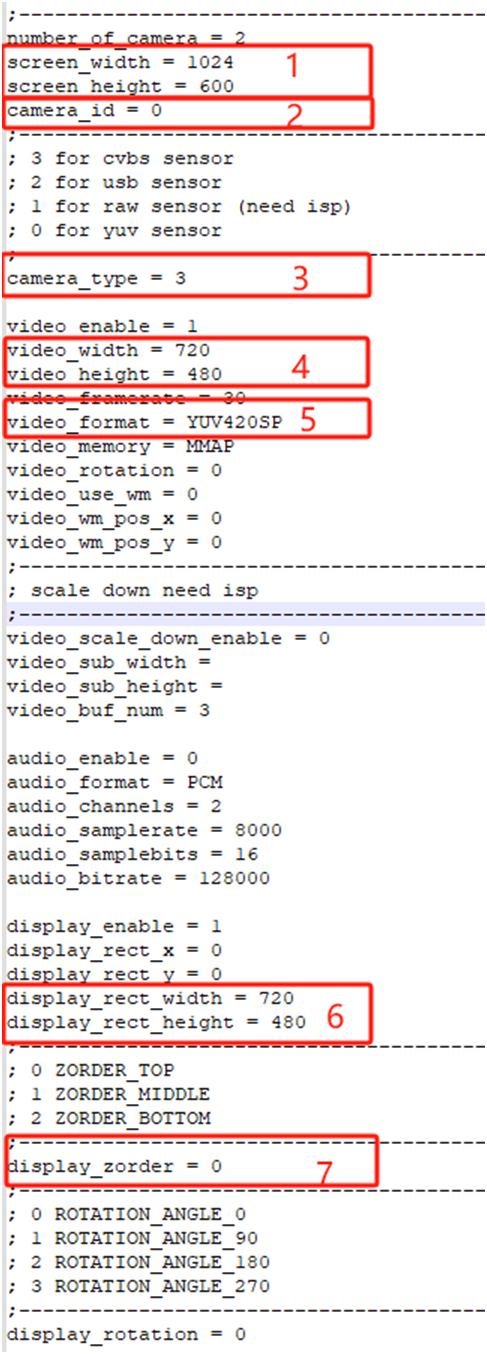
画红框的参数说明如下:
-
screen_width = 1024/screen_height = 600,表示显示屏的参数,比如演示时的屏幕分辨率是1024x600。
-
camera_id = 0,这个参数很重要。务必是0。trecorderdemo程序不是专门为tvin演示编写的,而是为主板可以接的各种camera,例如符合UVC协议的usb camera等。trecorderdemo程序中只能显示两路camera,一路是/dev/video0,另外一路是/dev/video1,在程序中分别对应的是front camera,另外一个对应的是back camera,见下图:
root@TinaLinux:/dev# trecorderdemo --help **************************************************************************** * This program shows how to test trecorder **************************************************************************** **************************************************************************** * trecorderdemo 0: front channel recorder test * trecorderdemo 1: rear channel recorder test * trecorderdemo 2: front and rear two channel recorder test * trecorderdemo audio X: audio X recording test(X = 0/1) *************************************************************************** root@TinaLinux:/dev# trecorderdemo --help **************************************************************************** * This program shows how to test trecorder **************************************************************************** **************************************************************************** * trecorderdemo 0: front channel recorder test * trecorderdemo 1: rear channel recorder test * trecorderdemo 2: front and rear two channel recorder test * trecorderdemo audio X: audio X recording test(X = 0/1) *************************************************************************** root@TinaLinux:/dev# trecorderdemo --help **************************************************************************** * This program shows how to test trecorder **************************************************************************** **************************************************************************** * trecorderdemo 0: front channel recorder test * trecorderdemo 1: rear channel recorder test * trecorderdemo 2: front and rear two channel recorder test * trecorderdemo audio X: audio X recording test(X = 0/1) *************************************************************************** root@TinaLinux:/dev# trecorderdemo --help **************************************************************************** * This program shows how to test trecorder **************************************************************************** **************************************************************************** * trecorderdemo 0: front channel recorder test * trecorderdemo 1: rear channel recorder test * trecorderdemo 2: front and rear two channel recorder test * trecorderdemo audio X: audio X recording test(X = 0/1) *************************************************************************** root@TinaLinux:/dev# trecorderdemo --help **************************************************************************** * This program shows how to test trecorder **************************************************************************** **************************************************************************** * trecorderdemo 0: front channel recorder test * trecorderdemo 1: rear channel recorder test * trecorderdemo 2: front and rear two channel recorder test * trecorderdemo audio X: audio X recording test(X = 0/1)-
列表camera_type,这个参数是确认摄像头的类型,如果是T113的TVIN接口的摄像头,选择3(cvbs sensor);如果是USB接口的摄像头,选择2(usb sensor);如果是处理器内部带了ISP了,那么一般会使用raw sensor,这个时候选择1。
-
列表video_width/video_height,这两个参数是明确视频的分辨率,本次测试的摄像头是NTSC格式的,那么它的分辨率是720x480。
-
列表video_format=YUV420SP,在用camerademo调试摄像头的时候,会给出这个参数。对应的是output_fmt=YUV420;
-
列表display_rect_width/display_rect_height,这两个参数表示在屏幕上显示时的视频框的大小。我们一般会设置和video_width/video_height一样。
trecorderdemo演示
演示时,务必把摄像头先接好,如果未接摄像头,程序会处于假死状态,因为无法识别到摄像头。执行trecorderdemo前,务必先执行fbinit进行清屏。具体演示步骤如下:
fbinit
trecorderdemo 0
以下截取部分执行日志信息:
root@TinaLinux:/mnt/SDCARD# ./fbinit
fbinit test version:V2.0.20220506
================Usage================
/fbinitmeans:clean /dev/fb0
/fbinit 0         means:clean /dev/fb0
/fbinit 1         means:clean /dev/fb1
/fbinit 2         means:clean /dev/fb2
================usage================
cleanning /dev/fb0 ...
clean /dev/fb0 finish
root@TinaLinux:/mnt/SDCARD# trecorderdemo  0
****************************************************************************
* This program shows how to test trecorder
****************************************************************************
▒_▒h:ii

>>>>>>>>>>>>>>>>>>>>>>>>>>>>>>>tina_multimedia<<<<<<<<<<<<<<<<<<<<<<<<<<<<<<<
tag   : tina3.5
branch: tina-dev
date  : Mon Jul 15 19:04:59 2019 +0800
Change-Id: I5f6c8a88d7b387a312b7744797a0d5f8ab07ee7a
-------------------------------------------------------------------------------
[  126.503419] [tvd] vidioc_s_fmt_vid_cap:1623
[  126.503419] interface=0
[  126.503419] system=NTSC
[  126.503419] format=0
[  126.503419] output_fmt=YUV420
[  126.519441] [tvd] vidioc_s_fmt_vid_cap:1627
[  126.519441] row=1
[  126.519441] column=1
[  126.519441] ch[0]=0
[  126.519441] ch[1]=0
[  126.519441] ch[2]=0
[  126.519441] ch[3]=0
[  126.538190] [tvd] vidioc_s_fmt_vid_cap:1629
[  126.538190] width=720
[  126.538190] height=480
[  126.538190] dev->sel=0
[  126.551055] [tvd] tvd_cagc_and_3d_config:1481 tvd0 agc auto mode
[  126.557990] [tvd] tvd_cagc_and_3d_config:1490 tvd0 CAGC enable:0x1
[  126.567569] [tvd] tvd_cagc_and_3d_config:1517 tvd0 3d enable :0x4f900000
[  126.596333] [tvd] vidioc_streamon:1712 Out vidioc_streamon:0
[  126.596367] VE: enable hw clock
[  126.606308] enable_cedar_hw_clk,563
---------------------------------------------------------------------------------------------
              | Preview Status | Preview Size | Audio Status | Water Mark | Recorder Status |
---------------------------------------------------------------------------------------------
front   |     enable     |    full      |    normal    |   disable  |      stop       |
---------------------------------------------------------------------------------------------
rear    |                |              |              |            |                 |
---------------------------------------------------------------------------------------------

RecorderCmd#
屏幕显示如下:
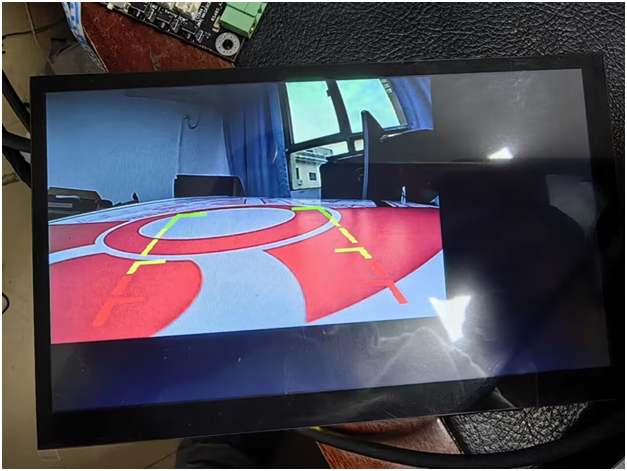
trecorderdemo功能强大,它整合了视频预览,录制音视频等功能,目前只实现了预览功能,其他功能待验证。
-
@hahage168 你好,是不是只能创建一个tvd节点
Copyright © 2024 深圳全志在线有限公司 粤ICP备2021084185号 粤公网安备44030502007680号