【XR806开发板试用】 环境配置记录篇
-
目录:
一. 环境配置
二. 串口通信
三. oled显示
总结:Linux下git、repo安装好后,其他步骤都很简单。
(转自https://aijishu.com/a/1060000000286755)
一.环境配置
提示:本文使用电脑为i7-10700,16G内存。安装windows10系统,主要使用phoenixMC_xxxx.exe软件进行后期固件烧录,window10内安装有VMware虚拟机,其中配置unbuntu20.04LTS系统,4G内存,40G硬盘,主要用作代码下载、固件编译。1.配置gitee公钥
首先注册gitee账号,按照https://gitee.com/help/articles/4181方法在unbuntu系统上生成公钥;在https://gitee.com/profile/sshkeys页面上添加公钥,完成公钥配置。2.在unbuntu上安装git、repo、源码、必要库和工具
2.1安装git
在Terminal上执行sudo apt install git-all ,若出现Waiting for cache lock: ....by process 9694,则在Terminal上执行sudo kill -9 9694 漫长等待~2.2安装repo
2.2.1创建目录
mkdir ~/bin2.2.2下载repo
在Terminal上执行curl -s https://gitee.com/oschina/repo/raw/fork\\_flow/repo-py3 > /usr/local/bin/repo #如果没有权限,可下载至其他目录,并将其配置到环境变量中2.2.3改变执行权限
在Terminal上执行chmod a+x /usr/local/bin/repo(文件夹需更改,我这里将目录改为~/bin/repo)2.2.4设置环境变量,在~/.bashrc文件的最后输入
export PATH=~/bin:$PATH
export REPO_URL=https://mirrors.tuna.tsinghua...2.2.5安装pip3
unbuntu20.04自带python3.8.2,只需安装pip3,在Terminal上执行sudo apt install python3-pip2.2.6pip安装request
在Terminal上执行pip3 install -i https://repo.huaweicloud.com/repository/pypi/simple requests可能问题:(Terminal中执行)
1.出现/usr/bin/env: ‘python’: No such file or directory,因为没有链接python 解决办法:
①查找python位置:whereis python3
②链接python:sudo ln -s /usr/bin/python3.8 /usr/bin/python2.出现Command 'repo' not found, did you mean,因为没有添加环境变量:
①chmod a+x ~/bin/repo
②export PATH="~/bin:$PATH
③vi ~/.bashrc
最后一行加入export PATH="~/bin:$PATH"
export REPO_URL=https://mirrors.tuna.tsinghua...3.出现fatal: unable to access 'https://mirrors.tuna.tsinghua...': server certificate verification failed. CAfile: none CRLfile: none,这个问题搞了半天,通过原文链接:https://www.code404.icu/561.html
①git config --global http.sslverify false
②git config --global https.sslverify false
运行后解决了,repo init正常,接着下载openharmony源码2.3下载openharmony源码(最后大小391,246 items, totalling 9.2 GB)
①mkdir openharmony
②cd openharmony
③repo init -u git@gitee.com:openharmony/manifest.git -b master --no-repo-verify
④repo sync -c
⑤repo forall -c 'git lfs pull'
同理下载xr806源码(最后大小100,985 items, totalling 2.7 GB)
①mkdir xr806_openharmony
②cd xr806_openharmony
③repo init -u ssh://git@gitee.com/openharmony-sig/manifest.git -b OpenHarmony_1.0.1_release --no-repo-verify -m devboard_xr806.xml
④repo sync -c
⑤repo forall -c 'git lfs pull' #下载部分大容量二进制文件2.4安装必要库和工具
按照https://gitee.com/openharmony...上面安装,已经很详细了。到此环境配置结束,在repo上浪费我太多时间,官方教程有些步骤没写,有些教程写的又有问题,综合好多教程最终解决,可累坏我了,篮球都没去打,其他步骤都蛮快的。
3.设置编译工具链
3.1 编译文件下载
XR806_SDK使用gcc进行编译,推荐使用gcc-arm-none-eabi-10-2020-q4-major,复制链接https://developer.arm.com/-/m...到迅雷上下载,一两分钟就下好了,linux上156.9M,windows上149M,因为二者文件系统不同。3.2 解压及修改
下载完成后保存在“~/tools”目录下(“~/tools”不存在则先创建)
①解压命令:tar jxvf gcc-arm-none-eabi-10-2020-q4-major-x86_64-linux.tar.bz2
②修改~/xr806_openharmony/device/xradio/xr806/liteos_m/config.gni第37行,改为相应地址
#Compiler prefix.
board_toolchain_prefix = "~/tools/gcc-arm-none-eabi-10-2020-q4-major/bin/arm-none-eabi-"
我这里相同就没改
③修改~/xr806_openharmony/device/xradio/xr806/xr_skylark/gcc.mk
第八行,改地址
CC_DIR := ~/tools/gcc-arm-none-eabi-10-2020-q4-major/bin
CC_PREFIX := $(CC_DIR)/arm-none-eabi-
也相同不用改3.3 代码工程配置
tips:在相应目录下右键进入Terminal,可快速cd
cd device/xradio/xr806/xr_skylark #(1)进入原生SDK目录cp project/demo/audio_demo/gcc/defconfig .config #(2)复制配置文件
make menuconfig #(3)图形化界面配置

出现缺库问题
在unbuntu Terminal执行sudo apt-get install libncurses5-dev
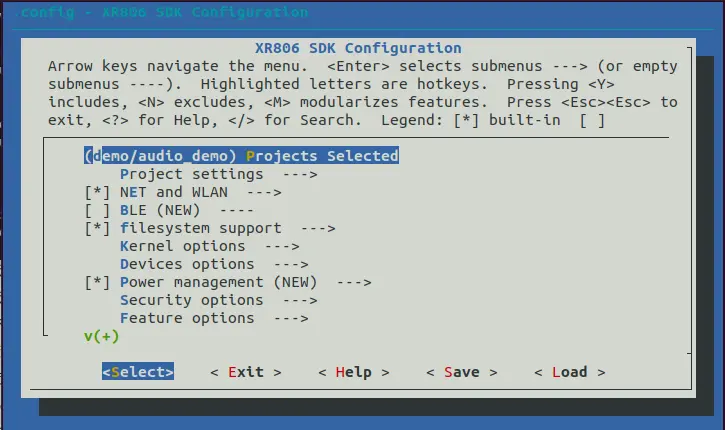
按方向键选择save保存后,选择exist退出即可。make build_clean #(4)清除旧配置
make lib -j #(5)根据配置生成静态库和全局头文件
cd - #(6)返回xr806_openharmony根目录
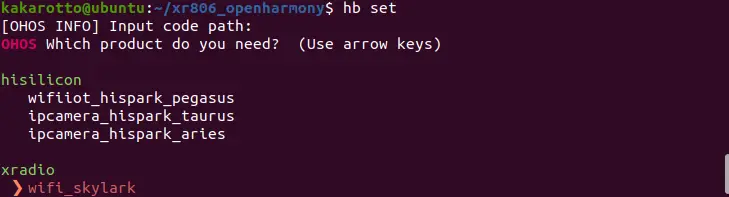
hb set #(7)执行命令
回车
 选择wifi_skylark,回车
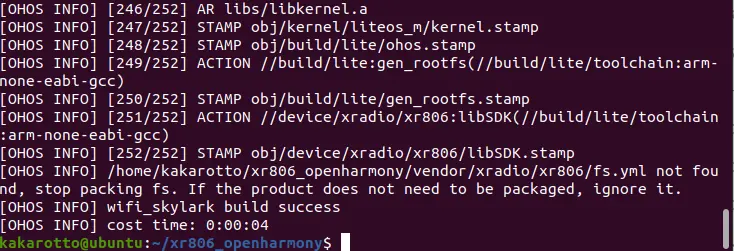
hb build -f #(8)编译,后续不需要重新配置
4.开烧开烧
xr_system.img固件:
位置:~/xr806_openharmony/device/xradio/xr806/xr_skylark/out
phoenixMC_v3.1.21014b.exe:
windows烧录软件位置:~/xr806_openharmony/device/xradio/xr806/xr_skylark/tools
从虚拟机复制到windows,打开软件,设置速率3000000,选择固件
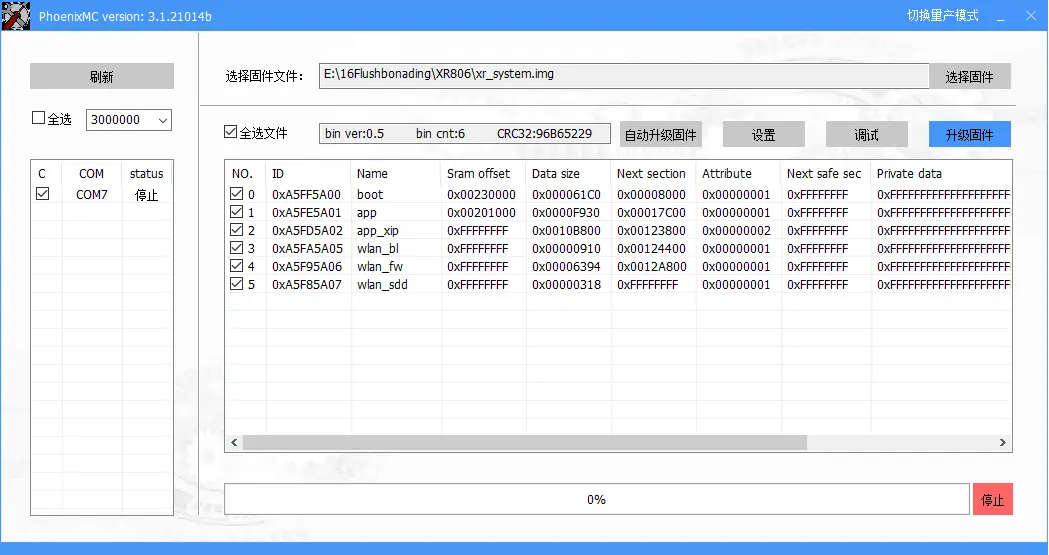
点击设置
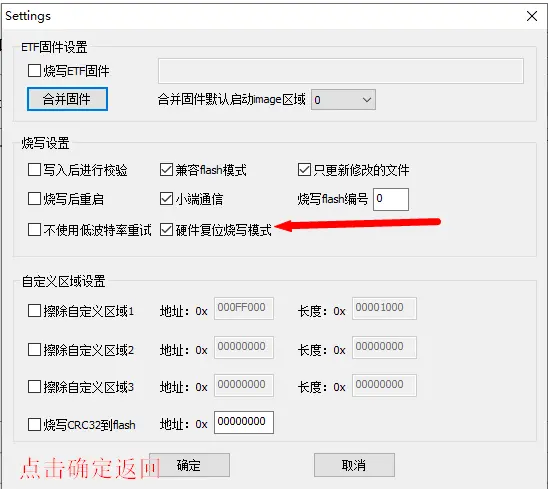
在主界面点击升级固件
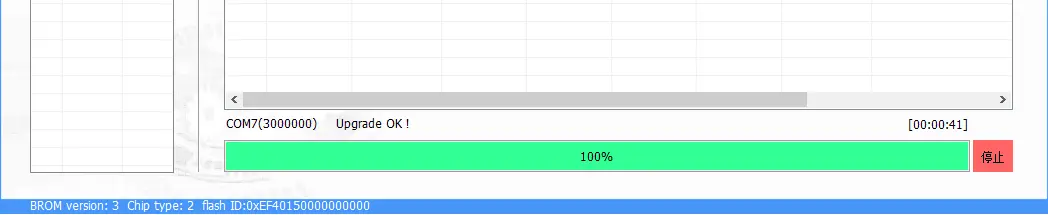
OK!
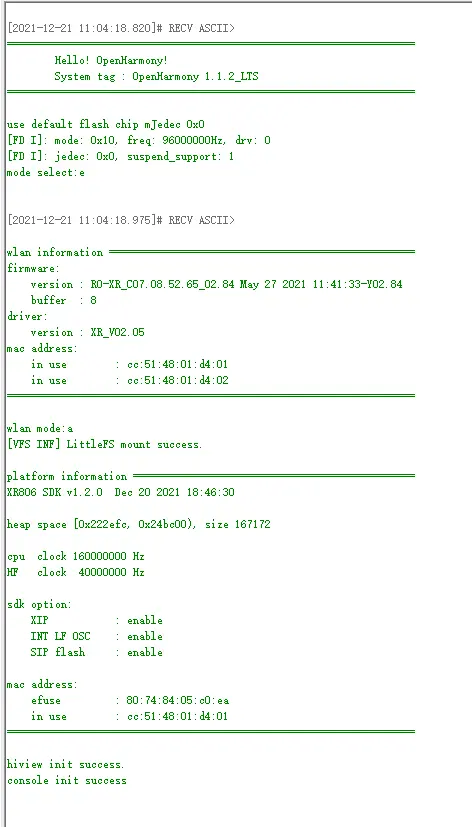
打开串口助手
快到饭点了,下午再点灯吧,哈哈
Copyright © 2024 深圳全志在线有限公司 粤ICP备2021084185号 粤公网安备44030502007680号