【XR806开发板试用】基于WEBSOCKET实现人机交互(控制开关灯)以及开发问题记录
-
一、开发板编译、功能介绍
根据官方文档编译烧录成功后,我们修改下官方例子,进行开发来实现websocket。
整体流程:开发板先自动寻找指定的wifi并且连接,连接成功后,通过websocket来与服务端连接,连接成功后,服务端就可以控制开发板开关灯。
二、代码编写以及功能实现
进入目录 device/xradio/xr806/ohosdemo/
修改BUILD.gn文件新增demo:app_demo
group("ohosdemo") {
deps = [
#"hello_demo:app_hello",
#"iot_peripheral:app_peripheral",
#"wlan_demo:app_WlanTest",
#"LED:app_led",
"demo:app_demo",
]
}
创建demo目录 tree -L 1
├── BUILD.gn
└── main.c
BUILD.gn内容:import("//device/xradio/xr806/liteos_m/config.gni") static_library("app_demo") { configs = [] sources = [ "main.c", ] cflags = board_cflags include_dirs = board_include_dirs include_dirs += [ "//kernel/liteos_m/kernel/arch/include", "//kernel/liteos_m/kernel/arch/include", "//base/iot_hardware/peripheral/interfaces/kits", "//utils/native/lite/include", "//foundation/communication/wifi_lite/interfaces/wifiservice", "//device/xradio/xr806/xr_skylark/project", ] }main.c
#include <stdio.h>
#include <string.h>

#include "ohos_init.h"
#include "kernel/os/os.h"
#include "iot_gpio.h"

#include "wifi_device.h"
#include "wifi_hotspot.h"

#include "net/libwebsockets/libwebsockets.h"


#define WIFI_DEVICE_CONNECT_AP_SSID "um"  //wifi名称
#define WIFI_DEVICE_CONNECT_AP_PSK "12345678" //wifi密码


#define WEBSOCKET_HOST      "192.168.10.21"    //服务器IP
#define WEBSOCKET_PORT      9999                //服务器端口
#define WEBSOCKET_PATH      "/ws"               //websocket路径

#define LIGHT_OPEN          "/light/open"       //开灯指令
#define LIGHT_CLOSE         "/light/close"               //关灯指令

static OS_Thread_t g_main_thread;

#define GPIO_ID_PA21 21


#define MAX_PAYLOAD_SIZE  10 * 1024

/**
 * 会话上下文对象,结构根据需要自定义
 */
struct session_data {
    int msg_count;
    unsigned char buf[LWS_PRE + MAX_PAYLOAD_SIZE];
    int len;
};

/**
 * 某个协议下的连接发生事件时,执行的回调函数
 *
 * wsi:指向WebSocket实例的指针
 * reason:导致回调的事件
 * user 库为每个WebSocket会话分配的内存空间
 * in 某些事件使用此参数,作为传入数据的指针
 * len 某些事件使用此参数,说明传入数据的长度
 */
int callback( struct lws *wsi, enum lws_callback_reasons reason, void *user, void *in, size_t len ) {
    struct session_data *data = (struct session_data *) user;
    switch ( reason ) {
        case LWS_CALLBACK_CLIENT_ESTABLISHED:   // 连接到服务器后的回调
            lwsl_notice( "Connected to server ok!\n" );
            break;

        case LWS_CALLBACK_CLIENT_RECEIVE:       // 接收到服务器数据后的回调,数据为in,其长度为len
            lwsl_notice( "Rx: %s\n", (char *) in );
            if (strncmp(in, LIGHT_CLOSE, len))
            {
                //开灯操作
                IoTGpioSetOutputVal(GPIO_ID_PA21, 1);
            }
            else if (strncmp(in, LIGHT_OPEN, len))
            {
                //关灯操作
                IoTGpioSetOutputVal(GPIO_ID_PA21, 0);
            }
            break;
        case LWS_CALLBACK_CLIENT_WRITEABLE:     // 当此客户端可以发送数据时的回调
            if ( data->msg_count < 3 ) {
                // 前面LWS_PRE个字节必须留给LWS
                memset( data->buf, 0, sizeof( data->buf ));
                char *msg = (char *) &data->buf[ LWS_PRE ];
                data->len = sprintf( msg, "你好 %d", ++data->msg_count );
                lwsl_notice( "Tx: %s\n", msg );
                // 通过WebSocket发送文本消息
                lws_write( wsi, &data->buf[ LWS_PRE ], data->len, LWS_WRITE_TEXT );
            }
            break;
    }
    return 0;
}

/**
 * 支持的WebSocket子协议数组
 * 子协议即JavaScript客户端WebSocket(url, protocols)第2参数数组的元素
 * 你需要为每种协议提供回调函数
 */
struct lws_protocols protocols[] = {
    {
        //协议名称,协议回调,接收缓冲区大小
        "ws", callback, sizeof( struct session_data ), MAX_PAYLOAD_SIZE,
    },
    {
        NULL, NULL,   0 // 最后一个元素固定为此格式
    }
};

//连接wifi,并且打印ip
static int wifiConnect()
{
    const char ssid_want_connect[] = WIFI_DEVICE_CONNECT_AP_SSID;
    const char psk[] = WIFI_DEVICE_CONNECT_AP_PSK;

    if (WIFI_SUCCESS != EnableWifi()) {
        printf("Error: EnableWifi fail.\n");
        return -1;
    }

    OS_Sleep(1);

    if (WIFI_STA_ACTIVE == IsWifiActive())
        printf("Wifi is active.\n");

    OS_Sleep(1);

    if (WIFI_SUCCESS != Scan()) {
        printf("Error: Scan fail.\n");
        return -1;
    }
    OS_Sleep(3);

    WifiScanInfo scan_results[30];
    unsigned int scan_num = 30;
    if (WIFI_SUCCESS != GetScanInfoList(scan_results, &scan_num)) {
        printf("Error: GetScanInfoList fail.\n");
        return -1;
    }

    WifiDeviceConfig config = { 0 };
    int netId = 0;

    int i;
    for (i = 0; i < scan_num; i++) {
        if (0 == strcmp(scan_results[i].ssid, ssid_want_connect)) {
            memcpy(config.ssid, scan_results[i].ssid,
                   WIFI_MAX_SSID_LEN);
            memcpy(config.bssid, scan_results[i].bssid,
                   WIFI_MAC_LEN);
            strcpy(config.preSharedKey, psk);
            config.securityType = scan_results[i].securityType;
            config.wapiPskType = WIFI_PSK_TYPE_ASCII;
            config.freq = scan_results[i].frequency;
            break;
        }
    }

    if (i >= scan_num) {
        printf("Error: No found ssid in scan_results\n");
        return -1;
    }

    if (WIFI_SUCCESS != AddDeviceConfig(&config, &netId)) {
        printf("Error: AddDeviceConfig Fail\n");
        return -1;
    }

    if (WIFI_SUCCESS != ConnectTo(netId)) {
        printf("Error: ConnectTo Fail\n");
        return -1;
    }
    printf("ConnectTo Success\n");

    OS_Sleep(15);

    return 0;
}

void wifiDisconnect()
{
    printf("\n=========== DisConnect Test Start ===========\n");
    if (WIFI_SUCCESS != Disconnect()) {
        printf("Error: Disconnect Fail\n");
        return;
    }
    printf("Disconnect Success\n");

    if (WIFI_SUCCESS != DisableWifi()) {
        printf("Error: DisableWifi fail.\n");
        return;
    }
    printf("DisableWifi Success\n");
    printf("\n=========== DisConnect Test End ===========\n");
}

static void MainThread(void *arg)
{
    int s32Ret = 0;

    s32Ret = wifiConnect();
    if (0 != s32Ret)
    {
        printf("wifiConnect failed\n");
        return;
    }

    IoTGpioInit(GPIO_ID_PA21);
    IoTGpioSetDir(GPIO_ID_PA21, IOT_GPIO_DIR_OUT);

    // 用于创建vhost或者context的参数
    struct lws_context_creation_info ctx_info = { 0 };
    ctx_info.port = CONTEXT_PORT_NO_LISTEN;
//    ctx_info.iface = NULL;
    ctx_info.protocols = protocols;
    ctx_info.gid = -1;
    ctx_info.uid = -1;

    // 创建一个WebSocket处理器
    struct lws_context *context = lws_create_context( &ctx_info );

    char address[] = WEBSOCKET_HOST;
    int port = WEBSOCKET_PORT;
    char addr_port[256] = { 0 };
    sprintf(addr_port, "%s:%u", address, port & 65535 );

    // 客户端连接参数
    struct lws_client_connect_info conn_info = { 0 };
    conn_info.context = context;
    conn_info.address = address;
    conn_info.port = port;
    conn_info.path = WEBSOCKET_PATH;
    conn_info.host = addr_port;
    conn_info.origin = addr_port;
    conn_info.protocol = protocols[ 0 ].name;

    // 下面的调用触发LWS_CALLBACK_PROTOCOL_INIT事件
    // 创建一个客户端连接
    struct lws *wsi = lws_client_connect_via_info( &conn_info );

    while (1) {

        // 执行一次事件循环(Poll),最长等待1000毫秒
        lws_service( context, 1000 );
        /**
         * 下面的调用的意义是:当连接可以接受新数据时,触发一次WRITEABLE事件回调
         * 当连接正在后台发送数据时,它不能接受新的数据写入请求,所有WRITEABLE事件回调不会执行
         */
        lws_callback_on_writable( wsi );
    }
    // 销毁上下文对象
    lws_context_destroy( context );

    wifiDisconnect();
}
//连接websocket 进行开灯,关灯操作

//wifi 连接
void demoMain(void)                                                              //(2)
{
    printf("websocket Test Start\n");

    if (OS_ThreadCreate(&g_main_thread, "MainThread", MainThread, NULL,
        OS_THREAD_PRIO_APP, 4 * 1024) != OS_OK)
    {
        printf("[ERR] Create MainThread Failed\n");
    }
}

SYS_RUN(demoMain);
三、效果演示
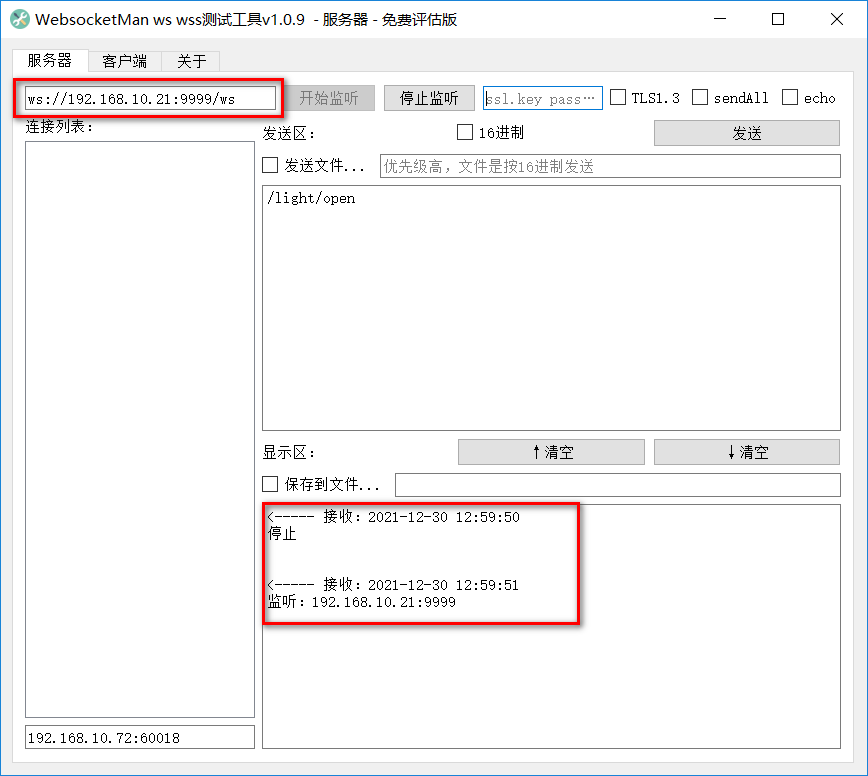
服务器用了网上下载的个WebssocketMan工具来模拟,网盘链接
链接:https://pan.baidu.com/s/1t82q_1evB5Zla-Hc1m4SYA
提取码:4pxu

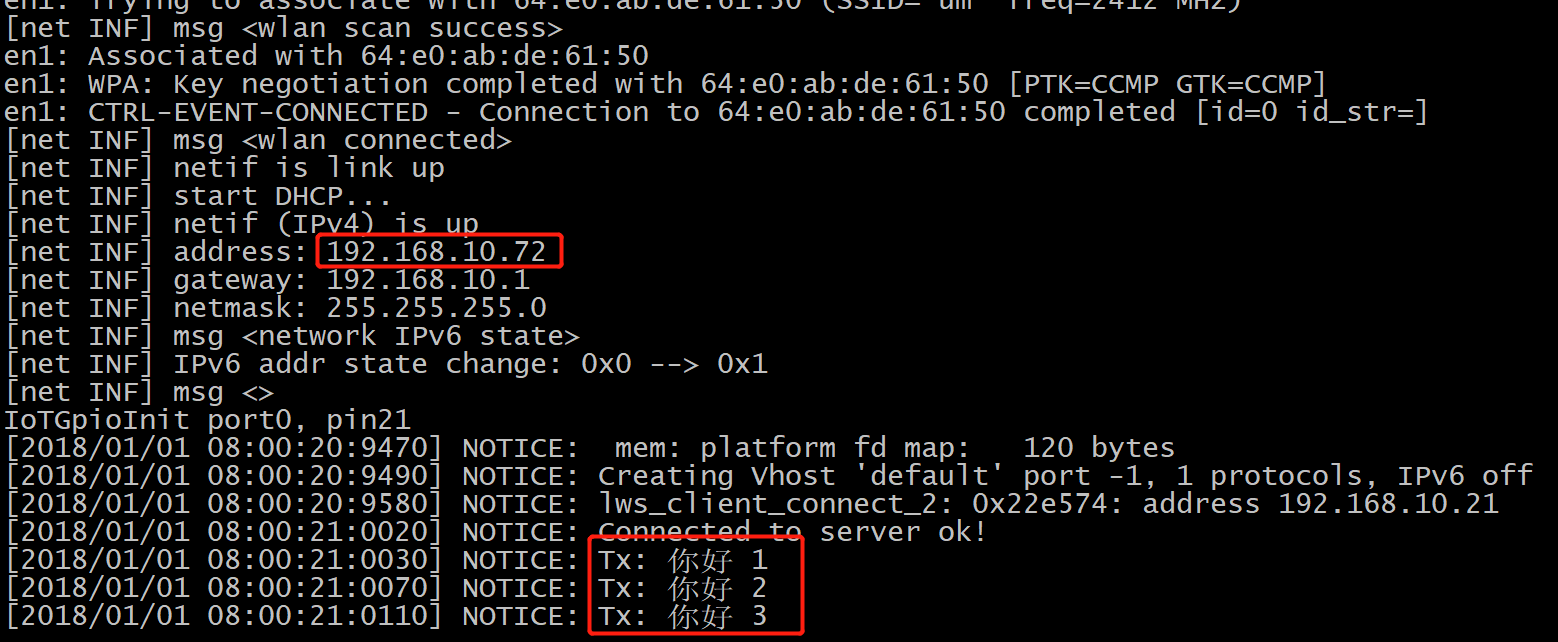
登陆成功后打印显示:

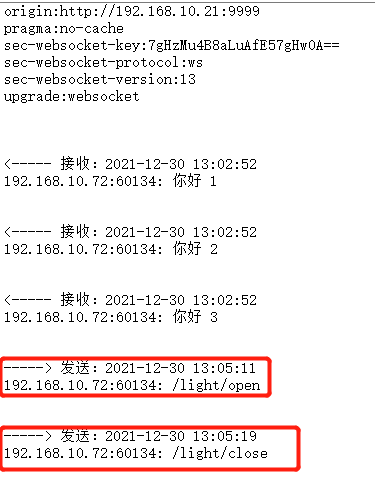
登录后平台收到“/light/open”消息为点灯,“/light/close”为关灯
演示截图:

四、问题记录
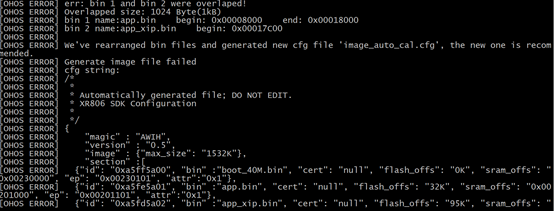
在打开wifi例子,编译过程中遇到了分区叠加的错误,具体如图(感谢群里的朋友、社区以及论坛的帮助)

因为内存分配不够,官方文档描述
device\xradio\xr806\xr_skylark\project\image_cfg\readme.md

按照网上说的修改:
device\xradio\xr806\xr_skylark\project\demo\wlan_ble_demo\image\xr806\image_wlan_ble.cfg 分配不能够生效
最终解决:xr806\device\xradio\xr806\xr_skylark\project\demo\audio_demo\image\xr806\目录中将 image_auto_cal.cfg替换image.cfg
Copyright © 2024 深圳全志在线有限公司 粤ICP备2021084185号 粤公网安备44030502007680号