打开原帖看到了 F133
是不是应该问问合作伙伴更新一下
Posts made by BedRock
-
Reply: 如何调用GPIO生成下降沿?posted in MR Series
@mgeekfb 然后我的程序是按照上面说过的,打开一个GPIO,检查状态,然后再进行写入,这种逻辑来的,你默认使用的话,推荐也是按照这种方法,防止后面出错

-
Reply: 如何调用GPIO生成下降沿?posted in MR Series
@mgeekfb 不可以,因为我上传的代码没有并入 Tina SDK ,所以你需要包含我的头文件,才能使用我这种方法
-
Reply: 如何调用GPIO生成下降沿?posted in MR Series
@mgeekfb 查看原理图 GPIO10 的SOCNO 应该是 PP1
PIN10 才是 PB9 PB9 默认被用作 UART0 当然不可以打开了PP1 对应的编号为 GPIO2021 (因为 PPx 是用芯片扩展出来的 GPIO 默认从2020开始)
-
Reply: D1 编译出错,提示链接iconv失败posted in MR Series
@wyx653633938 在 D1 编译出错,提示链接iconv失败 中说:
有技术支持或者大神帮忙回复一下吗? 本来自己安装环境不行,后面直接用全志提供的Ubuntu也不行。
你先更新一下软件包看看
-
Reply: 如何调用GPIO生成下降沿?posted in MR Series
根据帖https://bbs.aw-ol.com/topic/336/的图
GPIO10 SOCNO 为 PB9 对应的 在Tina中的命名规范 PB0 为32 + 9 = 41
所以需要向
/sys/class/gpio/export写入 41之后会生成 GPIO41 的文件夹
检查
/sys/class/gpio/gpio41/direction是否为 out如果是,则可以给
/sys/class/gpio/gpio41/value写入 0 则为低电平
-
Reply: D1 编译出错,提示链接iconv失败posted in MR Series
@wyx653633938 在 D1 编译出错,提示链接iconv失败 中说:
跟进官网提供的下载方法下载源码及“可编译Tina的Oraclr VM VirtualBox Ubuntu14.04虚拟机”,直接使用此虚拟机编译,报错如图,请问啥原因?
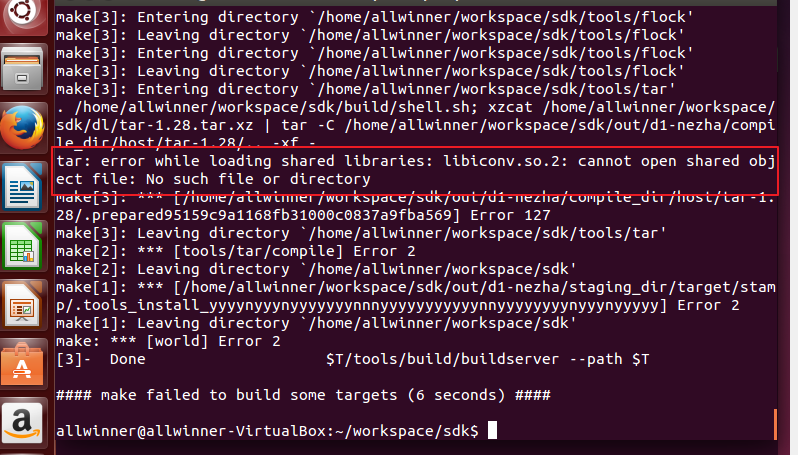
更新并升级一下软件包 尤其是 tar 相关的
-
Reply: D1 CoreMark运行时报错posted in MR Series
@codwine 应该是 1.8.5 你看看这个下载下来是不是 riscv64-glibc-gcc-thead_20200702
gcc 版本为 gcc version 8.1.0 (C-SKY RISCV Tools V1.8.4 B20200702)
-
Reply: D1 CoreMark运行时报错posted in MR Series
@codwine tina SDK工具链是riscv64-glibc-gcc-thead_20200702 你下载的新了
推荐你换成旧的 估计测分数会高一点
-
欢乐斗地主之AI斗地主posted in 灌水区
逛github发现的奇妙的开源仓库,赚豆神器物理外挂

https://github.com/tianqiraf/DouZero_For_HappyDouDiZhu
视频链接:
https://b23.tv/9WFP5F
-
请教一下大神们,嵌入式中有没有类似游戏机的开源框架posted in 爱搞机专区
如题。在网上找了找有一个mame,但是没在网上找到相关资源
然后再找了一下,就是需要图形桌面环境gtk,刚刚编译了一个SDL库,有没有用武之地。
-
又一款开源显示框架GUI-lite,在D1上试试效果posted in MR Series
项目开源链接:
https://gitee.com/idea4good/GuiLite
大道至簡 - 4千行/仅头文件/全平台GUI库sample仓库
https://gitee.com/idea4good/GuiLiteSamples/tree/master/
记录
项目使用Cmake构建,可以直接指定交叉编译链进行编译,实测在cmakelists中指定交叉编译链找不到路径,索性不管直接指定CC CXX环境变量,然后直接进行编译,跑一下 widgets 例程
-
Reply: 请问怎么把2D加速整合到Qt?posted in MR Series
@cloud_d1 我给你移植好的代码包。分别支持 makefile 构建和 cmake 构建
littlevgl-8.tar.gz
-
【模块第三弹】哪吒中的LEDC的驱动posted in MR Series
实现了控制LEDC的接口,通过宏定义控制LEDC的个数,前提是需要在dts中打开这么多个LEDC设备。封装成内部接口,当然也可以自定义修改。
- 集成颜色解码接口,使用宏定义声明颜色,调用颜色解码接口即可显示出对应的颜色。
- 目前有三种流水样式,其他流水样式可以参考这三种流水样式做修改。
代码
main.c#include "ws2812.h" int main(int argc, char const *argv[]) { printf("demo 1\n"); //LEDC_LiuShui(); //LED_LiuShui2(); LiuSui3(); return 0; }代码
ws2812.h#ifndef WS2812_H #define WS2812_H #include <stdio.h> #include <stdlib.h> #include <unistd.h> #include <sys/types.h> #include <sys/stat.h> #include <fcntl.h> typedef unsigned char uint8; typedef unsigned int uint32; #define LED_NUM 32 #define LEDC_RED_PATH "/sys/class/leds/sunxi_led%dr/brightness" #define LEDC_GREEN_PATH "/sys/class/leds/sunxi_led%dg/brightness" #define LEDC_BLUE_PATH "/sys/class/leds/sunxi_led%db/brightness" #define delay_ms(x) (usleep(x*1000)) #define MediumTurquoise 0x48D1CC #define Gold 0xFFD700 #define DarkGray 0xA9A9A9 #define Magenta 0xFF00FF #define Yellow 0xFFFF00 int LED_LiuShui2(); int LEDC_LiuShui(); int LED_Color(int led,uint8 R,uint8 G,uint8 B); int ColorDecode(uint32 color ,uint8 *R,uint8 *G,uint8 *B); int LiuSui3(); #endif代码
ws2812.c#include "ws2812.h" static int export_fd; static int color[3] = {0,0,255}; //RGB int LED_LiuShui2(){ int i; int mode = 0; int R= 0 ,G = 0,B = 0; while(1){ if(i == 32) { i = 0; mode += 1; } if(mode == 0){ R = 255; G = 0; B = 0; } if (mode == 1){ R = 0; G = 255; B = 0; } if(mode == 2){ R = 0; G = 0; B = 255; } if(mode == 3) { mode = 0; printf("delate 0\n"); } LED_Color(i,R,G,B); i++; delay_ms(20); } return 1; } int LEDC_LiuShui(){ int i = 0,len; char ledPath[45] = {0}; char led_write[3] = {0}; printf("demo 1 \n"); while(1){ for(i = 0 ; i < LED_NUM ; i++){ printf("LED %d \n",i); sprintf(ledPath,LEDC_BLUE_PATH,i); export_fd = open(ledPath, O_WRONLY); if(-1 == export_fd) { printf("[%s]:[%d] open gpio direction file error\r\n", __FUNCTION__, __LINE__); return -1; } len = sprintf(led_write,"%d",color[2]); if(-1 == write(export_fd, led_write, len)) { printf("[%s]:[%d] write operation direction error\r\n", __FUNCTION__, __LINE__); close(export_fd); return -1; } close(export_fd); if(i>3){ sprintf(ledPath,LEDC_BLUE_PATH,i-3); export_fd = open(ledPath, O_WRONLY); if(-1 == export_fd) { printf("[%s]:[%d] open gpio direction file error\r\n", __FUNCTION__, __LINE__); return -1; } len = sprintf(led_write,"%d",0); if(-1 == write(export_fd, led_write, len)) { printf("[%s]:[%d] write operation direction error\r\n", __FUNCTION__, __LINE__); close(export_fd); return -1; } close(export_fd); } else { sprintf(ledPath,LEDC_BLUE_PATH,i+29); export_fd = open(ledPath, O_WRONLY); if(-1 == export_fd) { printf("[%s]:[%d] open gpio direction file error\r\n", __FUNCTION__, __LINE__); return -1; } len = sprintf(led_write,"%d",0); if(-1 == write(export_fd, led_write, len)) { printf("[%s]:[%d] write operation direction error\r\n", __FUNCTION__, __LINE__); close(export_fd); return -1; } close(export_fd); } delay_ms(50); } } printf("demo 1 end \n"); return 1; } int LED_Color(int led,uint8 R,uint8 G,uint8 B) { int len; char ledPath[45] = {0}; char led_write[3] = {0}; sprintf(ledPath,LEDC_BLUE_PATH,led); export_fd = open(ledPath, O_WRONLY); if(-1 == export_fd) { printf("[%s]:[%d] open gpio direction file error\r\n", __FUNCTION__, __LINE__); return -1; } len = sprintf(led_write,"%d",B); if(-1 == write(export_fd, led_write, len)) { printf("[%s]:[%d] write operation direction error\r\n", __FUNCTION__, __LINE__); close(export_fd); return -1; } close(export_fd); sprintf(ledPath,LEDC_GREEN_PATH,led); export_fd = open(ledPath, O_WRONLY); if(-1 == export_fd) { printf("[%s]:[%d] open gpio direction file error\r\n", __FUNCTION__, __LINE__); return -1; } len = sprintf(led_write,"%d",G); if(-1 == write(export_fd, led_write, len)) { printf("[%s]:[%d] write operation direction error\r\n", __FUNCTION__, __LINE__); close(export_fd); return -1; } close(export_fd); sprintf(ledPath,LEDC_RED_PATH,led); export_fd = open(ledPath, O_WRONLY); if(-1 == export_fd) { printf("[%s]:[%d] open gpio direction file error\r\n", __FUNCTION__, __LINE__); return -1; } len = sprintf(led_write,"%d",R); if(-1 == write(export_fd, led_write, len)) { printf("[%s]:[%d] write operation direction error\r\n", __FUNCTION__, __LINE__); close(export_fd); return -1; } close(export_fd); } int ColorDecode(uint32 color ,uint8 *R,uint8 *G,uint8 *B){ *R = (color >> 16) & 0x000011; *G = (color >> 8 ) & 0x000011; *B = (color >> 0 ) & 0x000011; } int LiuSui3(){ int i; int mode = 0; uint8 R= 0 ,G = 0,B = 0; while(1){ if(i == 32) { i = 0; mode += 1; } if(mode == 0){ ColorDecode(MediumTurquoise,&R,&G,&B); } if (mode == 1){ ColorDecode(Gold,&R,&G,&B); } if(mode == 2){ ColorDecode(DarkGray,&R,&G,&B); } if(mode == 3) { mode = 0; printf("delate 0\n"); } LED_Color(i,R,G,B); i++; delay_ms(20); } return 1; }MakefileCC := riscv64-unknown-linux-gnu-gcc target = ws2812 LDFLAGS ?= -lm CFLAGS ?= -I . CSRCS += ws2812.c MAINSRC = main.c all : default OBJEXT ?= .o COBJS = $(CSRCS:.c=$(OBJEXT)) MAINOBJ = $(MAINSRC:.c=$(OBJEXT)) # SRCS = $(CSRCS) $(MAINSRC)s %.o: %.c @$(CC) $(CFLAGS) -c $< -o $@ @echo "CC $<" default: $(COBJS) $(MAINOBJ) $(CC) -o $(target) $(MAINOBJ) $(COBJS) $(LDFLAGS) clean: rm -f $(target) $(AOBJS) $(COBJS) $(MAINOBJ)
-
Reply: 64M DDR2 的 D1s tina linux 运行 tplayerdemo 内存不足直接奔溃,求解决方案。posted in MR Series
tplaydemo有个剪裁的版本目前没有发布,F133平台目前确实跑不起来
-
【资源汇总】2021年哪吒开发板第二期成果汇报posted in MR Series
点亮技能 开发者 简介 自适应MIPI屏幕-240*32 IAMLIUBO 实现修改dts文件驱动自己的屏幕!制作转接板,根据厂商驱动修改设备树节点,进行初始化,成功点亮! 扩展板的设计 xfdr0805 借鉴树莓派,给哪吒设计制作一个扩展板,可以充分利用哪吒引出的外设引脚 扩展版实现-SPI-LCD xfdr0805 在扩展板上使用引出的SPI1接口驱动屏幕,同时用3屏 
扩展版实现-IIC-OLED xfdr0805 在应用层操作OLED,实现IIC应用层写数据,并移植u8g2GUI框架 扩展版实现-红外发送与接收 xfdr0805 利用芯片内置的ir实现红外的发射与接收 扩展版实现-按键与旋转编码器 xfdr0805 使用扩展芯片引出脚做按键检测,配置设备dts添加设备,提供按键与编码器的测试程序 扩展版实现-点灯 xfdr0805 分别使用LEDC子系统与GPIO系统 点灯,同时展示了多种特效,呼吸效果,定时效果,并提供了测试代码 DLNA客户端投屏 逸俊晨晖 可以实现网络投屏!给哪吒适配DLNA客户端,并支持gsteamer硬解视频流,可支持同一网络下投屏使用,显示帧率够用 D1使用gstreamer硬件解码视频 逸俊晨晖 提高视频播放流畅性软件进行视频播放浪费CPU计算资源且播放卡顿不流畅,使用插件调用libcedar进行视频硬件解码,会非常流畅 D1使用lvgl8和lvgl7 逸俊晨晖 移植LVGL官方显示框架,使用cmake构建项目,使用软件刷屏,帧率不高,资源占用大 哪吒3D打印外壳 whycan转载 隐藏哪吒霸气的PCB,可以直接3D打印的 stl 模型文件 SSH和VNC的远程桌面访问 liangdi 远程桌面连接!基于RVBoards Debian 系统,开启远程访问,摆脱鼠标键盘显示器 Fedora 系统在D1上运行 tigger Fedora 是知名的Linux操作系统,是由全球社区爱好者构建的面向日常应用的快速、稳定、强大的操作系统。提供系统镜像,可直接dd烧录 LVGL7移植 whycan 使用官方仓库构建,提供移植好的源码固件,可直接编译使用 D1 F133 DXP封装 tigger 对硬件感兴趣的同学可以看这里!目前缺少D1原理图库文件,后续会补充上来 D1双屏异显 BedRock 在D1上实现两个屏幕同时播放不同应用!HDMI播放视频,MIPI做UI交互,附固件及食用方法 D1驱动树莓派dsi屏幕 mangogeek 哪吒点亮树莓派屏幕。详细修改踩坑过程,非常具有参考性 D1驱动IIC OLED屏幕 BedRock 哪吒点亮IIC OLED屏幕,借鉴单片机驱动显示方法,直接在应用层操作设备 D1 外设GPIO应用层食用 BedRock 在应用层操作GPIO使用方法,模仿单片机操作方法。对比上面的模块是使用增加dts设备方法 用D1实现提醒器 qianhao 制作:web服务器加LVGL及传感器数据读取,能够根据设置实现定时报警功能,附有详细DIY教程! openEuler烧录安装使用 中科院软件所 openEuler 是基于 CentOS 的 Linux 发行版,为企业量身定做!能够使用 JAVA 编程,并能使用该系统的特性 SPI-NAND性能优化 Banquo 针对SPI NAND读写中的思考,还有优化空间,目前优化一点搬运过程钟的时间 D1哪吒开发板做一个卡牌识别机 BedRock 使用ncnn LVGL 实时视像头推理,能够实现卡牌识别,记录详细过程,并附有开源链接可二次开发! D1 openssl 加密CE DOT小文哥 用来加密个人APP,SDK直接提供,打上pach,可以直接用来测试 D1开发板4GNAS使用 WM_CH 摆脱网盘泄密风险,打造自己的NAS,使用官方软件包,使用和宇宙4G模组,可外网访问NAS D1 Tina 升级gstreamer DOT小文哥 Tina中的播放器插件,支持D1RV架构,连接到显示插件,支持g2d硬件旋转 交叉编译opencv BedRock 在哪吒上使用Opencv做图像处理第一步,交叉编译! 整理帖,完全步骤,很详细
-
Reply: Tina通过命令行连接WiFiposted in MR Series
我又一个更好的方法,不知当讲不当讲,

忍不住了,我还是说说
1.扫描wifi
root@TinaLinux:/# wifi_scan_results_test

*********************************
***Start scan!***
*********************************
bssid / frequency / signal level / flags / ssid
90:67:1c:f8:11:ac       2422    -37     [WPA-PSK-CCMP+TKIP][WPA2-PSK-CCMP+TKIP][WPS][ESS]       AW-PDC-RTOS-MUSIC
9c:9d:7e:e1:a7:c6       2462    -45     [WPA2-PSK-CCMP][WPS][ESS]       Redmi_9EC8
88:d7:f6:88:8b:c0       2412    -50     [WPA2-PSK-CCMP][WPS][ESS]       AW-PDC-PD4-316Test
34:29:12:ac:c3:b9       2462    -56     [WPA2-PSK-CCMP][WPS][ESS]
50:d2:f5:f1:b7:08       2457    -58     [WPA-PSK-CCMP+TKIP][WPA2-PSK-CCMP+TKIP][WPS][ESS]       AW-PDC-PD2-xiaomi2.4g
34:29:12:ac:c3:b8       2462    -59     [WPA2-PSK-CCMP][WPS][ESS]       AW-PDC-KY_IPV6_1
80:e8:6f:d9:6b:80       2437    -61     [WPA-EAP-CCMP][WPA2-EAP-CCMP][ESS]      AWOffice
3c:20:93:0e:2f:97       2412    -54     [WPA-PSK-TKIP][WPA2-PSK-CCMP][ESS]      test_123
7e:b5:9b:1d:e2:89       2437    -64     [WPA2-PSK-CCMP][ESS]    AWTest
7c:b5:9b:fd:e2:89       2437    -65     [WPA-EAP-CCMP+TKIP][WPA2-EAP-CCMP+TKIP][ESS]    AWOffice
7e:b5:9b:2d:e2:89       2437    -66     [WPA-PSK-CCMP+TKIP][WPA2-PSK-CCMP+TKIP][ESS]    CangKu-221
7e:b5:9b:3d:e2:89       2437    -66     [WPA-PSK-CCMP+TKIP][WPA2-PSK-CCMP+TKIP][ESS]    AW-MLC-221
80:e8:6f:d9:6b:82       2437    -62     [WPA2-PSK-CCMP][ESS]    AWTest
ac:e3:42:9c:7f:78       2412    -64     [WPA2-PSK-CCMP][WPS][ESS]       AW-PDC-PSW-CAI
04:d4:c4:b9:b9:f8       2457    -67     [WPA2-PSK-CCMP][WPS][ESS]       ipv6
5c:a4:8a:bf:25:72       2437    -68     [WPA2-PSK-CCMP][ESS]    AWTest
5c:a4:8a:bf:25:70       2437    -69     [WPA-EAP-CCMP][WPA2-EAP-CCMP][ESS]      AWOffice
bc:67:1c:f8:9f:80       2427    -70     [WPA2-PSK-CCMP][ESS]    AWTest
2e:f4:32:07:7e:02       2452    -73     [WPA-PSK-CCMP+TKIP][WPA2-PSK-CCMP+TKIP][ESS]    OUT RF
80:e8:6f:d9:fd:a2       2412    -74     [WPA2-PSK-CCMP][ESS]    AWTest
38:1c:1a:2e:b3:50       2437    -74     [WPA-EAP-CCMP][WPA2-EAP-CCMP][ESS]      AWOffice
80:e8:6f:d9:fd:a0       2412    -75     [WPA-EAP-CCMP][WPA2-EAP-CCMP][ESS]      AWOffice
38:1c:1a:2e:b3:52       2437    -75     [WPA2-PSK-CCMP][ESS]    AWTest
ec:6c:9f:af:89:79       2452    -76     [WPA2-PSK-CCMP][ESS]    AW-APD-GMSipv6
66:6e:97:1a:5a:e4       2462    -81     [WPA2-PSK-CCMP][ESS]    AWTest
8c:be:be:2d:ec:22       2412    -81     [WPA-PSK-CCMP+TKIP][WPA2-PSK-CCMP+TKIP][WPS][ESS]       AW-AE2-TEST1
80:8f:1d:8a:36:76       2412    -61     [ESS]   AW-PDC-PD2-TEST-2.4G
fc:53:9e:c1:b9:2d       2462    -72     [ESS]   MEIZUtest
******************************
Wifi get_scan_results: Success!
******************************
2. 连接wifi
# 后面两个参数是  ssid 和 pwd
root@TinaLinux:/# wifi_connect_ap_test AWTest xxxxxx
==================================
Connecting to the network(AWTest)......
Connected to the AP(AWTest)
Getting ip address(AWTest)......
Wifi connect ap : Success!
==================================
开机连接如上

-
Reply: 请问为什么D1设备树里面的 lcd0 对应的 "allwinner,sunxi-lcd0" 驱动,在源码里面为什么找不到?posted in MR Series
刚才问了一下,在dts 钟进行设置,可以配置屏幕参数

源码在:
-
Reply: 【DIY教程】用D1哪吒开发板把”毛坯车“改造成”全车智能“(更新中)posted in MR Series
哪吒LEDC 驱动灯带
哪吒Tina系统有封装好的LEDC的驱动,可以不用在应用层写协议传输代码驱动LEDC灯带,灯带选择WX28XX ,连接上电源后可以直接驱动。
效果:
存在问题
因为LEDC驱动默认使用硬件FIFO传输,所以默认只能传输32位数据,超过32位会触发FIFO溢出中断。查看系统log更改驱动打印。
[  136.335943] dma xfer
[  136.338507] finish
[  136.341155] sunxi_ledc_irq_handler()1287 - there exists fifo overflow issue, irq_status=0x818010!
可以发现在超过32位的led灯后会使用dma来进行传输,此时FIFO中断照常,这个时目前的驱动问题,如果暂时解决不了,将会尝试在应用层使用GPIO口进行传输。

-
【Take Care】The differences between Nezha and Raspberry Piposted in MR Series
The D1 Nehza and noticedthat despite the Nehza having connectors that appear identical to the Raspberry Pi, they actually are not 100% compatible.
The GPIO header is mostly compatible. Some of the higher numbered pins are listed in the datasheet as NC, meaning that some GPIOI are lacking. Furthermore, some of the secondary peripheral functions seem different.
The Display ribbon cable connector is not physically compatible. It is still a MIPI-DSI connection, but the pinout is different. A adapter will be needed to use it with the Raspberry Pi Display.
The "Camera" ribbon cable connector is not compatible at all. On the Nehza it is not actually a camera connector, but instead analog and digital connections for a microphone breakout board. There is no MIPI-CSI capability on the connector (from what I can tell, the only MIPI-CSI connection shares pins with the RGMII connection, which is used for ethernet)
The 3.5mm audio jack is not entirely compatible. There is not an analog video out connection, instead there is a microphone input.
Be sure to check the schematics (I found them on the linux-sunix wiki), before trying to use any Raspberry Pi cessories to be sure you will not break anything.—Copied From Gabe R .Thank you for pointing out !
哪吒D1开发板虽然多数引脚及外设接口看起来与树莓派相同,但使用的过程中仍然有需要注意的与树莓派不兼容的地方。
- MIPI接口屏幕不兼容,其中IO序列不兼容,如果需要使用树莓派屏幕,则需要外加转接板才能使用。
- GPIO名称不同,哪吒GPIO虽然有一个IO扩展芯片,但其芯片本身印出来的引脚比较少。使用时需要参考哪吒原理图避坑。
- 树莓派的相机接口位置的MIPI接口不为相机接口,不带mipi功能,此接口为麦克风与按键板扩展接口。
- 3.5MM耳机接口为音源输出与麦克风输入,无模拟视频AV信号输出。
在使用树莓派的模块之前,一定要对照原理图检查确保其可用引脚相互不冲突,与功能正常,以保不会烧毁任何模块。
- 转自开发者Gabe R ,感谢指出提醒 !
-
Reply: (分享) D1 / D1s 的 DXP/AD 封装posted in MR Series
找到了一个创建原理图库飞快的方法,明天来试试

https://www.cnblogs.com/mouou/p/3627343.html
-
Reply: (分享) D1 / D1s 的 DXP/AD 封装posted in MR Series
给D1 的PCB封装加上了 3D 封装(封装上有点丑
 )
)原理图库 没有 正在建立,正在寻找D1 管脚的详细手册 分块把D1的 原理图库建立起来


-
Reply: D1 开发板使用 XR829 mesh fw 出现 code(56) 错误,如何解决posted in MR Series
@abing 在 D1 开发板使用 XR829 mesh fw 出现 code(56) 错误,如何解决 中说:
@bedrock img 里面原来的固件,我也是可以up,但是我现在在开发mesh功能,需要替换 支持mesh 共存的fw。之前 全志的同学 mingyuan 有给过我一个img,是可以up 这个 支持mesh的fw的,但是 tina 1.0.1 sdk 编译出来的img 就是up不起来。
看版本号,mesh在两个版本前加入,所以这个也是有的
-
Reply: D1 开发板使用 XR829 mesh fw 出现 code(56) 错误,如何解决posted in MR Series
此问题已修复,使用此蓝牙固件。

fw_xr829_bt_40M.bin已经成功up
root@TinaLinux:/# hciconfig hci0 up
root@TinaLinux:/# hciconfig
hci0:   Type: Primary  Bus: UART
        BD Address: 22:22:53:A1:50:DF  ACL MTU: 1021:8  SCO MTU: 255:4
        UP RUNNING
        RX bytes:1154 acl:0 sco:0 events:54 errors:0
        TX bytes:744 acl:0 sco:0 commands:54 errors:0
-
Reply: D1 开发板使用 XR829 mesh fw 出现 code(56) 错误,如何解决posted in MR Series
@abing 我log 显示 not fount 是不是 ttyS1 找不到?
root@TinaLinux:/# hciattch -n ttyS1 xradio
/bin/sh: hciattch: not found
-
Reply: D1 开发板使用 XR829 mesh fw 出现 code(56) 错误,如何解决posted in MR Series
@abing 在 D1 开发板使用 XR829 mesh fw 出现 code(56) 错误,如何解决 中说:
是
你好,我参考你的操作流程进行问题复现,更换掉板子剩的fw后,进行hci 挂载。
root@TinaLinux:/# hciattch -n ttyS1 xradio >/dev/null 2>&1 &
[1]-  Done(127)                  hciattch -n ttyS1 xradio 1>/dev/null 2>&1
然后使用 hciconfig 没有看到 hci 设备,是怎么回事呢?

root@TinaLinux:/# hciconfig
[2]+  Done(127)                  hciattch -n ttyS1 xradio 1>/dev/null 2>&1
root@TinaLinux:/# hciconfig
root@TinaLinux:/# hciconfig
-
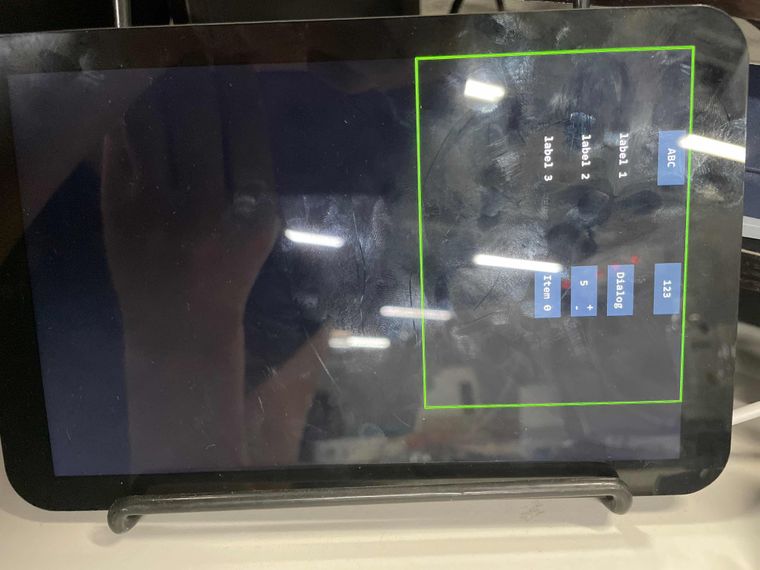
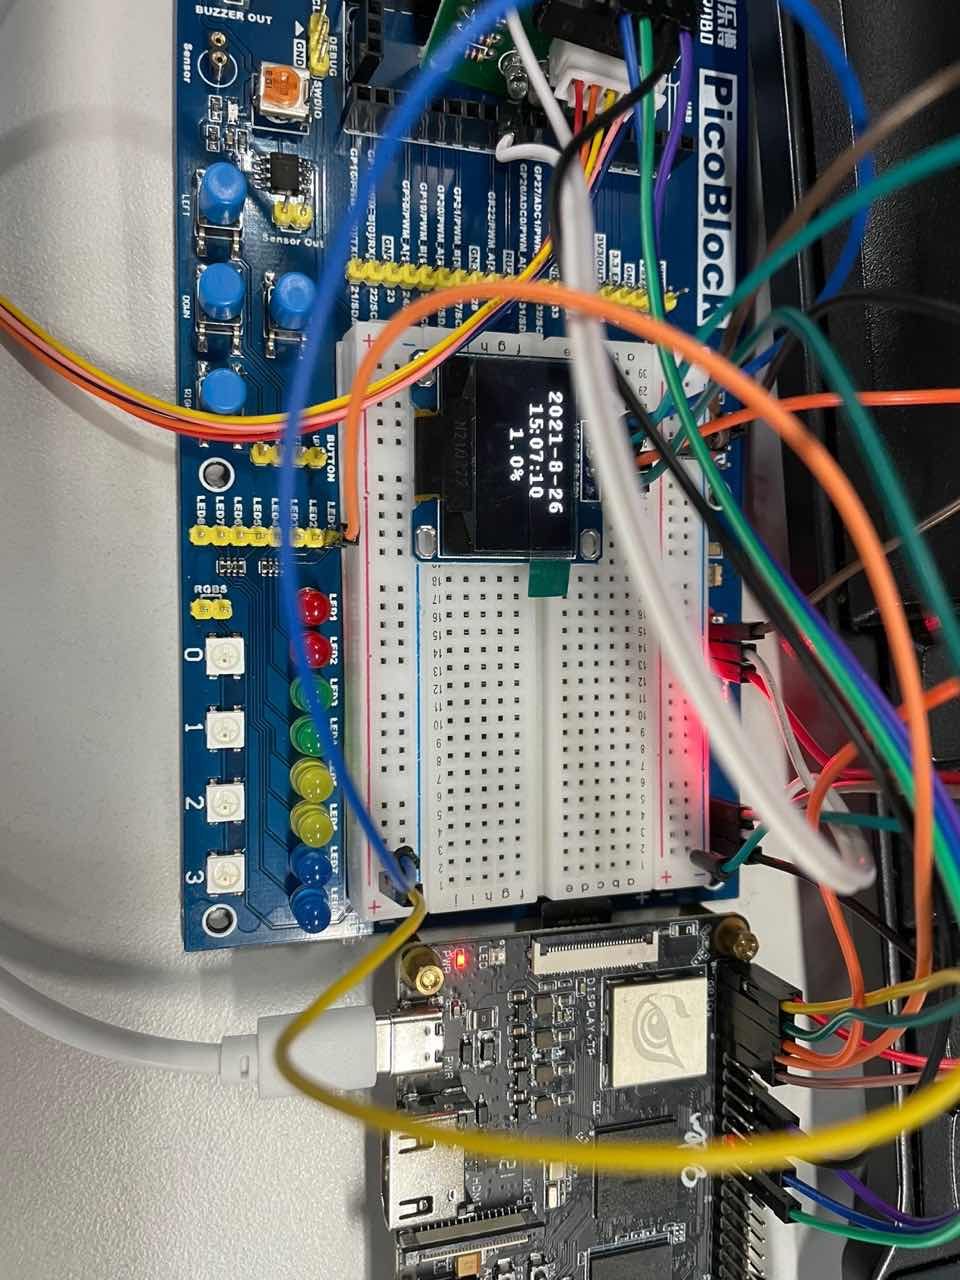
Reply: 【DIY教程】D1的双屏异显第一弹来啦!D1同时支持两个屏幕,一共做UI交互,一边个播放视频posted in MR Series
@cube_work 前两天还有OLED屏,再加上就 三块屏了

-
Reply: 【DIY教程】D1的双屏异显第一弹来啦!D1同时支持两个屏幕,一共做UI交互,一边个播放视频posted in MR Series
对于上述修改,在系统调试节点中查看可以看到:
root@TinaLinux:/sys/devices/virtual/disp/disp/attr# cat sys
screen 0:
de_rate 300000000 hz, ref_fps:62
mgr0: 800x1280 fmt[rgb] cs[0x204] range[full] eotf[0x4] bits[8bits] err[0] force_sync[0] unblank direct_show[false] iommu[1]
dmabuf: cache[0] cache max[0] umap skip[0] overflow[0]
        lcd output      backlight(100)  fps:62.5         800x1280
        err:1   skip:200        irq:18449       vsync:0 vsync_skip:0
   BUF    enable ch[1] lyr[0] z[16] prem[N] a[pixel 255] fmt[  0] fb[ 800,1280; 800,1280; 800,1280] crop[   0,1280, 800,1280] frame[   0,   0, 800,1280] addr[ff800000,       0,       0] flags[0x       0] trd[0,0]
depth[ 0] screen 1:
de_rate 300000000 hz, ref_fps:60
mgr1: 1920x1080 fmt[rgb] cs[0x101] range[limit] eotf[0x4] bits[8bits] err[0] force_sync[0] unblank direct_show[false] iommu[1]
dmabuf: cache[0] cache max[0] umap skip[0] overflow[0]
        hdmi output mode(10)    fps:60.6        1920x1080
        err:0   skip:4  irq:14742       vsync:0 vsync_skip:0
   BUF    enable ch[0] lyr[0] z[0] prem[N] a[globl 255] fmt[ 77] fb[ 992, 736; 496, 368; 496, 368] crop[   0,   0, 976, 720] frame[   0,   0,1920,1080] addr[fe800000,fe8b2400,fe8ded00] flags[0x       0] trd[0,0]
depth[ 0] root@TinaLinux:/sys/devices/virtual/disp/disp/attr#
此时系统中有两个屏幕。
但此时HDMI仅仅只创建了一个图层。
mipi则被加入到了framebuffer中。
-
【DIY教程】D1的双屏异显第一弹来啦!D1同时支持两个屏幕,一共做UI交互,一边个播放视频posted in MR Series
D1文档中有功能:双屏同显!具体操作见文档:https://d1.docs.aw-ol.com/source/3_getimg/
双屏同显测试固件:https://www.aw-ol.com/downloads/resources/38继上述固件之后,因为小项有需求,同显固件无法满足。故有双屏异显第一弹:
- mipi显示GUI,HDMI播放动画。
下图是演示效果。
异显固件:
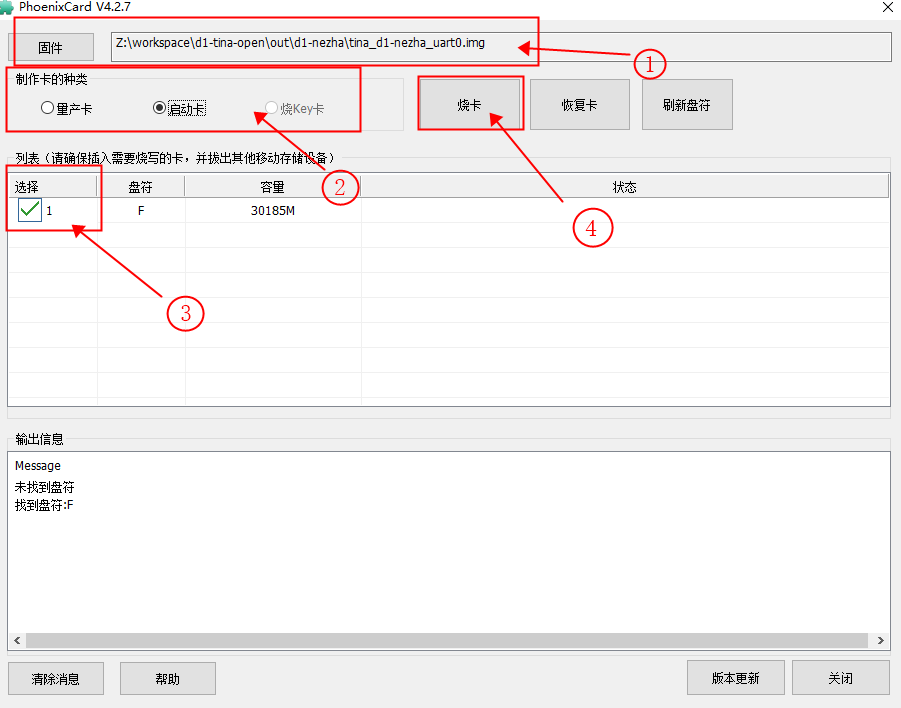
tina_d1-nezha_uart0_yixian.img操作过程
- 更改设备号
# 目录 d1-tina-open/package/allwinner/libuapi/src/videoOutPort.c # 调转一下默认屏幕输出 # 71 行 -#define SCREEN_0 0 -#define SCREEN_1 1 +#define SCREEN_0 1 +#define SCREEN_1 0- 编译并烧录固件
make -j32 && pack- 启动设备,切换HDMI到屏幕1
cd /sys/kernel/debug/dispdbg echo disp1 > name; echo switch1 > command; echo 4 10 0 0 0x4 0x101 0 0 0 8 > param; echo 1 > start;- 使用tplaydemo 播放视频
tplaydemo *****.mp4- 启动LVGL控制UI
./cardcamera以上就是双屏异显固件测试及使用的方法,大家能否基于此想到更多有趣的玩法,欢迎评论回帖催更
- mipi显示GUI,HDMI播放动画。
-
Reply: Allwinner Mass production start card making tutorialposted in MR Series
@uuuuid
Specify the parameters for the pack-dpack -d card0Unfortunately, the card packaging tool is still not perfect.
-
Reply: Allwinner Mass production start card making tutorialposted in MR Series
@tigger 用cardimg 也不行吗?需要打包成cardimg
-
Reply: 请问怎么把2D加速整合到Qt?posted in MR Series
@uuuuid 根据我之前移植LVGL经验来看,使用sunxifb替换devfb 然后使用宏打开 G2D开关,然后链接上动态库 libuapi.so 完成
-
Reply: Allwinner Mass production start card making tutorialposted in MR Series
2. Use the dd command in Linux
The dd command is a standard command for linux to burn images.
Insert the SD card in your computer, check the SD card mount directory, and cancel the mount.
df -h
Filesystem                 Size  Used Avail Use% Mounted on
udev                        32G  4.0K   32G   1% /dev
tmpfs                      6.3G   35M  6.3G   1% /run
/dev/sda1                   83G   20G   59G  26% /
/dev/sdc                  30.2G  4.0K 30.2G   0% /media/SDCARD

umount /dev/sdc
Find the img that needs to be downloaded.
sudo dd if=tina_d1-nezha_card0.img of=/dev/sdc bs=4M
-
Allwinner Mass production start card making tutorialposted in MR Series
Regarding the Allwinner startup card, there are two ways to make it.
Allwinner provides a variety of tools and methods for user firmware burning.This article introduces the production method of mass production startup card.
1.Use Allwinner PhoenixCard Tool
Tool download link:https://www.aw-ol.com/downloads?cat=5
We find "PhoenixCardv4.2.7.7z" and click to download, and get a "PhoenixCardv4.2.7.7z.7z" file,and use an unzip tool to unzip it.We open the application PhoenixCard.exe.

The application interface is as follows:
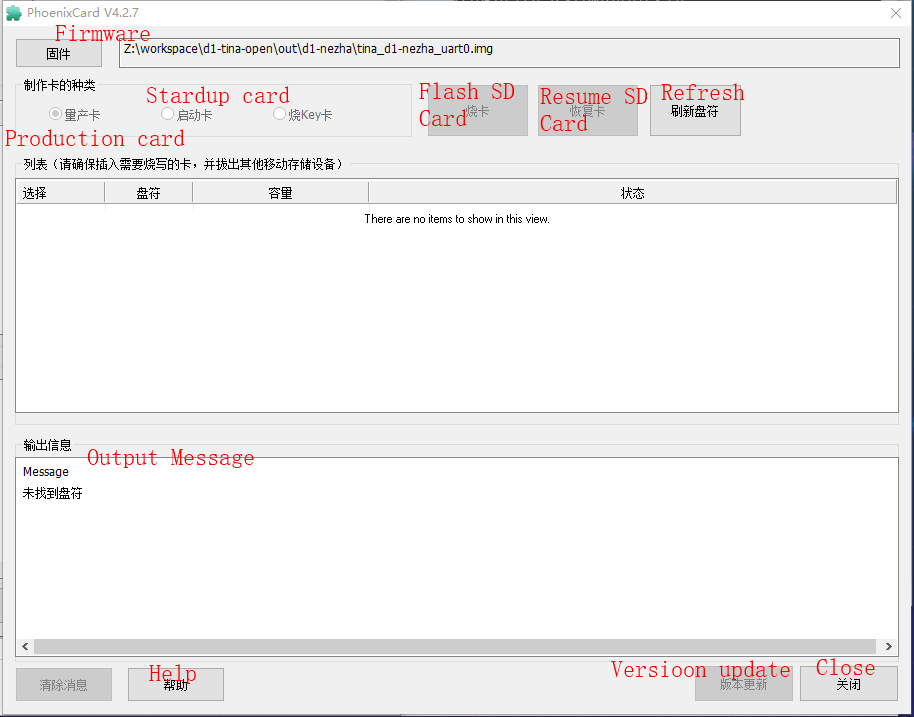
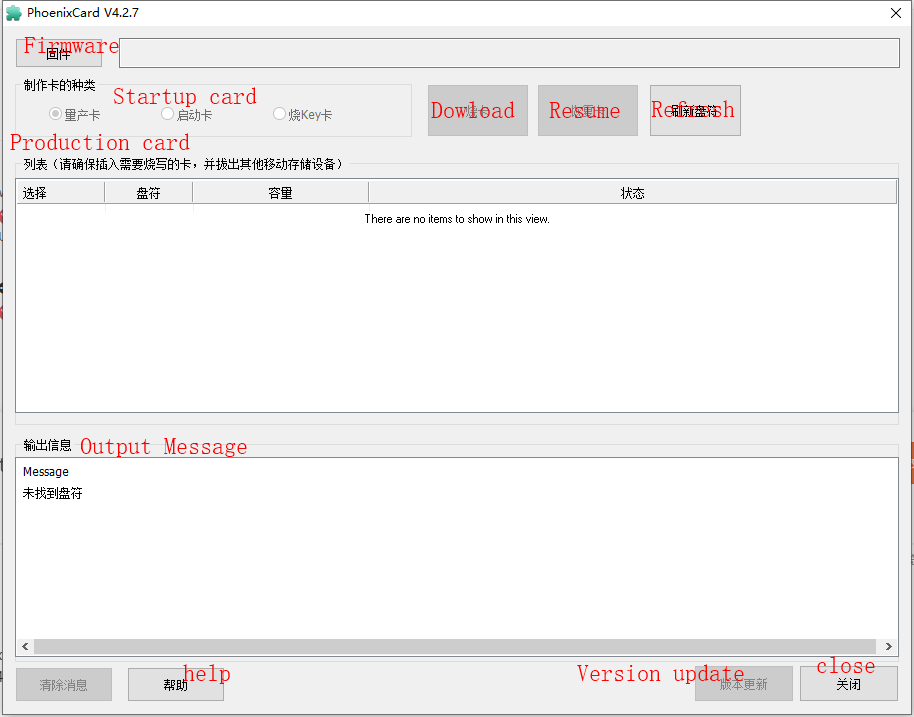
If you insert an SD card into your computer, the software interface is as follows.
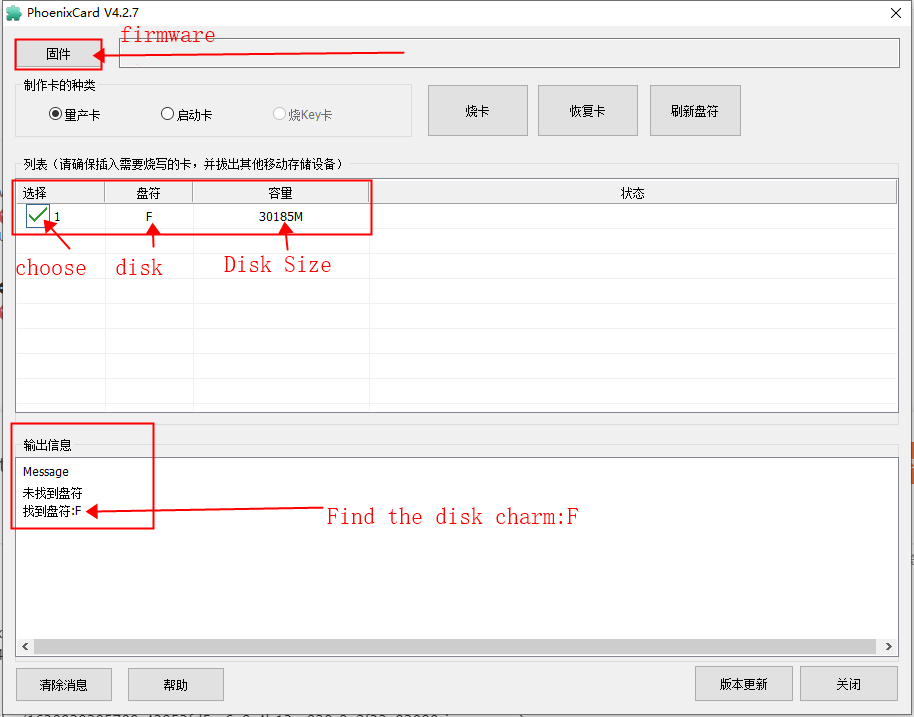
Now,you can choose the firmware that needs mass production.Follow the steps on the way to select and download.
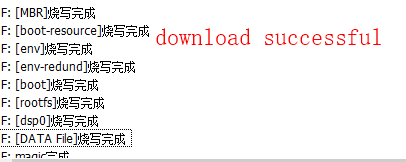
After clicking download, just wait for the end of the burning process.The following message will be output in the message bar:
-
Reply: 【模块第二弹】在哪吒D1上用IIC驱动OLED屏幕,实现系统资源监视器posted in MR Series
@ubuntu 做frambuffer驱动确实通用了
OLED屏幕不用太讲究吧
-
【模块第一弹】哪吒D1中GPIO及PWM使用posted in MR Series
前言
关于哪吒GPIO上节已经说过,不做过多展开,本次将上次没有伤处的代码一并上传。。。
使用步骤
查看原理图:

哪吒的PWM管脚为PD22,搜索这个管脚。
发现其连接的管脚为 PWM7 功能,我们直接按照文档,进入 /sys/class/pwm 使能其调试节点,发现在 enable 其功能时,出现 no device 没有设备功能。然后就发现
哪吒的PWM再dts 中并没有打开,所以需要进dts中打开,PWM的管脚功能。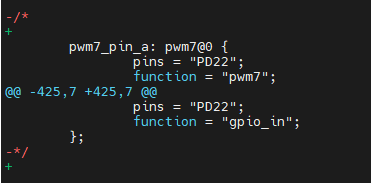
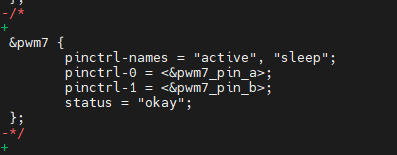
将pwm 7 被注释掉的功能打卡,重新编译。cconfig vim board.dts修改上面两处,将其注释打开。
croot
make -j32 && pack
重新编译 打包 烧录固件。
然后再做测试就没有问题了。
代码
make直接编译就好。
使用说明
硬件连接。
-
Reply: 【模块第二弹】在哪吒D1上用IIC驱动OLED屏幕,实现系统资源监视器posted in MR Series
代码的地方不是很明显,截图提示一下。附带一下编译教程(一步到位)
tar -zxvf oled_sys.tar.gz
cd oled_sys/
make -j4
生成文件为 main
-
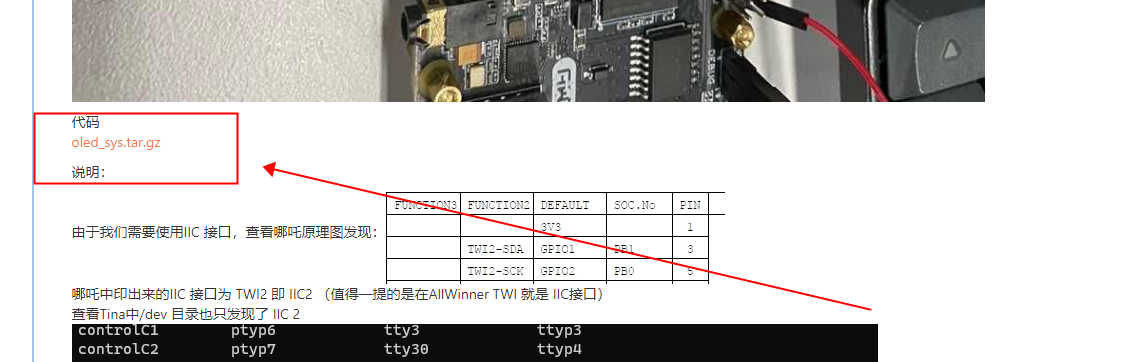
【模块第二弹】在哪吒D1上用IIC驱动OLED屏幕,实现系统资源监视器posted in MR Series
前言
最近正在为”毛胚车“改造计划准备模块,昨天准备了"旋转旺仔"需要的步进电机。今天成功驱动IIC OLED屏幕(虽然目前不知道干什么)那就暂且当作一个资源监视器吧。
效果图
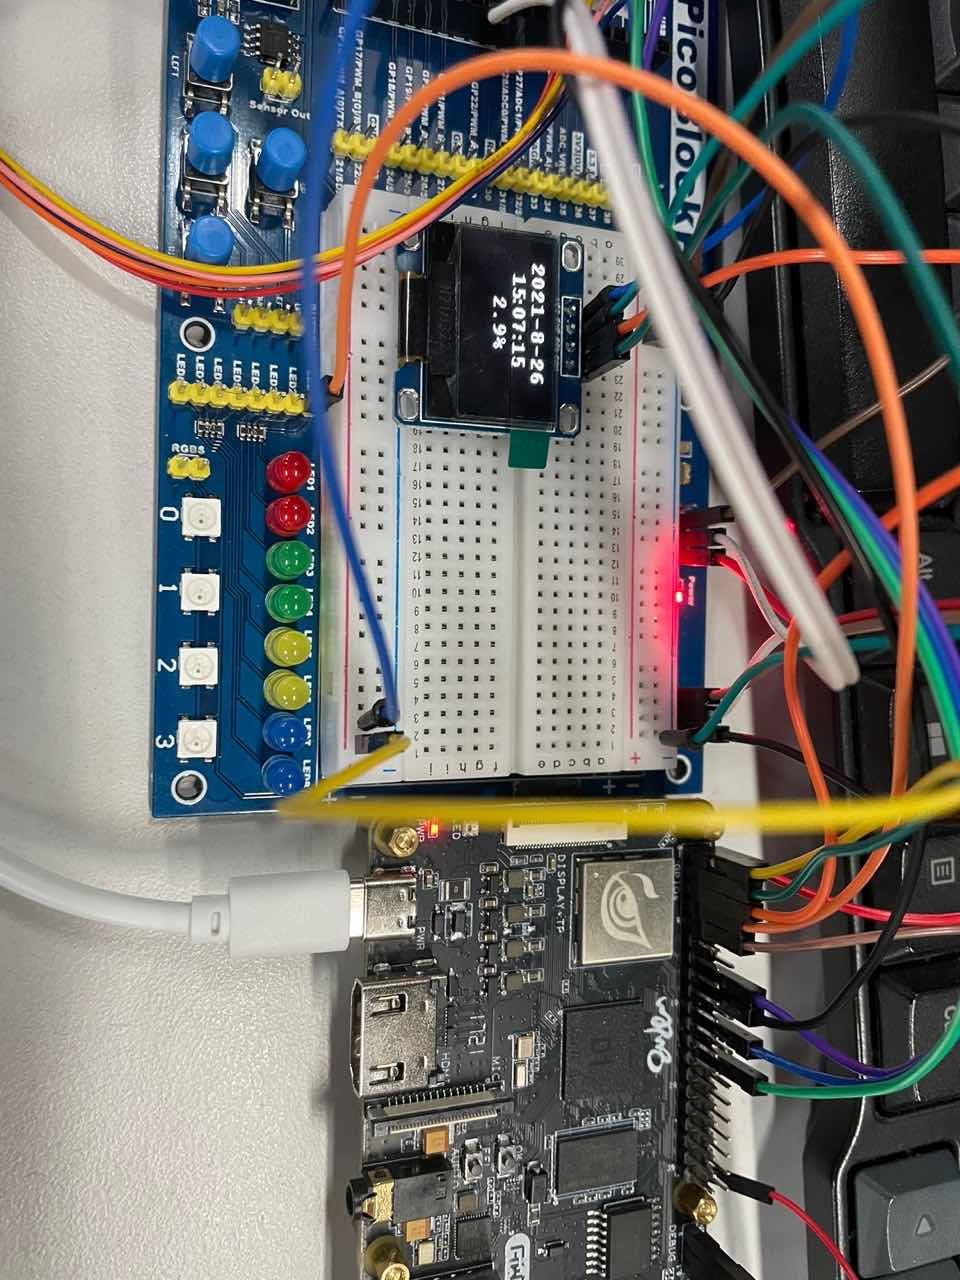
说明:
由于我们需要使用IIC 接口,查看哪吒原理图发现:
哪吒中印出来的IIC 接口为 TWI2 即 IIC2 (值得一提的是在AllWinner TWI 就是 IIC接口)
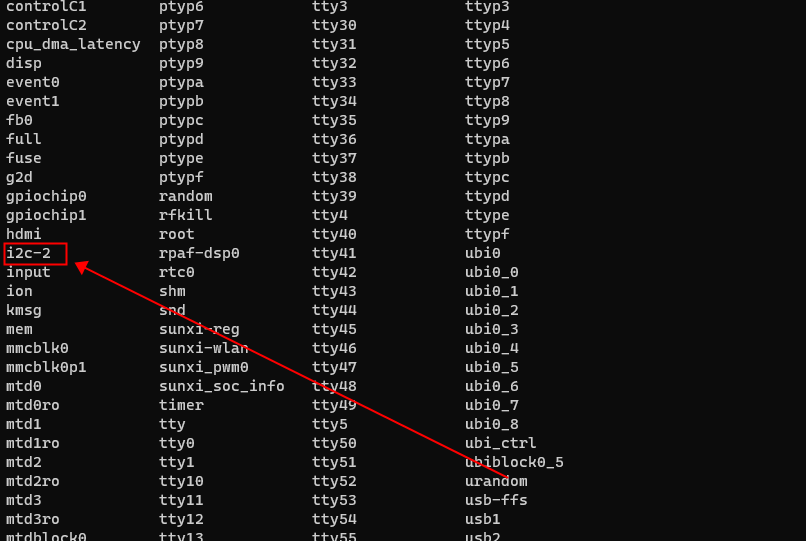
查看Tina中/dev 目录也只发现了 IIC 2
然后再试试iic 相关的指令,此时插上OLED 屏幕进行扫描:root@TinaLinux:/# i2cdetect -y 2 0 1 2 3 4 5 6 7 8 9 a b c d e f 00: -- -- -- -- -- -- -- -- -- -- -- -- -- 10: -- -- -- -- UU -- -- -- -- -- -- -- -- -- -- -- 20: -- -- -- -- -- -- -- -- -- -- -- -- -- -- -- -- 30: -- -- -- -- -- -- -- -- UU -- -- -- 3c -- -- -- 40: -- -- -- -- -- -- -- -- -- -- -- -- -- -- -- -- 50: -- -- -- -- -- -- -- -- -- -- -- -- -- -- -- -- 60: -- -- -- -- -- -- -- -- -- -- -- -- -- -- -- -- 70: -- -- -- -- -- -- -- --可以看到它已经检测到我们的OLED设备了,该设备地址为
0x3c。
知道了这些,我们就知道了 哪吒 是能够连接上他,并且驱动它的,那么下一步就是如何驱动的问题。
查看Tina Linux 关于IIC的文档,发现有如下代码:
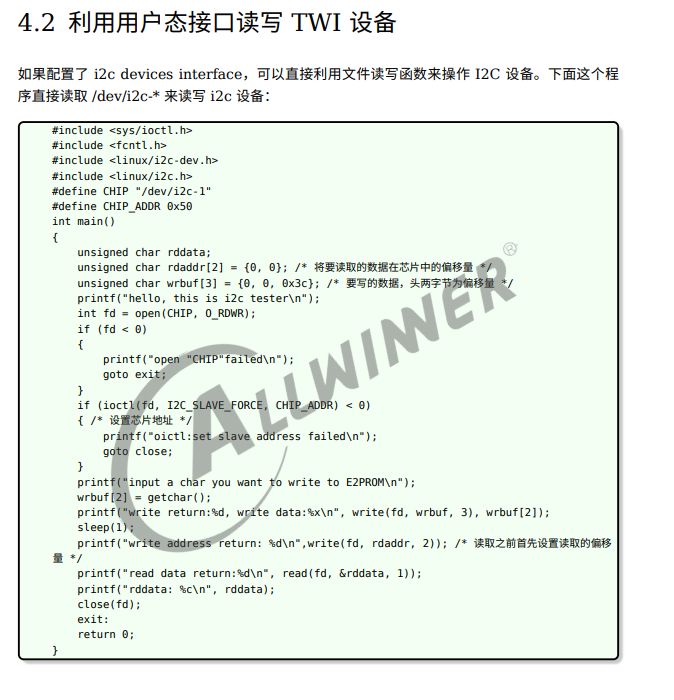
#include <sys/ioctl.h>
#include <fcntl.h>
#include <linux/i2c-dev.h>
#include <linux/i2c.h>
#define CHIP "/dev/i2c-1"
#define CHIP_ADDR 0x50
int main()
{
unsigned char rddata;
unsigned char rdaddr[2] = {0, 0}; /* 将要读取的数据在芯片中的偏移量 */
unsigned char wrbuf[3] = {0, 0, 0x3c}; /* 要写的数据,头两字节为偏移量 */
printf("hello, this is i2c tester\n");
int fd = open(CHIP, O_RDWR);
if (fd < 0)
{
printf("open "CHIP"failed\n");
goto exit;
}
if (ioctl(fd, I2C_SLAVE_FORCE, CHIP_ADDR) < 0)
{ /* 设置芯片地址 */
printf("oictl:set slave address failed\n");
goto close;
}
printf("input a char you want to write to E2PROM\n");
wrbuf[2] = getchar();
printf("write return:%d, write data:%x\n", write(fd, wrbuf, 3), wrbuf[2]);
sleep(1);
printf("write address return: %d\n",write(fd, rdaddr, 2)); /* 读取之前首先设置读取的偏移
量 */
printf("read data return:%d\n", read(fd, &rddata, 1));
printf("rddata: %c\n", rddata);
close(fd);
exit:
return 0;
}
该代码向我们演示了操作IIC设备的具体步骤,总结如下:
- 打开 /dev/i2c-* 节点
- 使用ioctl 设置从设备地址
- 使用 write or read 发送 or 读取数据
步骤我们知道了,下一步就是,驱动起来这块屏幕,使用单片机驱动这块屏幕的例程比较多,网上百度搜索随时就能搜到。那么,我们要做的修改就是需要将 IIC_WriteByte() 修改成再Tina 中对IIC设备进行写入数据的方法。并在初始化的时候打开设备节点,进行操作。
OK ,理论可行,开干。。

。。。。。。过程省略,哈哈哈哈哈
然后得到我在上面上传的压缩包。
-
Reply: 【DIY教程】用D1哪吒开发板把”毛坯车“改造成”全车智能“(更新中)posted in MR Series
今天开始开篇第一更!!!
这两天在研究哪吒外设,驱动外设,应用层驱动完善,现在来更新一下,关于细节我会详细单独开一条帖子进行说明。
关于 GPIO 的驱动方法看,上帖:用用D1上的GPIO(封装好的函数)https://bbs.aw-ol.com/topic/338/share/1
并将上述驱动进行了完善,目前使用方位为,使用函数来进行驱动,考虑到宏在使用的时候不安全,所以修改为使用函数来进行驱动。
除GPIO外,还用了哪吒的PWM,产生PWM的输出准备用来控制直流电机。
外设还在进一步驱动和完善。各位骚等,我们单独开帖见。

-
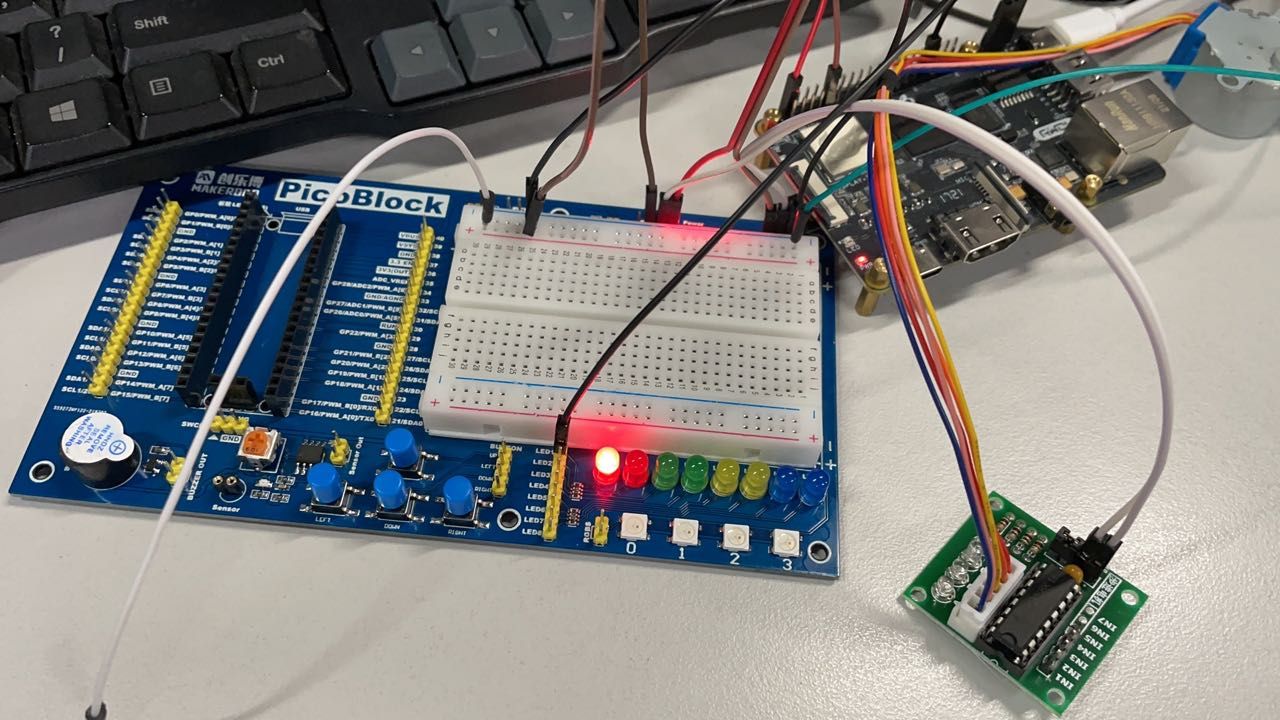
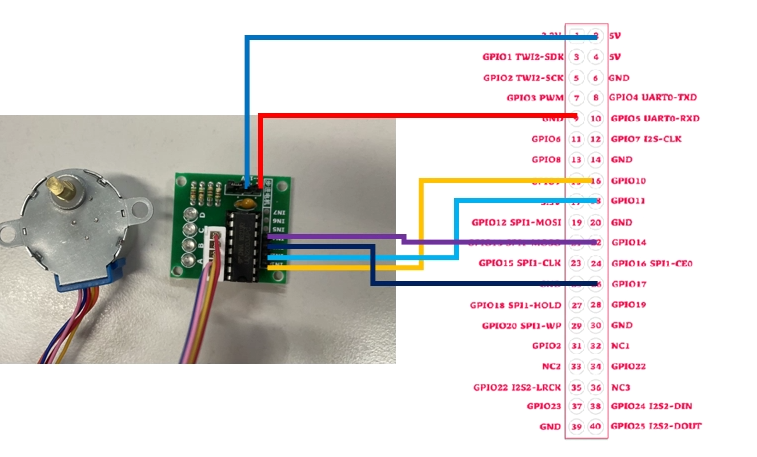
用用D1上的GPIO(封装好的函数)posted in MR Series
由于最近要使用GPIO,所以今天就把玩了一下D1的GPIO,在使用的时候需要注意,GPIO是否可用,有没有被其他模块使用,可以下载原理图进行查看,本着扩展IO肯定没模块用的心理,就直接上扩展IO了。
话不多说直接上代码,晚点发GitHub。
#ifndef MOTOR_H
#define MOTOR_H


#include <stdio.h>
#include <stdlib.h>
#include <unistd.h>
#include <sys/types.h>
#include <sys/stat.h>
#include <fcntl.h>

#define GPIO_PATH "/sys/class/gpio/gpio%d/value"
#define GPIO_FUNCTION_PATH "/sys/class/gpio/gpio%d/direction"


static int GPIO_Point_IN1_fd;
static int GPIO_Point_IN2_fd;
static int GPIO_Point_IN3_fd;
static int GPIO_Point_IN4_fd;


static unsigned char phasecw[4] = {0x08, 0x04, 0x02, 0x01};


//

#define GPIO_Point_IN1 2021
#define GPIO_Point_IN2 2022
#define GPIO_Point_IN3 2023
#define GPIO_Point_IN4 2024

#define GPIO_WRITEPIN(Point,value) (write(Point,value,1))

#define delay_ms(x)  (usleep(x*1000))

#define GPIO_Point_IN1_Set write(GPIO_Point_IN1_fd, "1", 1)
#define GPIO_Point_IN2_Set write(GPIO_Point_IN2_fd, "1", 1)
#define GPIO_Point_IN3_Set write(GPIO_Point_IN3_fd, "1", 1)
#define GPIO_Point_IN4_Set write(GPIO_Point_IN4_fd, "1", 1)

#define GPIO_Point_IN1_ReSet write(GPIO_Point_IN1_fd, "0", 1)
#define GPIO_Point_IN2_ReSet write(GPIO_Point_IN2_fd, "0", 1)
#define GPIO_Point_IN3_ReSet write(GPIO_Point_IN3_fd, "0", 1)
#define GPIO_Point_IN4_ReSet write(GPIO_Point_IN4_fd, "0", 1)


int Motor_Init();

void GPIO_WrietPin(int GPIO_Point,int GPIO_Value);
void MotorCW( void );
#endif
#include "Motor.h" static int export_fd, direction_fd, gpiovalue_fd; static int Motor_GPIO_Init(); static int Motor_GPIO_Function(); static int Motor_GPIO_File_FOK(); int Motor_Init(){ //1、检查文件是否存在 4 个 GPIO 都需要检查. if(-1 == Motor_GPIO_File_FOK()){ printf("Motor_GPIO_File creat Faild\n"); return -1; } //2、设置IO功能为 out if(-1 == Motor_GPIO_Function()){ printf("Motor_GPIO_Function set Faild \n"); return -1; } //2、IO file open return fd* if(-1 == Motor_GPIO_Init()){ printf("Motor_GPIO_File Open Faild \n"); return -1; } return 1; } void MotorCW( void ) { unsigned char i; unsigned char temp = 0; for( i = 0; i < 4; i++ ) { temp = phasecw[i]; // LD = ( temp >> 3 ) & 0x01; //取bit4的值 // LC = ( temp >> 2 ) & 0x01; // LB = ( temp >> 1 ) & 0x01; // LA = ( temp >> 0 ) & 0x01; //取bit0的值 GPIO_WrietPin(GPIO_Point_IN1, ( temp >> 3 ) & 0x01); GPIO_WrietPin(GPIO_Point_IN2, ( temp >> 2 ) & 0x01); GPIO_WrietPin(GPIO_Point_IN3, ( temp >> 1 ) & 0x01); GPIO_WrietPin(GPIO_Point_IN4, ( temp >> 0 ) & 0x01); delay_ms(2); } } void GPIO_WrietPin(int GPIO_Point,int GPIO_Value){ if(!(GPIO_Value == 0 || GPIO_Value == 1)){ printf("GPIO_Value Faild %d \n",GPIO_Value); return -1; } switch(GPIO_Point){ case GPIO_Point_IN1: //GPIO_WRITEPIN(GPIO_Point_IN1_fd,GPIO_Value); if(GPIO_Value) GPIO_Point_IN1_Set; else GPIO_Point_IN1_ReSet; break; case GPIO_Point_IN2: //GPIO_WRITEPIN(GPIO_Point_IN2_fd,GPIO_Value); if(GPIO_Value) GPIO_Point_IN2_Set; else GPIO_Point_IN2_ReSet; break; case GPIO_Point_IN3: //GPIO_WRITEPIN(GPIO_Point_IN3_fd,GPIO_Value); if(GPIO_Value) GPIO_Point_IN3_Set; else GPIO_Point_IN3_ReSet; break; case GPIO_Point_IN4: //GPIO_WRITEPIN(GPIO_Point_IN4_fd,GPIO_Value); if(GPIO_Value) GPIO_Point_IN4_Set; else GPIO_Point_IN4_ReSet; break; default: break; } } static int Motor_GPIO_File_FOK(){ char gpio_file_path[40] = {0}; char gpio_Point_File_Num[4] = {0}; sprintf(gpio_file_path,GPIO_PATH,GPIO_Point_IN1); sprintf(gpio_Point_File_Num,"%d",GPIO_Point_IN1); if(access(gpio_file_path,F_OK)){ printf("GPIO [%d] not find creat it \n ",GPIO_Point_IN1); export_fd = open("/sys/class/gpio/export", O_WRONLY); if(-1 == export_fd) { printf("[%s]:[%d] open gpio export file error\r\n", __FUNCTION__, __LINE__); return -1; } if(-1 == write(export_fd, gpio_Point_File_Num, 4)) { printf("write file operation error\r\n"); return -1; } close(export_fd); } sprintf(gpio_file_path,GPIO_PATH,GPIO_Point_IN2); sprintf(gpio_Point_File_Num,"%d",GPIO_Point_IN2); if(access(gpio_file_path,F_OK)){ printf("GPIO [%d] not find creat it \n ",GPIO_Point_IN2); export_fd = open("/sys/class/gpio/export", O_WRONLY); if(-1 == export_fd) { printf("[%s]:[%d] open gpio export file error\r\n", __FUNCTION__, __LINE__); return -1; } if(-1 == write(export_fd, gpio_Point_File_Num, 4)) { printf("write file operation error\r\n"); return -1; } close(export_fd); } sprintf(gpio_file_path,GPIO_PATH,GPIO_Point_IN3); sprintf(gpio_Point_File_Num,"%d",GPIO_Point_IN3); if(access(gpio_file_path,F_OK)){ printf("GPIO [%d] not find creat it \n ",GPIO_Point_IN3); export_fd = open("/sys/class/gpio/export", O_WRONLY); if(-1 == export_fd) { printf("[%s]:[%d] open gpio export file error\r\n", __FUNCTION__, __LINE__); return -1; } if(-1 == write(export_fd, gpio_Point_File_Num, 4)) { printf("write file operation error\r\n"); return -1; } close(export_fd); } sprintf(gpio_file_path,GPIO_PATH,GPIO_Point_IN4); sprintf(gpio_Point_File_Num,"%d",GPIO_Point_IN4); if(access(gpio_file_path,F_OK)){ printf("GPIO [%d] not find creat it \n ",GPIO_Point_IN4); export_fd = open("/sys/class/gpio/export", O_WRONLY); if(-1 == export_fd) { printf("[%s]:[%d] open gpio export file error\r\n", __FUNCTION__, __LINE__); return -1; } if(-1 == write(export_fd, gpio_Point_File_Num, 4)) { printf("write file operation error\r\n"); return -1; } close(export_fd); } return 1; } static int Motor_GPIO_Function(){ char GPIO_Function_Path[40] = {0}; sprintf(GPIO_Function_Path,GPIO_FUNCTION_PATH,GPIO_Point_IN1); direction_fd = open(GPIO_Function_Path, O_WRONLY); if(-1 == direction_fd) { printf("[%s]:[%d] open gpio direction file error\r\n", __FUNCTION__, __LINE__); return -1; } if(-1 == write(direction_fd, "out", sizeof("out"))) { printf("[%s]:[%d] write operation direction error\r\n", __FUNCTION__, __LINE__); close(direction_fd); return -1; } close(direction_fd); sprintf(GPIO_Function_Path,GPIO_FUNCTION_PATH,GPIO_Point_IN2); direction_fd = open(GPIO_Function_Path, O_WRONLY); if(-1 == direction_fd) { printf("[%s]:[%d] open gpio direction file error\r\n", __FUNCTION__, __LINE__); return -1; } if(-1 == write(direction_fd, "out", sizeof("out"))) { printf("[%s]:[%d] write operation direction error\r\n", __FUNCTION__, __LINE__); close(direction_fd); return -1; } close(direction_fd); sprintf(GPIO_Function_Path,GPIO_FUNCTION_PATH,GPIO_Point_IN3); direction_fd = open(GPIO_Function_Path, O_WRONLY); if(-1 == direction_fd) { printf("[%s]:[%d] open gpio direction file error\r\n", __FUNCTION__, __LINE__); return -1; } if(-1 == write(direction_fd, "out", sizeof("out"))) { printf("[%s]:[%d] write operation direction error\r\n", __FUNCTION__, __LINE__); close(direction_fd); return -1; } close(direction_fd); sprintf(GPIO_Function_Path,GPIO_FUNCTION_PATH,GPIO_Point_IN4); direction_fd = open(GPIO_Function_Path, O_WRONLY); if(-1 == direction_fd) { printf("[%s]:[%d] open gpio direction file error\r\n", __FUNCTION__, __LINE__); return -1; } if(-1 == write(direction_fd, "out", sizeof("out"))) { printf("[%s]:[%d] write operation direction error\r\n", __FUNCTION__, __LINE__); close(direction_fd); return -1; } close(direction_fd); return 1; } // int GPIO_Point_IN1_fd; // int GPIO_Point_IN2_fd; // int GPIO_Point_IN3_fd; // int GPIO_Point_IN4_fd; static int Motor_GPIO_Init(){ char gpio_file_path[40] = {0}; sprintf(gpio_file_path,GPIO_PATH,GPIO_Point_IN1); GPIO_Point_IN1_fd = open(gpio_file_path, O_WRONLY); //RDWR if(-1 == GPIO_Point_IN1_fd) { printf("[%s]:[%d]: open value file error\r\n", __FUNCTION__, __LINE__); return -1; } sprintf(gpio_file_path,GPIO_PATH,GPIO_Point_IN2); GPIO_Point_IN2_fd = open(gpio_file_path, O_WRONLY); //RDWR if(-1 == GPIO_Point_IN2_fd) { printf("[%s]:[%d]: open value file error\r\n", __FUNCTION__, __LINE__); return -1; } sprintf(gpio_file_path,GPIO_PATH,GPIO_Point_IN3); GPIO_Point_IN3_fd = open(gpio_file_path, O_WRONLY); //RDWR if(-1 == GPIO_Point_IN3_fd) { printf("[%s]:[%d]: open value file error\r\n", __FUNCTION__, __LINE__); return -1; } sprintf(gpio_file_path,GPIO_PATH,GPIO_Point_IN4); GPIO_Point_IN4_fd = open(gpio_file_path, O_WRONLY); //RDWR if(-1 == GPIO_Point_IN4_fd) { printf("[%s]:[%d]: open value file error\r\n", __FUNCTION__, __LINE__); return -1; } return 1; }CC := riscv64-unknown-linux-gnu-gcc target = Motor LDFLAGS ?= -lm CFLAGS ?= -I . CSRCS += Motor.c MAINSRC = ./main.c all : default OBJEXT ?= .o COBJS = $(CSRCS:.c=$(OBJEXT)) MAINOBJ = $(MAINSRC:.c=$(OBJEXT)) # SRCS = $(CSRCS) $(MAINSRC)s %.o: %.c @$(CC) $(CFLAGS) -c $< -o $@ @echo "CC $<" default: $(COBJS) $(MAINOBJ) $(CC) -o $(target) $(MAINOBJ) $(COBJS) $(LDFLAGS) clean: rm -f $(target) $(AOBJS) $(COBJS) $(MAINOBJ)
-
Reply: 全志开发板GPIO名命规范(全系列通用)posted in MR Series
emmmm.... 还没有关注D1本身的IO是否可以用目前先,用扩展IO做了一个测试。
#include <stdio.h>
#include <stdlib.h>
#include <unistd.h>
#include <sys/types.h>
#include <sys/stat.h>
#include <fcntl.h>


int main(int argc ,char *argv[]){

    char value;
    int export_fd, direction_fd, gpiovalue_fd;

    if(access("/sys/class/gpio/gpio2023/value",F_OK))
    {
        printf("GPIO value not find creat it \n ");
        export_fd = open("/sys/class/gpio/export", O_WRONLY);
        if(-1 == export_fd)
        {
                printf("[%s]:[%d] open gpio export file error\r\n", __FUNCTION__, __LINE__);
                exit(1);
        }
        if(-1 == write(export_fd, "2022", 4))
        {
                printf("write file operation error\r\n");
                exit(1);
        }
        close(export_fd);
        //sleep(2000);
        direction_fd = open("/sys/class/gpio/gpio2022/direction", O_WRONLY);
        if(-1 == direction_fd)
        {
                printf("[%s]:[%d] open gpio direction file error\r\n", __FUNCTION__, __LINE__);

                exit(1);
        }
        if(-1 == write(direction_fd, "out", sizeof("out")))
        {
                printf("[%s]:[%d] write operation direction error\r\n", __FUNCTION__, __LINE__);
                close(direction_fd);
                exit(1);
        }
        close(direction_fd);
        printf("[%s]:[%d] debug information print\r\n", __FUNCTION__, __LINE__);
    }
    else {
        gpiovalue_fd = open("/sys/class/gpio/gpio2022/value", O_RDWR);  //RDWR
        if(-1 == gpiovalue_fd)
        {
                printf("[%s]:[%d]: open value file error\r\n", __FUNCTION__, __LINE__);
                exit(1);
        }
        printf("file open success! \n");
        while(1)
        {
            if(-1 == write(gpiovalue_fd, "1", 1))
                {
                    printf("[%s]:[%d] write operation direction error\r\n", __FUNCTION__, __LINE__);
                    close(gpiovalue_fd);
                    exit(1);
                }
              usleep(500000);

            //write(gpiovalue_fd, "1", sizeof("1"));
            //write(gpiovalue_fd, "0", sizeof("0"));
            if(-1 == write(gpiovalue_fd, "0", 1))
            {
                printf("[%s]:[%d] write operation direction error\r\n", __FUNCTION__, __LINE__);
                close(gpiovalue_fd);
                exit(1);
            }
            usleep(500000);

            // system("echo 1 > /sys/class/gpio/gpio2022/value");
            // usleep(500000);
            // system("echo 0 > /sys/class/gpio/gpio2022/value");
            // usleep(500000);

        }
        close(gpiovalue_fd);
    }

}
-
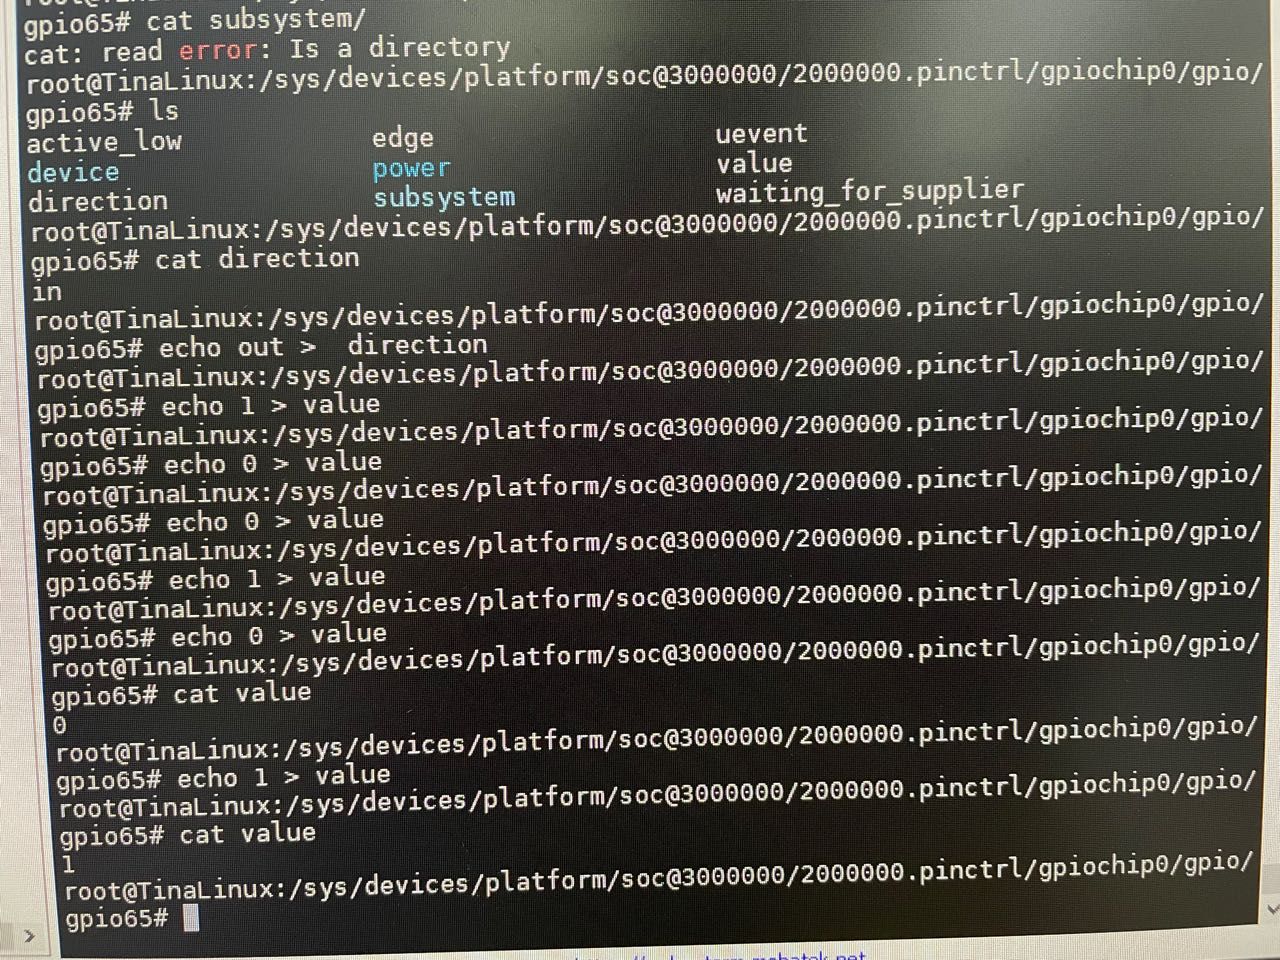
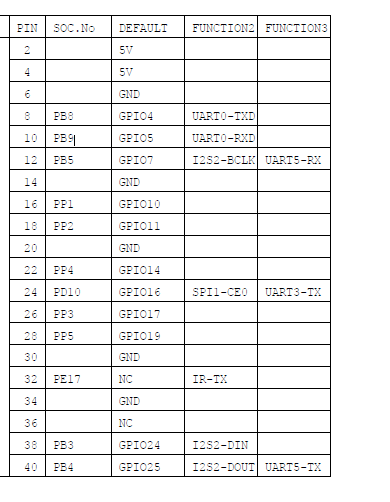
全志开发板GPIO名命规范(全系列通用)posted in MR Series
今天想要使用哪吒的GPIO,查看原理图,其GPIO数字如图:
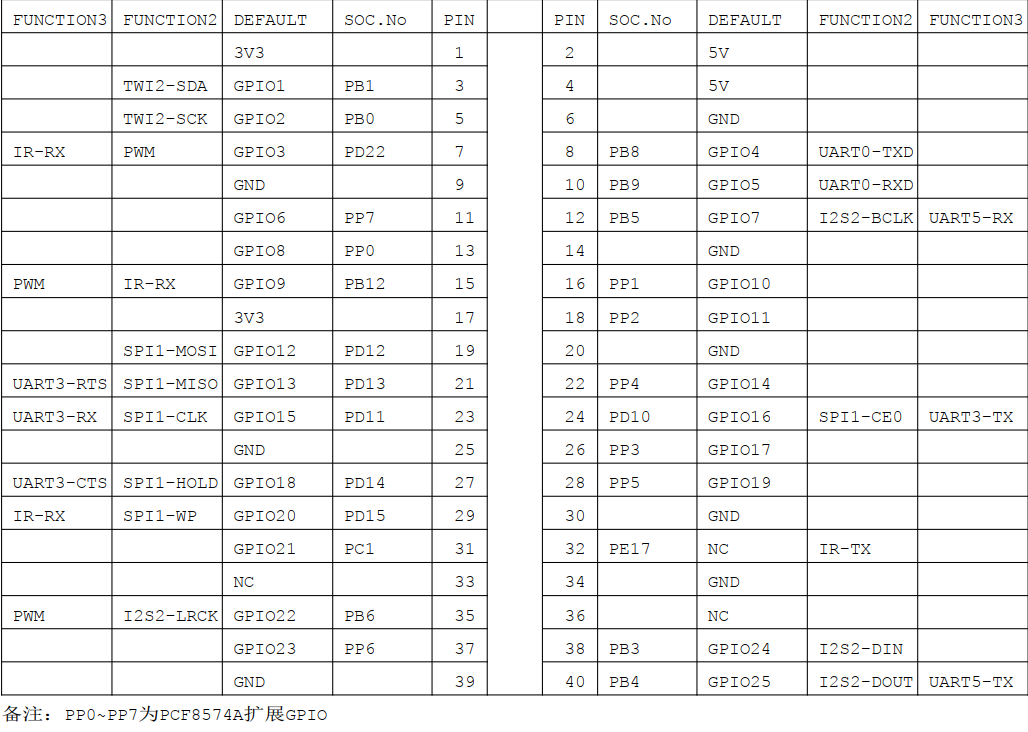
使用芯片扩展出来的IO为 PP*。 在原理图上标注出来的 IO,为 GPIO* 这个序号,查看文档,要阿紫用户空间使用GPIO需要先将GPIO从内核空间映射出来(此处为 PinCtl 驱动所做的事情)经过一番询问,发现Tina的GPIO的空间中,其引脚是按照字母的GPIO的映射空间每组32个,所以按照这种说法,PC1 在硬件上是GPIO 21 但是在系统中应该是65 所以 应该是
echo 65 > export此时就会多出来一个文件夹,gpio65.
进入该文件夹就可以对该IO口进行操作。
操作方式明天更新。。。。。照片开了实况上床上看不到。。。。。


 豪
豪