导航

    全志在线开发者论坛

    • 注册
    • 登录
    • 搜索
    • 版块
    • 话题
    • 在线文档
    • 社区主页
    1. 主页
    2. Negro
    N
    • 资料
    • 关注 0
    • 粉丝 2
    • 我的积分 2312
    • 主题 9
    • 帖子 36
    • 最佳 5
    • 群组 0

    NegroLV 5

    @Negro

    2312
    积分
    9
    声望
    26
    资料浏览
    36
    帖子
    2
    粉丝
    0
    关注
    注册时间 最后登录

    Negro 取消关注 关注

    Negro 发布的最佳帖子

    • 回复: Tina文件系统添加了一些文件后,rootfs编译不过

      @yuzukitsuru
      我通过以下办法将找到相关的库了
      1、通过apt-cache search命令查找到libc.so.6的共享库,然后安装。还有libstdc++.so.6的库也可以这样装,最终安装好的库会在电脑的/usr/arm-linux-gnueabi/lib/下,然后复制到/tina-v853/openwrt/target/v853/v853-vision/busybox-init-base-files/lib里面。

      gray@PC:~/sdk/tina-v853$ apt-cache search libc | grep armel
      libc6-armel-armhf-cross - Dummy package to get libc6:armel installed
      libc6-armel-cross - GNU C Library: Shared libraries (for cross-compiling)
      libc6-armhf-armel-cross - Dummy package to get libc6:armhf installed
      libc6-dbg-armel-cross - GNU C Library: detached debugging symbols (for cross-compiling)
      libc6-dev-armel-armhf-cross - Dummy package to get libc6-dev:armel installed
      libc6-dev-armel-cross - GNU C Library: Development Libraries and Header Files (for cross-compiling)
      libc6-dev-armhf-armel-cross - Dummy package to get libc6-dev:armhf installed
      linux-libc-dev-armel-cross - Linux Kernel Headers for development (for cross-compiling)
      
      gray@PC:~/sdk/tina-v853$ sudo apt-get install -y libc6-armel-cross
      

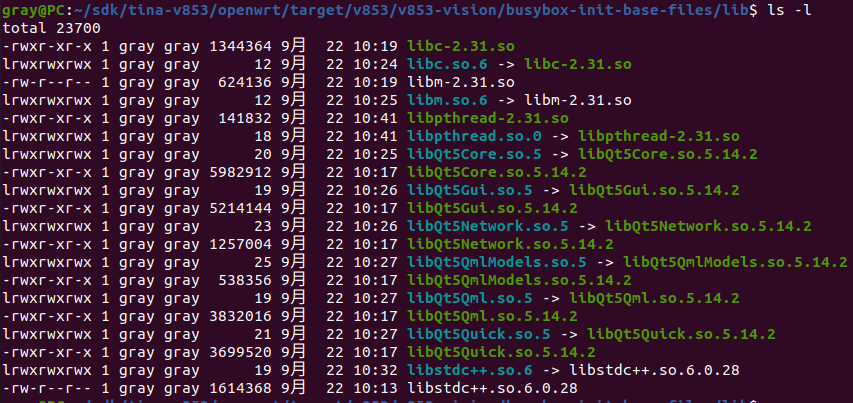
      2、还缺少QT的库,我之前也交叉编译好了QT库的,所以直接将QT相关的库复制到/tina-v853/openwrt/target/v853/v853-vision/busybox-init-base-files/lib里面。
      91843a04-31d9-489b-ab76-886d3a9d38e3-image.png

      3、接着./build.sh编译固件。然后就发现个比较蛋疼的问题。我添加的libstdc++.so.6和原有的冲突了。如果在busybox-init-base-files/lib里面去掉这个库,编译又报错说少了这个库。

      。。。。。。
      Configuring wpa-cli.
      Configuring liblua5.1.5.
      Configuring wifimanager-demo.
      Configuring blkid.
      Configuring alsa-utils.
      Configuring lv_g2d_test.
      Configuring wireless-regdb.
      Configuring kmod-cfg80211.
      Collected errors:
       * check_data_file_clashes: Package busybox-init-base-files wants to install file /home/gray/sdk/tina-v853/out/v853/vision/openwrt/build_dir/target/root-v853-vision/lib/libstdc++.so.6
      	But that file is already provided by package  * libstdcpp6
       * opkg_install_cmd: Cannot install package busybox-init-base-files.
      package/Makefile:66: recipe for target 'package/install' failed
      make[2]: *** [package/install] Error 255
      make[2]: Leaving directory '/home/gray/sdk/tina-v853/openwrt/openwrt'
      package/Makefile:111: recipe for target '/home/gray/sdk/tina-v853/openwrt/openwrt/staging_dir/target/stamp/.package_install' failed
      make[1]: *** [/home/gray/sdk/tina-v853/openwrt/openwrt/staging_dir/target/stamp/.package_install] Error 2
      make[1]: Leaving directory '/home/gray/sdk/tina-v853/openwrt/openwrt'
      /home/gray/sdk/tina-v853/openwrt/openwrt/include/toplevel.mk:236: recipe for target 'world' failed
      make: *** [world] Error 2
      make: Leaving directory '/home/gray/sdk/tina-v853/openwrt/openwrt'
      INFO: build_openwrt_rootfs failed
      

      4、所以有什么办法可以搞定这个libstdc++.so.6库的冲突问题呢?
      5、还有个疑问点:我试了直接将编译好的QT库放到板子上,是可以正常使用QT的。证明我不用额外添加依赖库编译出来的固件环境是可以支持QT的。为什么将QT程序放到sdk里面编译固件,反而要添加额外的依赖库呢?

      发布在 V Series
      N
      Negro
    • V853 buildroot系统,SPI通信超时

      spi从设备是20MHz的频率,CS是低电平有效。dts配置如下:

      &spi3 {
          clock-frequency = <100000000>;
          pinctrl-0 = <&spi3_pins_a &spi3_pins_b>;
          pinctrl-1 = <&spi3_pins_c>;
          pinctrl-names = "default", "sleep";
          spi_slave_mode = <0>;
          spi_dbi_enable = <1>;
          spi_cs_bitmap = <1>;
          spi3_cs_number = <1>;
          status = "okay";
      
          spidev@0 {
              device_type = "spidev";
              compatible = "rohm,dh2228fv";
              spi-max-frequency = <100000000>;
              reg = <0x0>;
              spi-cs-high;
              spi-rx-bus-width = <0x8>;
              spi-tx-bus-width = <0x8>;
              status = "okay";
          };
      };
      
      ...
      
          spi3_pins_a: spi3@0 {
              allwinner,pins = "PH11", "PH12", "PH13";
              allwinner,pname = "spi3_sclk", "spi3_mosi","spi3_miso";
              allwinner,function = "spi3";
              allwinner,muxsel = <6>; 
              allwinner,drive = <1>; 
              allwinner,pull = <0>; 
          };   
      
          spi3_pins_b: spi3@1 {
              allwinner,pins = "PH14";
              allwinner,pname = "spi3_cs0";
              allwinner,function = "spi3";
              allwinner,muxsel = <6>; 
              allwinner,drive = <1>; 
              allwinner,pull = <1>;   // only CS should be pulled up
          };   
      
          spi3_pins_c: spi3@2 {
              allwinner,pins = "PH11", "PH12", "PH13", "PH14";
              allwinner,function = "io_disabled";
              allwinner,muxsel = <0xf>;
              allwinner,drive = <1>; 
              allwinner,pull = <0>; 
          }; 
      

      测试程序是这样的:

      #include <stdint.h>
      #include <unistd.h>
      #include <stdio.h>
      #include <stdlib.h>
      #include <getopt.h>
      #include <fcntl.h>
      #include <sys/ioctl.h>
      #include <linux/types.h>
      #include <linux/spi/spidev.h>
       
      static uint8_t mode = 0; /* SPI通信使用全双工,设置CPOL=0,CPHA=0。 */
      static uint8_t bits = 8; /* 8bits读写,MSB first。*/
      static uint32_t speed = 20 * 1000 * 1000;/* 设置20M传输速度 */
      static uint16_t delay = 0;
      static int g_SPI_Fd = 0;
      
      unsigned char r_buf[256];
      unsigned char w_buf[256];
      
      int SPI_Write(uint8_t *TxBuf, int len)
      {
          int ret;
          int fd = g_SPI_Fd;
       
          ret = write(fd, TxBuf, len);
          if (ret < 0)
              printf("SPI Write error\n");
          else
          {
              int i;
              printf("\nSPI Write [Len:%d]: ", len);
              for (i = 0; i < len; i++)
              {
                  if (i % 8 == 0)
                  printf("\n\t");
                  printf("0x%02X ", TxBuf[i]);
              }
              printf("\n");
          }
      
          return ret;
      }
      
      
      static int SPI_Open(const char* device)
      {
          int fd;
          int ret = 0;
      
          if (g_SPI_Fd != 0) /* 设备已打开 */
              return 0xF1;
      
          fd = open(device, O_RDWR);
          if (fd < 0)
              printf("can't open device");
          else
              printf("SPI - Open Succeed. Start Init SPI...\n");
      
          g_SPI_Fd = fd;
          /*
           * spi mode
           */
          ret = ioctl(fd, SPI_IOC_WR_MODE, &mode);
          if (ret == -1)
              printf("can't set spi mode");
            ret = ioctl(fd, SPI_IOC_RD_MODE, &mode);
          if (ret == -1)
              printf("can't get spi mode");
      
          /*
           * bits per word
           */
          ret = ioctl(fd, SPI_IOC_WR_BITS_PER_WORD, &bits);
          if (ret == -1)
              printf("can't set bits per word");
      
          ret = ioctl(fd, SPI_IOC_RD_BITS_PER_WORD, &bits);
          if (ret == -1)
              printf("can't get bits per word");
      
          /*
           * max speed hz
           */
          ret = ioctl(fd, SPI_IOC_WR_MAX_SPEED_HZ, &speed);
          if (ret == -1)
              printf("can't set max speed hz");
      
          ret = ioctl(fd, SPI_IOC_RD_MAX_SPEED_HZ, &speed);
          if (ret == -1)
              printf("can't get max speed hz");
      
          printf("spi mode: %d\n", mode);
          printf("bits per word: %d\n", bits);
          printf("max speed: %d KHz (%d MHz)\n", speed / 1000, speed / 1000 / 1000);
      
          return ret;
      }
      
      
      int SPI_Close(void)
      {
          int fd = g_SPI_Fd;
              if (fd == 0) /* SPI是否已经打开*/
              return 0;
          close(fd);
          g_SPI_Fd = 0;
      
          return 0;
      }
      
      
      int main(int argc, char* argv[])
      {
          char *str="hello";
          int len = 5;
          SPI_Open("/dev/spidev3.0");
          SPI_Write(str, len);
          SPI_Close();
          return 0;
      }


      交叉编译后放到板子上运行,会出现这样的超时报错,想问问看各位有没有什么思路解决,十分感谢。

      root:/root# ./spi
      SPI - Open Succeed. Start Init S[  586.085918] spi_set_clk()459 - set spi clock 100000000, mclk 20000000
      PI...
      [  586.095997] spi_set_clk()459 - set spi clock 100000000, mclk 100000000
      [  586.104382] spi_set_clk()459 - set spi clock 20000000, mclk 100000000
      spi mode: 0[  586.111792] sunxi_spi_transfer_one()1433 - [spi3] begin transfer, txbuf df6ab000, rxbuf   (null), len 5
      
      bits per word: 8
      max speed: 2[  586.123289] spi_set_clk()459 - set spi clock 20000000, mclk 20000000
      0000 KHz (20 MHz)
      [  586.133363] sunxi_spi_mode_check()1166 - [spi3] Single mode Half duplex tx
      [  586.142730] spi_config_dbi()376 - DBI mode configurate : 40
      [  586.148979] sunxi_spi_xfer()1376 - [spi3] tx -> by ahb
      [  586.155060] sunxi_spi_cpu_writel()1250 - t->len = 5
      [  586.160602] 000: 68 65 6c 6c 6f
      [  596.275684] sunxi_spi_cpu_writel()1276 - [spi3] cpu transfer data time out!
      [  596.283516] sunxi_spi_transfer_one()1462 - [spi3] dump reg:
      [  596.289762] 0x04028000: 00010001 00000098 00002104 00000000
      [  596.296582] 0x04028010: 00000000 00000012 00200020 000f0000
      [  596.303189] 0x04028020: 00000000 00000002 00002000 00000000
      [  596.309535] 0x04028030: 00000005 00000005 00000005 00000000
      [  601.351828] sunxi_spi_transfer_one()1471 - [spi3] xfer timeout
      [  601.358391] spidev spi3.0: SPI transfer failed: -1
      [  601.364475] spi_master spi3: failed to transfer one message from queue
      SPI Write error
      

      启动时的spi log

      [    0.650370] sunxi_spi_probe()2251 - [spi3] SPI DBI INTERFACE
      [    0.656168] sunxi_spi_probe()2260 - [spi3] SPI MASTER MODE
      [    0.661799] sunxi_spi_resource_get()1909 - Failed to get sample mode
      [    0.668268] sunxi_spi_resource_get()1914 - Failed to get sample delay
      [    0.674824] sunxi_spi_resource_get()1918 - sample_mode:aaaaffff sample_delay:aaaaffff
      [    0.682785] spi3 supply spi not found, using dummy regulator
      [    0.688624] sunxi_spi_request_gpio()1884 - [spi3] Pinctrl init spi3
      [    0.695128] sunxi_spi_clk_init()1955 - [spi3] mclk 100000000
      [    0.701466] spi_master spi3: spi-tx-bus-width 8 not supported
      [    0.707476] spi_master spi3: spi-rx-bus-width 8 not supported
      [    0.713865] sunxi_spi_probe()2340 - [spi3]: driver probe succeed, base e0834000, irq 295
      
      
      发布在 V Series
      N
      Negro
    • 回复: Tina文件系统添加了一些文件后,rootfs编译不过

      @yuzukitsuru

      gray@PC:~/sdk/tina-v853/openwrt/openwrt$ git diff
      diff --git a/include/toplevel.mk b/include/toplevel.mk
      index defd5cb..12023b6 100644
      --- a/include/toplevel.mk
      +++ b/include/toplevel.mk
      @@ -233,7 +233,7 @@ ifeq ($(SDK),1)
       else
       
       %::
      -       @+$(PREP_MK) $(NO_TRACE_MAKE) -r -s prereq
      +       @+$(PREP_MK) $(NO_TRACE_MAKE) -r -s V=sc prereq
              @( \
                      cp .config tmp/.config; \
                      ./scripts/config/conf $(KCONF_FLAGS) --defconfig=tmp/.config -w tmp/.config Config.in > /dev/null 2>&1; \
      

      我在toplevel.mk里面加了V=sc,是可以看到说少了这些库,我应该怎么弄到文件系统里面呢?

      6b906536-d3de-47e6-b42f-60626ad73375-image.png

      发布在 V Series
      N
      Negro
    • 回复: V853 openwrt系统,make menuconfig打开Allwinner > Visiol>LibAWIspApi 报错

      我也遇到类似的问题,请问有解决吗?官方有没有办出来帮忙解惑一下呢?🤕

      发布在 V Series
      N
      Negro
    • 回复: Tina文件系统添加了一些文件后,rootfs编译不过

      实在找不到办法,我就直接把openwrt/include/package-ipkg.mk文件中的判断给删掉了,然后也编译出了固件,系统可以正常使用。就是QT现在启动的时候会被ramdon进程阻塞,开机自动启动QT的话,要等好久。

      发布在 V Series
      N
      Negro

    Negro 发布的最新帖子

    • 回复: OKT507-C V2.1 的HDMI怎么输出4K?

      @haaland T507不支持真实的4K显示,硬件受限最大支持2k的buffer。所以超过2k的图片就无法显示

      发布在 飞凌嵌入式专区
      N
      Negro
    • 回复: 请问D1-H怎样只更新uboot呢?

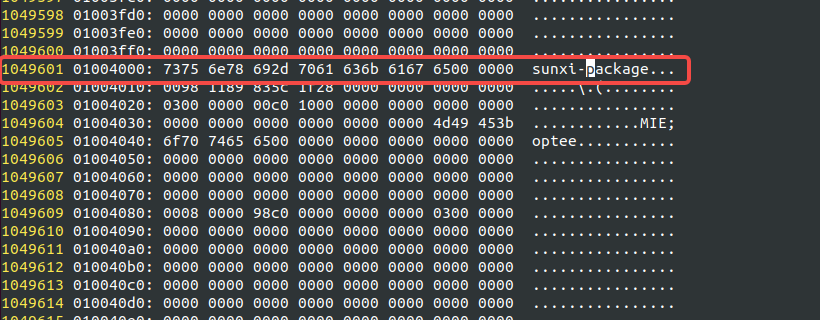
      @daizebin 应该是uboot的代码被打包在boot_package.fex里面了,所以直接dd boot_package.fex就可以了。偏移地址计算方法其实时没错的,是我看错了boot_package.fex数据的起始地址。正确的应该是这个:

      9a2d0d8d-fce3-4122-b4c1-b49d80a1208e-image.png

      0x01004000 等于10进制的16793600, 16793600 / 1024 = 16400kbyte

      发布在 MR Series
      N
      Negro
    • 回复: 请问D1-H怎样只更新uboot呢?

      哎呀呀,终于成功啦。原来是我之前地址看错了,导致偏移地址也算错了。
      直接dd boot_package.fex 到对应地址就可以了。我执行的命令是
      dd if=boot_package.fex of=/dev/mmcblk0 bs=1k seek=16400

      发布在 MR Series
      N
      Negro
    • 回复: 请问D1-H怎样只更新uboot呢?

      @whycan 请问下晕哥你是从哪里找得到偏移地址的?
      我是这样找的
      1、在正常运行的板子上dd出30M的数据出来

      root:/# dd if=/dev/mmcblk0 of=test.img bs=1M count=30
      30+0 records in
      30+0 records out
      

      2、用vim打开这个test.img,然后用16进制的方式查看数据(vim中执行:%!xxd)
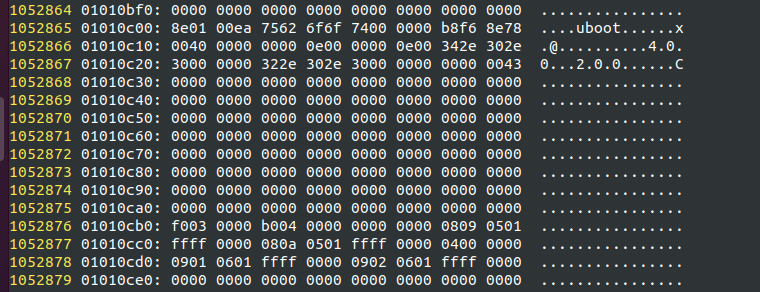
      3、在vim中搜索关键字uboot,看到uboot的数据是从地址0x01010c00开始的
      换算一下:0x01010c00 就是十进制的16845824 ,单位是byte;
      16845824 / 1024 = 16451 kbyte;这个就是我算出来的偏移地址。
      ea0c29c8-e577-46b3-a1ce-0e3a0726ad54-image.png
      4、然后重新编译uboot,得到u-boot.fex文件。同样用vim查看uboot.fex文件,和test.img中找到的uboot数据基本一致,可以判定是u-boot.fex保存在在第三步找到的地址。
      5、将u-boot.fex文件复制到板子,执行

      root:/# dd if=u-boot.fex of=/dev/mmcblk0 bs=1k seek=16451
      896+0 records in
      896+0 records out
      

      可是这样操作,uboot还是没有改变,蓝瘦。

      同样的方法,也尝试过将boot_package.fex 写到找到的地址上,还是没有修改到。因为在test.img的数据中,找不到.bin文件的位置,所以想知道你是怎么找到这个地址的?感觉是我找的文件是不对的。

      发布在 MR Series
      N
      Negro
    • 回复: 请问D1-H怎样只更新uboot呢?

      @whycan 我试了下,还是不行。甚至直接dd /dev/zero进去这个偏移地址,都还可以正常重启😵
      你的这个偏移地址是在哪里找的呢?会不会是我们芯片不一样会有差异?我试了刷机工具,是可以刷boot0和boot1,可惜拿不到源码来看13389d29-8e5c-4cd7-a59d-5e856516aa26-image.png

      发布在 MR Series
      N
      Negro
    • 回复: 请问D1-H怎样只更新uboot呢?

      @whycan 感谢回复,不过boot.img不是内核相关的吗?我只想更新uboot

      发布在 MR Series
      N
      Negro
    • 回复: 请问D1-H怎样只更新uboot呢?

      在 /sys/block/mmcblk0bootx里面,echo 0到force_ro里,就可以dd写进去了,不过好像我烧录bin文件到mmcblk0boot0和mmcblk0boot1都不管用,看来我猜错了🤕
      有大神知道mmcblk0boot0 mmcblk0boot1 是用来做什么的吗?

      发布在 MR Series
      N
      Negro
    • 回复: 请问D1-H怎样只更新uboot呢?

      @whycan 请教下晕哥,我用的是V853的buildroot。想要单独升级uboot,就将编译出来的u-boot-sun8iw21p1.bin用dd命令烧录到对应的分区。但是这个地址我应该怎么才能找到呢?不想用线刷,想着将bin文件放到板子上,然后在板子上执行dd命令去升级。

      板子上fdisk -l是这样的输出,看不到uboot的具体位置:

      root:/server# fdisk -l
      Found valid GPT with protective MBR; using GPT
      
      Disk /dev/mmcblk0: 30539776 sectors, 2624M
      Logical sector size: 512
      Disk identifier (GUID): ab6f3888-569a-4926-9668-80941dcb40bc
      Partition table holds up to 6 entries
      First usable sector is 49152, last usable sector is 30539742
      
      Number  Start (sector)    End (sector)  Size Name
           1           49152           61639 6244K boot-resource
           2           61640           62647  504K env
           3           62648           87847 12.3M boot
           4           87848           88359  256K dtb
           5           88360         1112359  500M rootfs
           6         1112360        30539742 14.0G UDISK
      Disk /dev/mmcblk0boot1: 4 MB, 4194304 bytes, 8192 sectors
      128 cylinders, 4 heads, 16 sectors/track
      Units: sectors of 1 * 512 = 512 bytes
      
      Disk /dev/mmcblk0boot1 doesn't contain a valid partition table
      Disk /dev/mmcblk0boot0: 4 MB, 4194304 bytes, 8192 sectors
      128 cylinders, 4 heads, 16 sectors/track
      Units: sectors of 1 * 512 = 512 bytes
      
      Disk /dev/mmcblk0boot0 doesn't contain a valid partition table
      

      看到有 /dev/mmcblk0boot0 和 /dev/mmcblk0boot1,想直接dd进去试试看,结果是没权限(已经是root用户)

      root:/server# dd if=u-boot-sun8iw21p1.bin of=/dev/mmcblk0boot1
      dd: error writing '/dev/mmcblk0boot1': Operation not permitted
      1+0 records in
      0+0 records out
      root:/server# dd if=u-boot-sun8iw21p1.bin of=/dev/mmcblk0boot0
      dd: error writing '/dev/mmcblk0boot0': Operation not permitted
      1+0 records in
      0+0 records out
      
      root:/# ls -l /dev/mmcblk0*
      brw-rw----    1 root     disk      179,   0 Jan  1  1970 mmcblk0
      brw-rw----    1 root     disk      179,   8 Jan  1  1970 mmcblk0boot0
      brw-rw----    1 root     disk      179,  16 Oct 17 10:24 mmcblk0boot1
      brw-rw----    1 root     disk      179,   1 Jan  1  1970 mmcblk0p1
      brw-rw----    1 root     disk      179,   2 Jan  1  1970 mmcblk0p2
      brw-rw----    1 root     disk      179,   3 Jan  1  1970 mmcblk0p3
      brw-rw----    1 root     disk      179,   4 Jan  1  1970 mmcblk0p4
      brw-rw----    1 root     disk      179,   5 Jan  1  1970 mmcblk0p5
      brw-rw----    1 root     disk      179,   6 Jan  1  1970 mmcblk0p6
      brw-rw----    1 root     disk      179,  24 Jan  1  1970 mmcblk0rpmb
      
      发布在 MR Series
      N
      Negro
    • 回复: V853 openwrt系统,make menuconfig打开Allwinner > Visiol>LibAWIspApi 报错

      我也遇到类似的问题,请问有解决吗?官方有没有办出来帮忙解惑一下呢?🤕

      发布在 V Series
      N
      Negro
    • 回复: F133可以做成按键长按开机关机吗?

      @godzhou0909 在 F133可以做成按键长按开机关机吗? 中说:

      现在是上电开机,是否可以改成用按键长按开机关机呢?

      顶一下,我也想知道,用的是V853+AXP2101,怎么实现上电不自启动,需要长按或短按power按键之类的开机。

      发布在 MR Series
      N
      Negro