Navigation

    全志在线开发者论坛

    • Register
    • Login
    • Search
    • Categories
    • Tags
    • 在线文档
    • 社区主页
    1. Home
    2. tripod9
    T
    • Profile
    • Following 0
    • Followers 2
    • my integral 1149
    • Topics 6
    • Posts 36
    • Best 6
    • Groups 0

    tripod9LV 5

    @tripod9

    1149
    integral
    7
    Reputation
    32
    Profile views
    36
    Posts
    2
    Followers
    0
    Following
    Joined Last Online

    tripod9 Unfollow Follow

    Best posts made by tripod9

    • 全志D1裸奔工具XFEL

      工欲善其事,必先利其器,全志D1沿用传统设计思路,brom里面集成了FEL模式,这个模式是一个很有用的模式,可以烧录,测试,能干的事情很多,本来这种工具也是有成熟的可用,比如:sunxi-fel,基本算裸奔必用的开发工具,但突然来了个RISCV版的FEL,sunxi-fel就无能为力,其深度绑定ARM实现,里面的payload都是arm,根本没有riscv,没有工具,想正向开发,比登天还难。

      仔细分析D1的fel,发现其烧写工具跟原先的一致,没有做任何更新,那也就是说,fel标准协议其实是指令集无关的,有了这个信息就好办了,我们完全也可以创建一个指令集无关的fel工具,阅读sunxi-fel,发现其改造困难,基本深度绑定,没有太多开发的意义,还不如重新开发,轻装上阵,遂有了此工程。

      此工具理论上全志全系列芯片都可以支持,不管是arm32,arm64,riscv64,重点目标是riscv64的D1支持,设计时避免过多hack,增强适应性,最大的特色借用xfel工具可以直接初始化DDR。有了直接能初始化DDR的fel工具,开发裸机就没有任何难度了,当单片机耍。

      xfel(v1.0.1) - https://github.com/xboot/xfel
      usage:
          xfel help                                   - Print this usage
          xfel version                                - Show brom version
          xfel hexdump <address> <length>             - Dumps memory region in hex
          xfel dump <address> <length>                - Binary memory dump to stdout
          xfel exec <address>                         - Call function address
          xfel read32 <address>                       - Read 32-bits value from device memory
          xfel write32 <address> <value>              - Write 32-bits value to device memory
          xfel read <address> <length> <file>         - Read memory to file
          xfel write <address> <file>                 - Write file to memory
          xfel reset                                  - Reset device using watchdog
          xfel sid                                    - Show 128-bits sid information
          xfel jtag                                   - Enable jtag debug
          xfel ddr [type]                             - Initial ddr controller with optional type
          xfel spinor                                 - Detect spi nor flash
          xfel spinor read <address> <length> <file>  - Read spi nor flash to file
          xfel spinor write <address> <file>          - Write file to spi nor flash
          xfel spinand                                - Detect spi nand flash
          xfel spinand read <address> <length> <file> - Read spi nand flash to file
          xfel spinand write <address> <file>         - Write file to spi nand flash
      

      链接文本

      posted in D1系列-RISC-V
      T
      tripod9
    • D1s运行自制立即式UI框架--XUI

      D1s运行自制立即式UI框架--XUI

      posted in D1系列-RISC-V
      T
      tripod9
    • 利用XFEL直接引导xboot

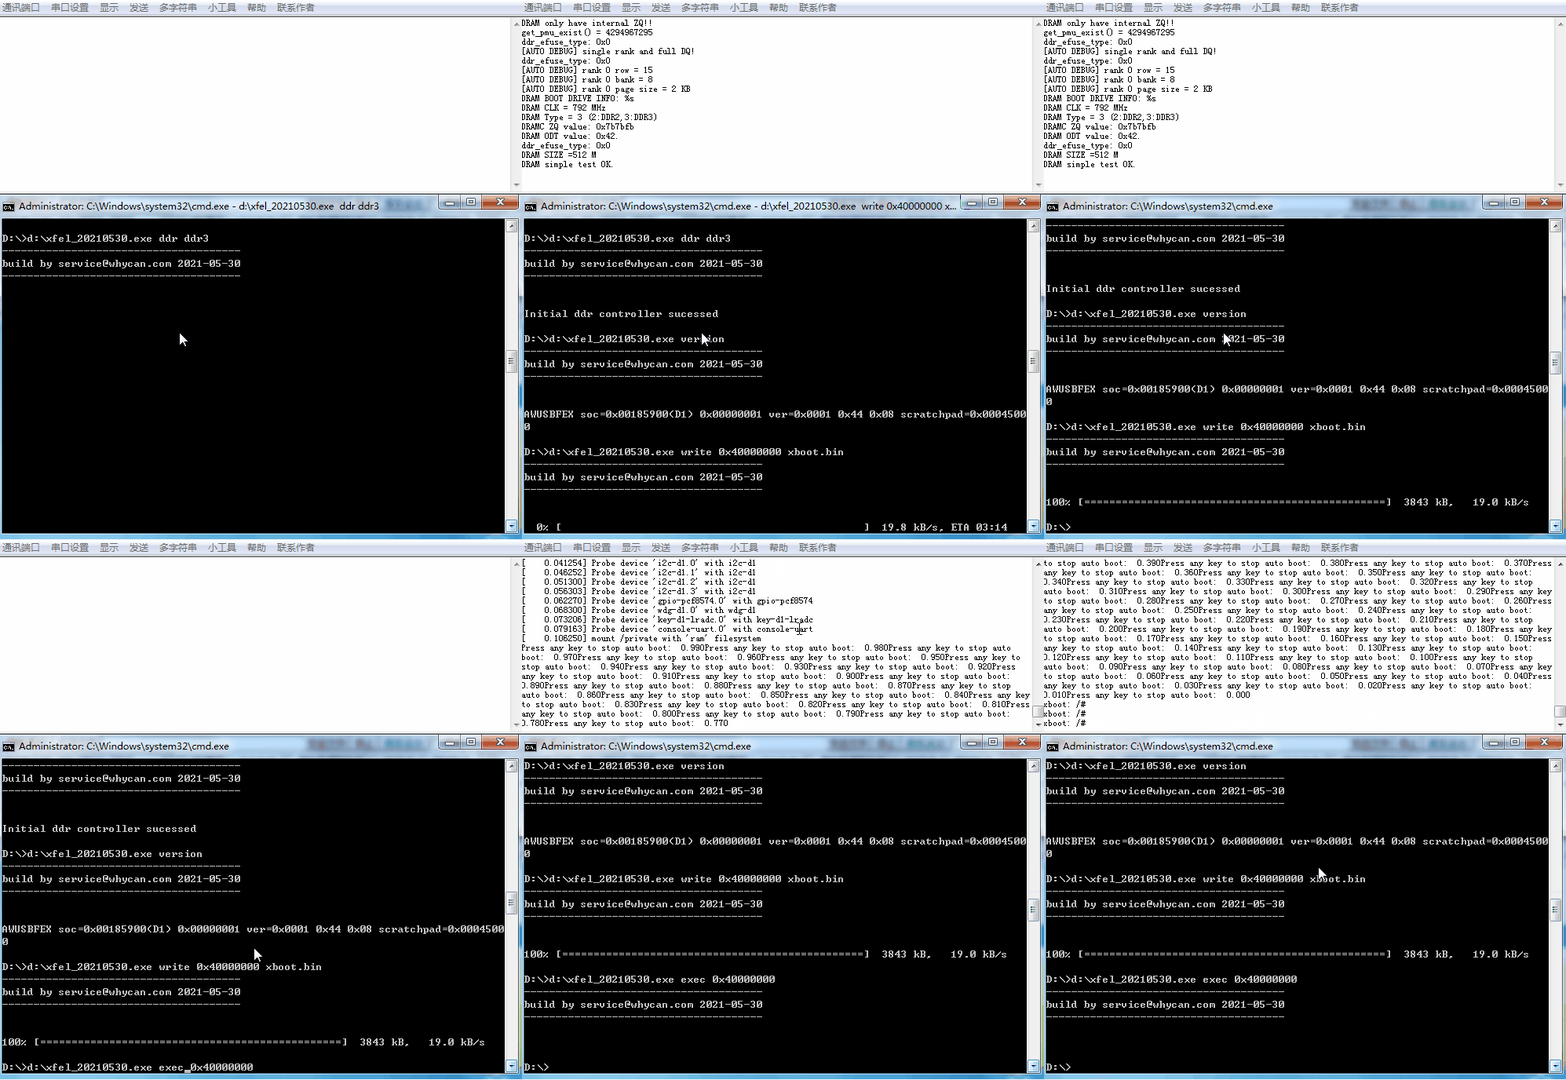
      在缺乏工具前,都是利用已有的软件,间接开发,现在有了专用工具,就无需像那么折腾了,仅需在板子上电时,按着fel按键,敲一下如下,指令就可以将xboot运行在DDR中,复杂的开发工作,从此变得简单起来。

      sudo xfel ddr ddr3
      sudo xfel write 0x40000000 output/xboot.bin
      sudo xfel exec 0x40000000
      

      补充下,xboot代码的获取与编译,工具链随便了,你想用玄铁的也行,啥都可以的。

      git clone https://github.com/xboot/xboot/ -b test-d1
      CROSS_COMPILE=riscv64-linux-gnu- PLATFORM=riscv64-d1 make -j3
      

      xfel_run_xboot.gif

      借用下晕哥的图,在晕哥的努力下,XFEL现在有了windows版了,方便使用win做开发的同学。

      链接文本

      posted in D1系列-RISC-V
      T
      tripod9
    • Reply: 全志D1裸奔工具XFEL

      @mangogeek 已添加Winbond SPI NAND的支持,因为华邦的ID是3个字节,其他的SPI NAND芯片是两个字节的ID,现在代码已做了扩展。

      	/* Winbond */
      	{ "W25N512GV",       SPINAND_ID(0xef, 0xaa, 0x20), 2048,  64,  64,  512, 1, 1 },
      	{ "W25N01GV",        SPINAND_ID(0xef, 0xaa, 0x21), 2048,  64,  64, 1024, 1, 1 },
      	{ "W25M02GV",        SPINAND_ID(0xef, 0xab, 0x21), 2048,  64,  64, 1024, 1, 2 },
      	{ "W25N02KV",        SPINAND_ID(0xef, 0xaa, 0x22), 2048, 128,  64, 2048, 1, 1 },
      
      posted in D1系列-RISC-V
      T
      tripod9
    • Reply: D1s裸奔驱动LCD,并运行xboot的各种风骚APP

      https://www.zhihu.com/column/c_1382754923101081600

      posted in D1系列-RISC-V
      T
      tripod9
    • D1S内置电阻触摸TSADC,演示效果

      D1s内部含有一个电阻触摸控制器TSADC,可以直接连接标准的电阻触摸,这个控制器基本跟F1C100S的类似,所以编写驱动也就手到擒来,拷贝下,基本就可以了。对于电阻触摸屏,所涉及到的均值滤波,中值滤波,触摸校正参数等,这些xboot里都有成熟的解决方案,就不细说了。

      下面是演示视频,感觉还是比较丝滑的。

      posted in D1系列-RISC-V
      T
      tripod9

    Latest posts made by tripod9

    • Reply: T113裸跑不能产生中断请教:

      @l13819506056 频率是1.008G ,是否方便提供一个简单的可以测试中断的裸机程序。我debug下,现在我实验后发现总是产生swi异常,不知哪里在触发。

      posted in D1系列-RISC-V
      T
      tripod9
    • Reply: T113裸跑不能产生中断请教:

      @l13819506056 我实验T113中断时,只要一中断,就会产生SWI异常,很神奇,我是裸奔,根本没执行swi相关指令。一直理解不了。

      posted in D1系列-RISC-V
      T
      tripod9
    • Reply: T113烧录R528的img文件失败

      @yuzukitsuru
      找到个这个函数,是R528里面的,id_judge_fun,有谁发现什么机关,需要找多个平台的id_judge_fun函数来对比,估计才能看出名堂。

      
      uint id_judge_fun(uint param_1)
      
      {
        uint uVar1;
        
        if ((_DAT_01c15004 & 7) == 0) {
          uVar1 = disturb_coding(param_1,1);
          return uVar1;
        }
        return 0;
      }


      uint disturb_coding(uint param_1,int param_2)
      
      {
        int iVar1;
        
        iVar1 = crc_16(param_1,param_2);
        return param_1 + param_2 | iVar1 << 0x10;
      }


      void crc_16(uint param_1,int param_2)
      
      {
        uint uVar1;
        uint uVar2;
        short sVar3;
        
        uVar1 = param_1 ^ param_2 << 8;
        sVar3 = 8;
        do {
          uVar2 = uVar1 & 0x8000;
          uVar1 = (uVar1 & 0x7fff) << 1;
          if (uVar2 != 0) {
            uVar1 = (uVar1 ^ 0xffff8005) & 0xffff;
          }
          sVar3 = sVar3 + -1;
        } while (sVar3 != 0);
        return;
      }
      
      
      posted in D1系列-RISC-V
      T
      tripod9
    • Reply: T113烧录R528的img文件失败

      @xiaowenge 芯片验证代码能找到机关吗?xfel现在找一个方法来判断各种马甲

      posted in D1系列-RISC-V
      T
      tripod9
    • Reply: 麻雀加核计划:MQ增加双核内置128M版本,MQ-Pro则增加四核版本

      @mangogeek 跑的1.008GHZ

      posted in H616系列-OTT
      T
      tripod9
    • Reply: 麻雀加核计划:MQ增加双核内置128M版本,MQ-Pro则增加四核版本

      全志T113-S3 编译烧写步骤。

      https://xboot.org/xboot/#/guide-allwinner-t113s3

      posted in H616系列-OTT
      T
      tripod9
    • Reply: 麻雀加核计划:MQ增加双核内置128M版本,MQ-Pro则增加四核版本

      T133-S3 xboot裸奔

      1.jpg 2.jpg

      posted in H616系列-OTT
      T
      tripod9
    • Reply: 又在全志d1开发板上玩ncnn

      @tripod9

      玄铁900系列GCC工具链V2.2.4发布公告

      • 编译器:修复在某些机器上cc1出现illegal instruction的问题

      posted in D1系列-RISC-V
      T
      tripod9
    • Reply: D1/D1S 的区别是啥?

      @kirin 在 D1/D1S 的区别是啥? 中说:

      wifi/蓝牙可以通过外接无线芯片实现,比如哪吒板子上外接的就是XR829,可以做2.4Gwifi/BT.
      预告:明年全志将会推出内置wifi/BT的RISC-V芯片,针对AIoT市场。

      这个wifi/BT芯片,是MCU级别还是SOC级别,但愿内存不要太小,否则就跟市面上的没有区别了,可选余地很多。

      posted in D1系列-RISC-V
      T
      tripod9
    • Reply: 又在全志d1开发板上玩ncnn

      新版本工具链,在某些老电脑上会出现编译器内部错误,2.0.3版本正常,但这之后的全部异常了。

      Compiler executable checksum: 91a728100f71f55a898c866a0b8bf7a7
      main.c: In function 'my_strtod':
      main.c:37:3: internal compiler error: Illegal instruction
         37 |   number = number * 10. + (*p - '0');
            |   ^~~~~~
      Please submit a full bug report,
      with preprocessed source if appropriate.
      See <https://gcc.gnu.org/bugs/> for instructions.
      
      
      posted in D1系列-RISC-V
      T
      tripod9