【全志T113-S3_100ask】4-编写按键驱动(atomic + poll)
-
前言
本来想写一下点灯的驱动的,结果发现板子上没有用户的led灯?????那就试着写一下按键的驱动吧。
(一)查看原理图
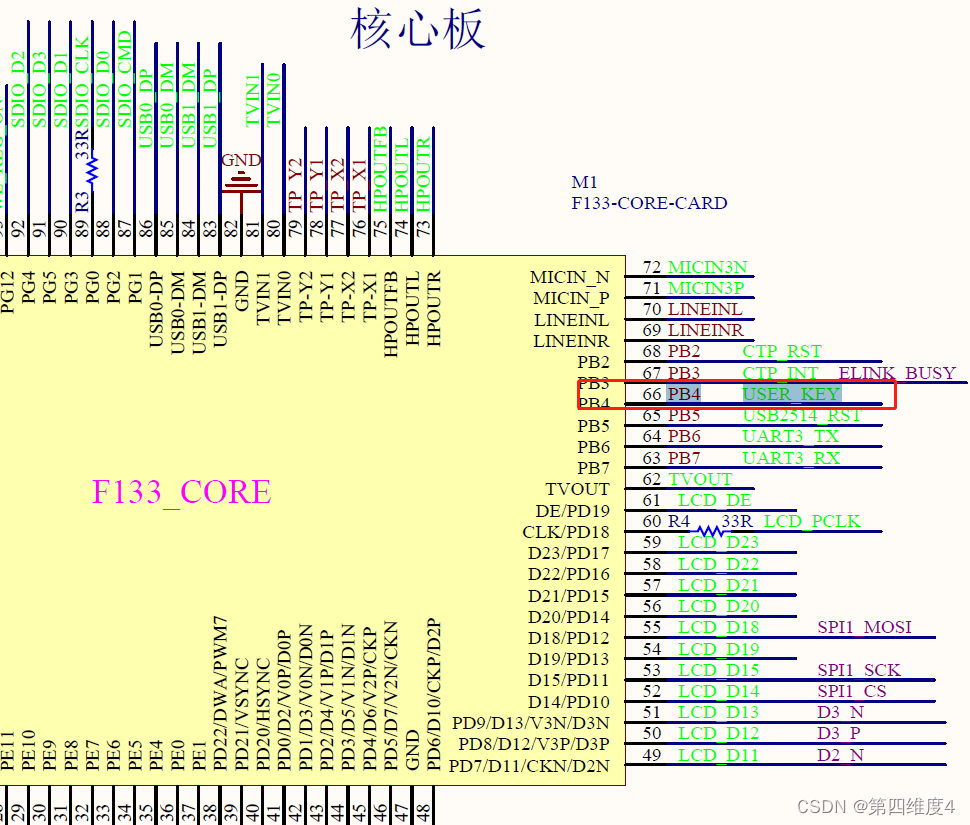
在原理图里,找到了用户按键USER KEY的内容

并且是连接在核心板的PB 4 引脚上

看起来没有用作其他功能。
(二)修改设备树
设备树在以下目录里
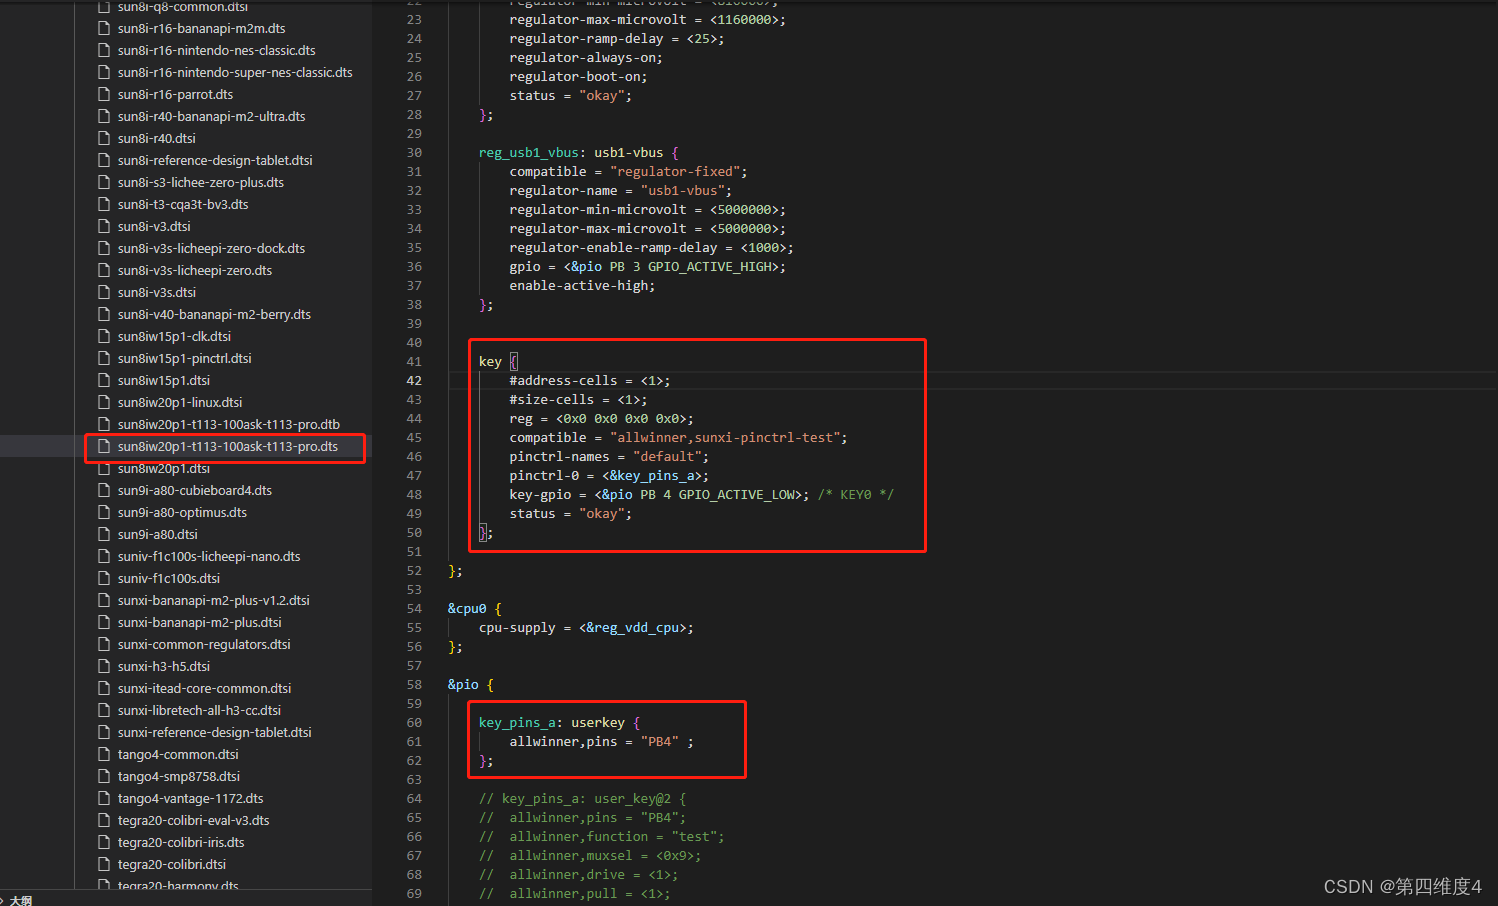
/disk/buildroot-100ask_t113-pro/buildroot/output/build/linux-d96275805a67d54998123d36e59108cb1ed52ad5/arch/arm/boot/dts添加一级子节点
key {
	#address-cells = <1>;
	#size-cells = <1>;
	reg = <0x0 0x0 0x0 0x0>;
  	compatible = "allwinner,sunxi-pinctrl-test";
  	pinctrl-names = "default";
 	pinctrl-0 = <&key_pins_a>;
  	key-gpio = <&pio PB 4 GPIO_ACTIVE_LOW>; /* KEY0 */
  	status = "okay";
};
添加 pio
key_pins_a: userkey {
	allwinner,pins = "PB4" ;
};
添加后如下:

(三)编写驱动 key_drv.c
#include <linux/types.h>
#include <linux/kernel.h>
#include <linux/delay.h>
#include <linux/ide.h>
#include <linux/init.h>
#include <linux/module.h>
#include <linux/errno.h>
#include <linux/gpio.h>
#include <linux/cdev.h>
#include <linux/device.h>
#include <linux/of.h>
#include <linux/of_address.h>
#include <linux/of_gpio.h>
#include <linux/semaphore.h>
#include <asm/mach/map.h>
#include <asm/uaccess.h>
#include <asm/io.h>

#define KEY_CNT			1		/* 设备号个数 	*/
#define KEY_NAME		"key"	/* 名字 		*/

/* 定义按键值 */
#define KEY0VALUE		0XF0	/* 按键值 		*/
#define INVAKEY			0X00	/* 无效的按键值  */

/* key设备结构体 */
struct key_dev{
	dev_t devid;			/* 设备号 	 */
	struct cdev cdev;		/* cdev 	*/
	struct class *class;	/* 类 		*/
	struct device *device;	/* 设备 	 */
	int major;				/* 主设备号	  */
	int minor;				/* 次设备号   */
	struct device_node	*nd; /* 设备节点 */
	int key_gpio;			/* key所使用的GPIO编号		*/
	atomic_t keyvalue;		/* 按键值 		*/
};

struct key_dev keydev;		/* key设备 */

/*
 * @description	: 初始化按键IO,open函数打开驱动的时候
 * 				  初始化按键所使用的GPIO引脚。
 * @param 		: 无
 * @return 		: 无
 */
static int keyio_init(void)
{
	keydev.nd = of_find_node_by_path("/key");
	if (keydev.nd== NULL) {
		return -EINVAL;
	}

	keydev.key_gpio = of_get_named_gpio(keydev.nd ,"key-gpio", 0);
	if (keydev.key_gpio < 0) {
		printk("can't get key0\r\n");
		return -EINVAL;
	}
	printk("key_gpio=%d\r\n", keydev.key_gpio);

	/* 初始化key所使用的IO */
	gpio_request(keydev.key_gpio, "key0");	/* 请求IO */
	gpio_direction_input(keydev.key_gpio);	/* 设置为输入 */
	return 0;
}

/*
 * @description		: 打开设备
 * @param - inode 	: 传递给驱动的inode
 * @param - filp 	: 设备文件,file结构体有个叫做private_data的成员变量
 * 					  一般在open的时候将private_data指向设备结构体。
 * @return 			: 0 成功;其他 失败
 */
static int key_open(struct inode *inode, struct file *filp)
{
	int ret = 0;
	filp->private_data = &keydev; 	/* 设置私有数据 */

	ret = keyio_init();				/* 初始化按键IO */
	if (ret < 0) {
		return ret;
	}

	return 0;
}

/*
 * @description		: 从设备读取数据
 * @param - filp 	: 要打开的设备文件(文件描述符)
 * @param - buf 	: 返回给用户空间的数据缓冲区
 * @param - cnt 	: 要读取的数据长度
 * @param - offt 	: 相对于文件首地址的偏移
 * @return 			: 读取的字节数,如果为负值,表示读取失败
 */
static ssize_t key_read(struct file *filp, char __user *buf, size_t cnt, loff_t *offt)
{
	int ret = 0;
	int value;
	struct key_dev *dev = filp->private_data;

	if (gpio_get_value(dev->key_gpio) == 0) { 		/* key0按下 */
		while(!gpio_get_value(dev->key_gpio));		/* 等待按键释放 */
		atomic_set(&dev->keyvalue, KEY0VALUE);
	} else {
		atomic_set(&dev->keyvalue, INVAKEY);		/* 无效的按键值 */
	}

	value = atomic_read(&dev->keyvalue);
	ret = copy_to_user(buf, &value, sizeof(value));
	return ret;
}

/*
 * @description		: 向设备写数据
 * @param - filp 	: 设备文件,表示打开的文件描述符
 * @param - buf 	: 要写给设备写入的数据
 * @param - cnt 	: 要写入的数据长度
 * @param - offt 	: 相对于文件首地址的偏移
 * @return 			: 写入的字节数,如果为负值,表示写入失败
 */
static ssize_t key_write(struct file *filp, const char __user *buf, size_t cnt, loff_t *offt)
{
	return 0;
}

/*
 * @description		: 关闭/释放设备
 * @param - filp 	: 要关闭的设备文件(文件描述符)
 * @return 			: 0 成功;其他 失败
 */
static int key_release(struct inode *inode, struct file *filp)
{
	return 0;
}

/* 设备操作函数 */
static struct file_operations key_fops = {
	.owner = THIS_MODULE,
	.open = key_open,
	.read = key_read,
	.write = key_write,
	.release = 	key_release,
};

/*
 * @description	: 驱动入口函数
 * @param 		: 无
 * @return 		: 无
 */
static int __init mykey_init(void)
{
	/* 初始化原子变量 */
	atomic_set(&keydev.keyvalue, INVAKEY);

	/* 注册字符设备驱动 */
	/* 1、创建设备号 */
	if (keydev.major) {		/*  定义了设备号 */
		keydev.devid = MKDEV(keydev.major, 0);
		register_chrdev_region(keydev.devid, KEY_CNT, KEY_NAME);
	} else {						/* 没有定义设备号 */
		alloc_chrdev_region(&keydev.devid, 0, KEY_CNT, KEY_NAME);	/* 申请设备号 */
		keydev.major = MAJOR(keydev.devid);	/* 获取分配号的主设备号 */
		keydev.minor = MINOR(keydev.devid);	/* 获取分配号的次设备号 */
	}

	/* 2、初始化cdev */
	keydev.cdev.owner = THIS_MODULE;
	cdev_init(&keydev.cdev, &key_fops);

	/* 3、添加一个cdev */
	cdev_add(&keydev.cdev, keydev.devid, KEY_CNT);

	/* 4、创建类 */
	keydev.class = class_create(THIS_MODULE, KEY_NAME);
	if (IS_ERR(keydev.class)) {
		return PTR_ERR(keydev.class);
	}

	/* 5、创建设备 */
	keydev.device = device_create(keydev.class, NULL, keydev.devid, NULL, KEY_NAME);
	if (IS_ERR(keydev.device)) {
		return PTR_ERR(keydev.device);
	}

	return 0;
}

/*
 * @description	: 驱动出口函数
 * @param 		: 无
 * @return 		: 无
 */
static void __exit mykey_exit(void)
{
	/* 注销字符设备驱动 */
	gpio_free(keydev.key_gpio);
	cdev_del(&keydev.cdev);/*  删除cdev */
	unregister_chrdev_region(keydev.devid, KEY_CNT); /* 注销设备号 */

	device_destroy(keydev.class, keydev.devid);
	class_destroy(keydev.class);
}

module_init(mykey_init);
module_exit(mykey_exit);
MODULE_LICENSE("GPL");
MODULE_AUTHOR("z");
参考了正点原子的按键驱动:
(四)编写测试应用 key_drv_test.c
#include "stdio.h"
#include "unistd.h"
#include "sys/types.h"
#include "sys/stat.h"
#include "fcntl.h"
#include "stdlib.h"
#include "string.h"

/* 定义按键值 */
#define KEY0VALUE	0XF0
#define INVAKEY		0X00

/*
 * @description		: main主程序
 * @param - argc 	: argv数组元素个数
 * @param - argv 	: 具体参数
 * @return 			: 0 成功;其他 失败
 */
int main(int argc, char *argv[])
{
	int fd, ret;
	char *filename;
	int keyvalue;

	if(argc != 2){
		printf("Error Usage!\r\n");
		return -1;
	}

	filename = argv[1];

	/* 打开key驱动 */
	fd = open(filename, O_RDWR);
	if(fd < 0){
		printf("file %s open failed!\r\n", argv[1]);
		return -1;
	}

	/* 循环读取按键值数据! */
	while(1) {
		read(fd, &keyvalue, sizeof(keyvalue));
		if (keyvalue == KEY0VALUE) {	/* KEY0 */
			printf("KEY0 Press, value = %#X\r\n", keyvalue);	/* 按下 */
		}
	}

	ret= close(fd); /* 关闭文件 */
	if(ret < 0){
		printf("file %s close failed!\r\n", argv[1]);
		return -1;
	}
	return 0;
}
(五)编写Makefile
KERN_DIR = /disk/buildroot-100ask_t113-pro/buildroot/output/build/linux-d96275805a67d54998123d36e59108cb1ed52ad5


all:
	make -C $(KERN_DIR) M=`pwd` modules
	$(CROSS_COMPILE)gcc -o key_drv_test key_drv_test.c

clean:
	make -C $(KERN_DIR) M=`pwd` modules clean
	rm -rf modules.order
	rm -f key_drv_test

obj-m	+= key_drv.o
(六)测试
编译驱动
root@znh-ubuntu:/disk/vsCode/04_key# ls
key_drv.c  key_drv_test.c  Makefile

root@znh-ubuntu:/disk/vsCode/04_key# make
make -C /disk/buildroot-100ask_t113-pro/buildroot/output/build/linux-d96275805a67d54998123d36e59108cb1ed52ad5 M=`pwd` modules
make[1]: 进入目录“/disk/buildroot-100ask_t113-pro/buildroot/output/build/linux-d96275805a67d54998123d36e59108cb1ed52ad5”
  CC [M]  /disk/vsCode/04_key/key_drv.o
  Building modules, stage 2.
  MODPOST 1 modules
  CC [M]  /disk/vsCode/04_key/key_drv.mod.o
  LD [M]  /disk/vsCode/04_key/key_drv.ko
make[1]: 离开目录“/disk/buildroot-100ask_t113-pro/buildroot/output/build/linux-d96275805a67d54998123d36e59108cb1ed52ad5”
arm-linux-gnueabi-gcc -o key_drv_test key_drv_test.c

root@znh-ubuntu:/disk/vsCode/04_key# ls
key_drv.c   key_drv.mod    key_drv.mod.o  key_drv_test    Makefile       Module.symvers
key_drv.ko  key_drv.mod.c  key_drv.o      key_drv_test.c  modules.order
root@znh-ubuntu:/disk/vsCode/04_key#
编译kernel、buildroot、烧卡、tftp:略
测试驱动
# chmod 777 key_drv_test
# ls
key_drv.ko    key_drv_test

# insmod key_drv.ko
[  162.979954] key_drv: loading out-of-tree module taints kernel.

# ./key_drv_test /dev/key
[  166.293872] key_gpio=36
KEY0 Press, value = 0XF0
KEY0 Press, value = 0XF0
KEY0 Press, value = 0XF0
^C

# ls /proc/device-tree
#address-cells                memory@40000000
#size-cells                   model
aliases                       name
chosen                        pio-18
compatible                    pio-33
cpu-opp-table                 pmu
cpus                          power-management@ff000000
dcxo24M_clk                   psci
dram                          rc16m_clk
dump_reg@20000                share_space@0x42100000
ext32k_clk                    soc@3000000
firmware                      thermal-zones
interrupt-controller@3020000  timer_arch
interrupt-parent              usb1-vbus
iommu@2010000                 vdd-cpu
key
至此,按键驱动完成,但是还有很多需要修改的地方吧,或者很多冗余的东西,以后再修改了。
原文链接:https://blog.csdn.net/qq_46079439/article/details/125899592
Copyright © 2024 深圳全志在线有限公司 粤ICP备2021084185号 粤公网安备44030502007680号