Navigation

    全志在线开发者论坛

    • Register
    • Login
    • Search
    • Categories
    • Tags
    • 在线文档
    • 社区主页
    1. Home
    2. iysheng
    • Profile
    • Following 0
    • Followers 0
    • my integral 564
    • Topics 4
    • Posts 13
    • Best 4
    • Groups 0

    iyshengLV 4

    @iysheng

    564
    integral
    4
    Reputation
    6
    Profile views
    13
    Posts
    0
    Followers
    0
    Following
    Joined Last Online

    iysheng Unfollow Follow

    Best posts made by iysheng

    • 【XR806开发板试用】1. 优化 console 打印提示

      刚开始接触 XR806, 根据官方指导說明一步步将 wifi_skylark demo 編譯了出來,使用 ckermit 終端查看打印,發現很凌亂。具體效果是:
      2021-12-20_17-15.png
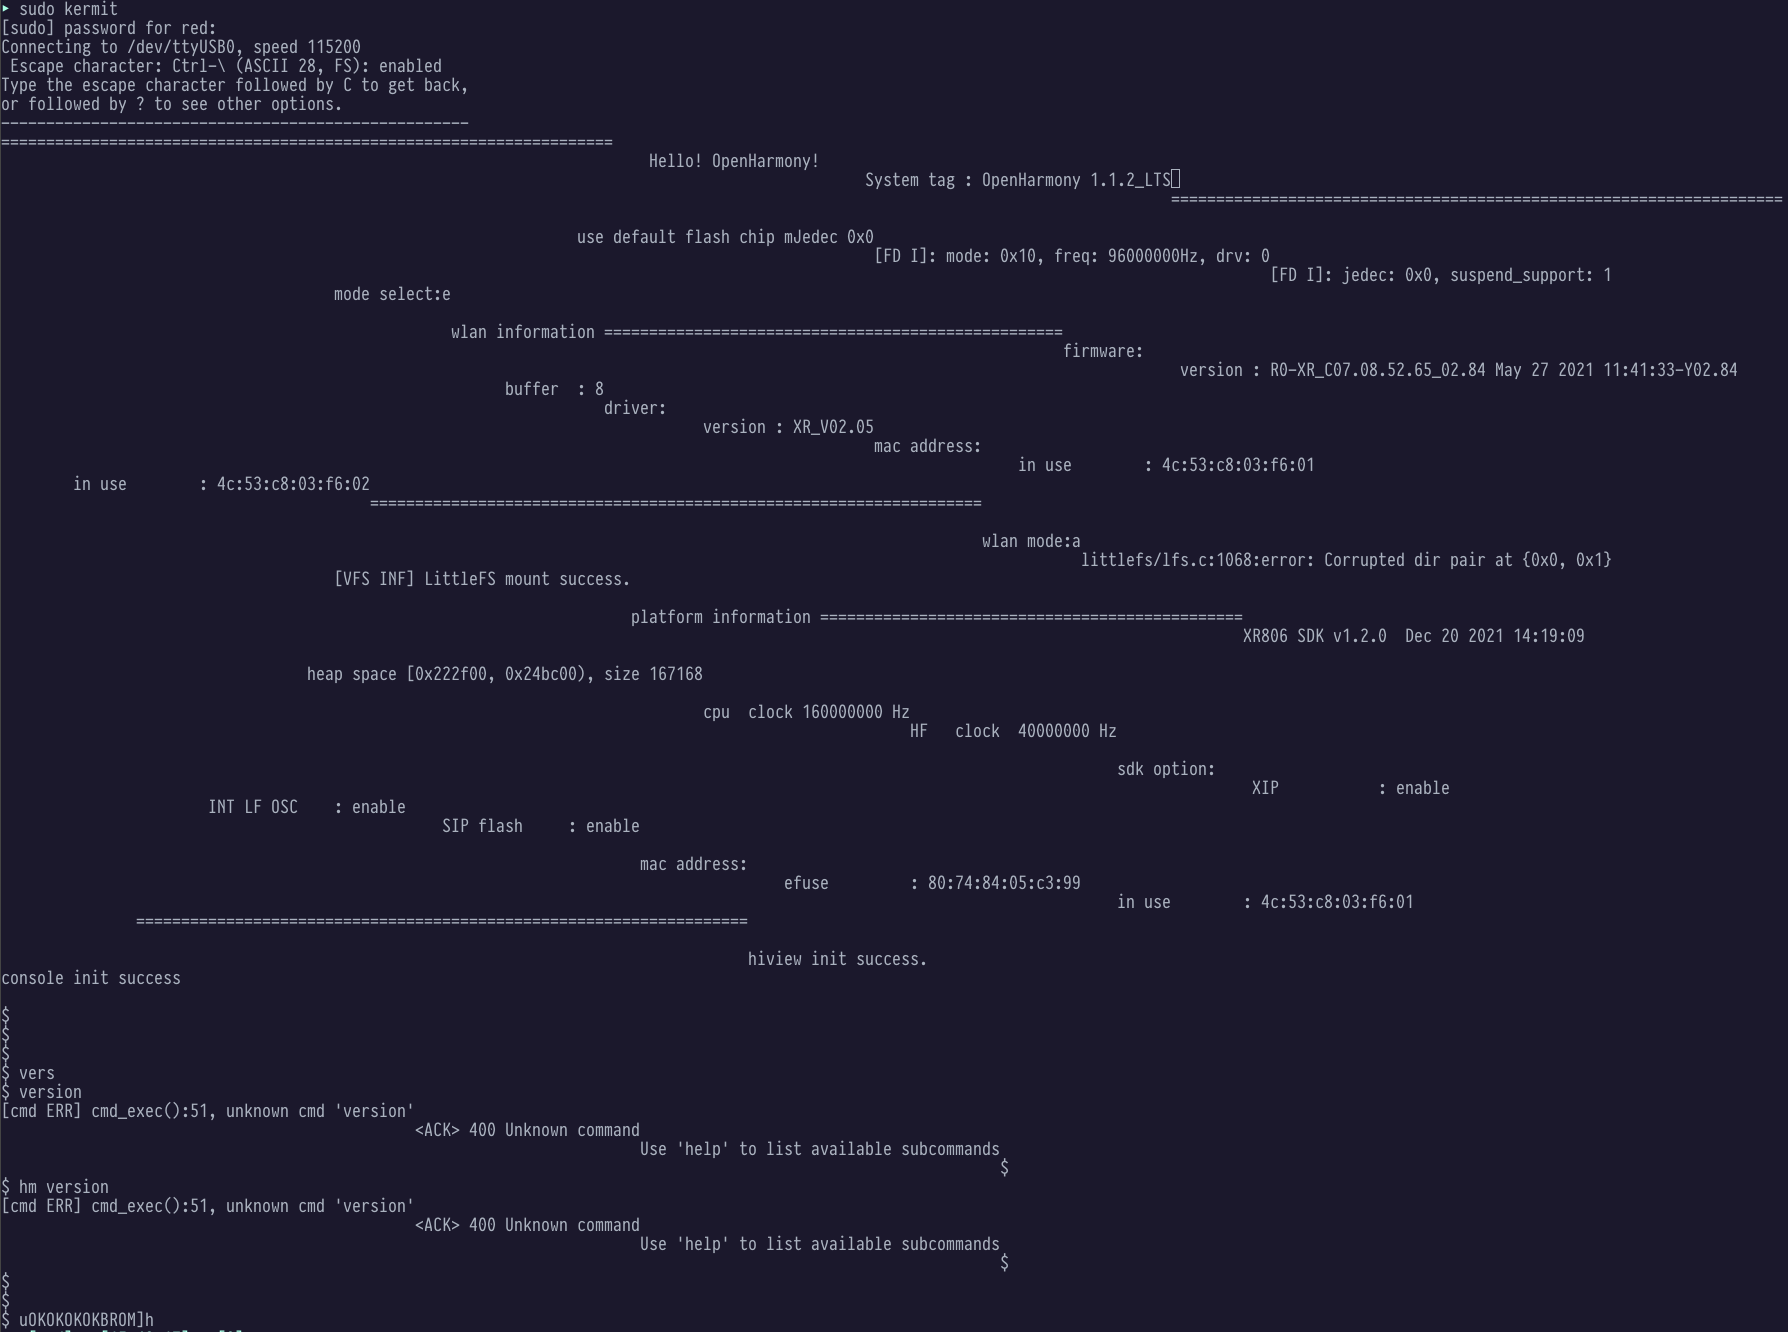
      實在是不美觀,因爲之前碰到過類似的問題簡單來說就是沒有將 \n 識別出回車 \r 的效果。這種現象的解決方法有多種。
      這次我選擇了修改putchar() 的方法。通過一步步的跟蹤代碼,發現 console 的基本流程是:

      int __wrap_putchar(int c)
           //  stdio_set_write(stdout_write)
              board_uart_write()
      

      我修改的部分在 stdio_set_write 函數,具體是:

      diff --git a/xr806/xr_skylark/project/common/startup/gcc/retarget_stdout.c b/xr806/xr_skylark/project/common/startup/gcc/retarget_stdout.c
      index 487c75b..9cd725f 100755
      --- a/xr806/xr_skylark/project/common/startup/gcc/retarget_stdout.c
      +++ b/xr806/xr_skylark/project/common/startup/gcc/retarget_stdout.c
      @@ -175,7 +175,17 @@ static int stdout_write(const char *buf, int len)
       	}
       #endif
       
      -	return board_uart_write(g_stdout_uart_id, buf, len);
      +	if (buf[len - 1] == '\n')
      +	{
      +		char r_ch[1] = {'\r'};
      +		int rlen = board_uart_write(g_stdout_uart_id, buf, len);
      +		board_uart_write(g_stdout_uart_id, r_ch, 1);
      +    	return rlen;
      +	}
      +	else
      +	{
      +    	return board_uart_write(g_stdout_uart_id, buf, len);
      +	}
       }
      

      測試之後發現打印信息變成了這樣:
      2021-12-20_17-33.png
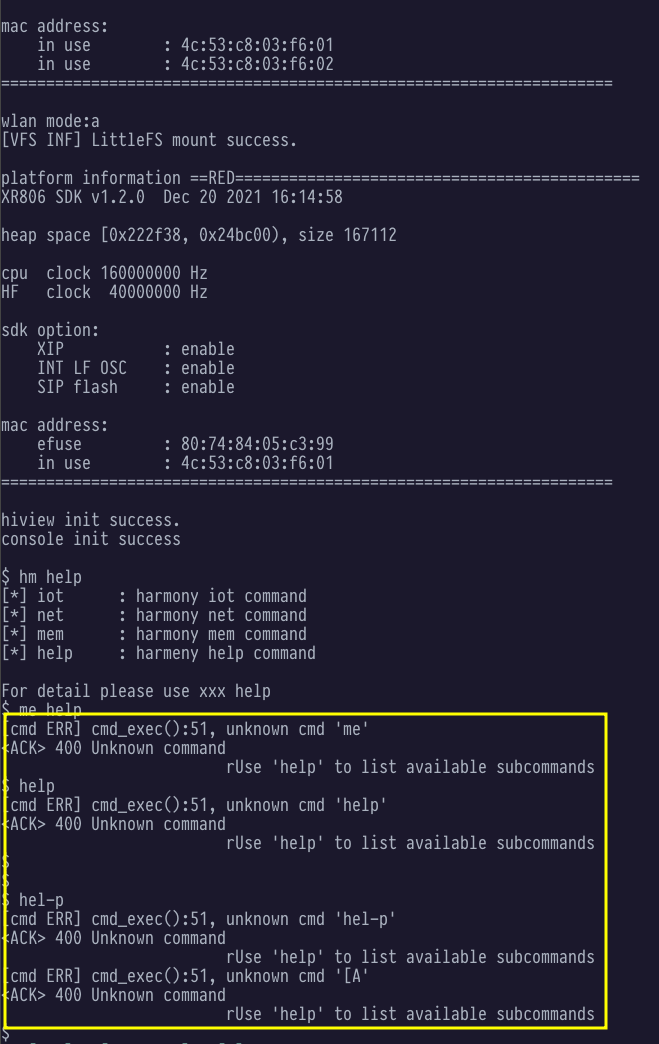
      命令行的顯示效果還是會出現問題,繼續跟蹤代碼,修改部分:

      diff --git a/xr806/xr_skylark/src/console/console.c b/xr806/xr_skylark/src/console/console.c
      index 457ee23..72b5a0b 100755
      --- a/xr806/xr_skylark/src/console/console.c
      +++ b/xr806/xr_skylark/src/console/console.c
      @@ -439,7 +439,16 @@ int console_write(uint8_t *buf, int32_t len)
       	console_priv_t *console;
       
       	console = &g_console;
      -	return HAL_UART_Transmit_Poll(console->uart_id, buf, len);
      +	if (buf[len - 1] == '\n')
      +	{
      +		uint8_t r_ch[1] = {'\r'};
      +    	HAL_UART_Transmit_Poll(console->uart_id, buf, len);
      +    	return HAL_UART_Transmit_Poll(console->uart_id, r_ch, 1);
      +	}
      +	else
      +	{
      +    	return HAL_UART_Transmit_Poll(console->uart_id, buf, len);
      +	}
       }
       
       /**
      

      打上以上連個補丁後,console 的輸出就美觀多了。
      2021-12-20_17-15_1.png

      😊

      posted in XR系列-无线互联
      iysheng
      iysheng
    • Reply: 請教現在的工程是如何生成 xr_system.img 的?

      最近幾天學習了構建的過程,再次記錄描述一下。

      該文件記錄 XR806 工程的編譯過程

      涉及到的組件
      * [GN](https://gn.googlesource.com/gn/+/main/docs/reference.md)
      * [ninja](https://ninja-build.org/)
      
      編譯命令
      階段一: 配置以及編譯扳機的原生靜態庫
      1. cd device/xradio/xr806/xr_skylark 切換到處理器層級目錄
      2. cp project/demo/audio_demo/gcc/defconfig .config 複製 demo 工程的配置文件
      3. make menuconfig;make build_clean 根據 demo 配置工程,並進行工程清理, 實際的目標定義在 project/prject.mk 文件中
        1. <a id='SDKconfig'>配置工程</a>,生成 ../liteos_m/SDKconfig.gni 文件,這一步很重要
        menuconfig: mconf
            $< ./Kconfig
            python config.py
        
        特別地在 python config.py 過程中會根據 .config 文件生成 ../liteos_m/SDKconfig.gni 文件,這個文件在後續構建鴻蒙的時候會用到.
        2.
        #  在文件 gcc/Makefile 中定義的 ROOT_PATH
        #  絕對路徑 device/xradio/xr806/xr_skylark 是處理器級別的
        ROOT_PATH := ../../../..
        build_clean: clean lib_clean lib_install_clean
        	-$(Q)-rm -rf $(ROOT_PATH)/out/*
        # 刪除編譯的工程文件
        clean:
        	$(Q)-rm -f $(PROJECT_LD) $(PROJECT).* *.bin $(OBJS) $(DEPS)
        	$(Q)-rm -rf $(ROOT_PATH)/out/*
        lib_clean:
        # 進入到 **src** 目錄執行對應的清除動作
        	$(Q)$(MAKE) $(S) -C $(ROOT_PATH)/src clean
        lib_install_clean:
        	$(Q)$(MAKE) $(S) -C $(ROOT_PATH)/src install_clean
        
      4. make lib -j 編譯設備層級的 lib 文件,这些 lib 文件在当前处理器级别的 src 目录,并且会将这些 .a 文件复制到当前处理器界别的 lib 目录。
        lib: __lib
        
        # 根據 .config 生成對應的 autoconf.h 頭文件
        # 執行的命令是 $(CONF) --syncconfig $(Kconfig) 文件就可以生成 include/generated/autoconf.h 頭文件
        include/generated/autoconf.h:
        	$(Q)cd $(ROOT_PATH); $(MAKE) prj=$(PRJ_PARENT_DIR)/$(PROJECT) $@; cd -
        
        ifeq ($(sdk_cfg_rdy), y)
        # 第二次開始編譯庫並執行對應 src 目錄的 Makefile
        __lib:
        # 执行 src 目录的 Makefile
        	$(Q)$(MAKE) $(S) -C $(ROOT_PATH)/src install
        else
        # 第一次生成頭文件
        __lib: include/generated/autoconf.h
        	$(Q)$(MAKE) $(S) $@ sdk_cfg_rdy=y
        endif
        
        install:
        	$(Q)$(MAKE) _install TARGET=install
        
        _install: $(SUBDIRS)
        
        # 分别去对应当的 SUBDIRS 中执行 install
        $(SUBDIRS):
        	$(Q)$(MAKE) $(S) -C $@ $(TARGET)
        
        # 以 src/console/ 目錄下的 Makefile 爲例
        
        # 编译 lib 的目标就是 install, 該目標定義在 src/lib.mk 文件中
        #  如果没有特殊指定,那么 lib 的安装目录文件在處理器級別的 lib/ 目录
        INSTALL_PATH ?= $(ROOT_PATH)/lib
        install: $(LIBS)
        	# 将生成的 .a 库文件移动到指定的目录
        	$(Q)$(CP) -t $(INSTALL_PATH) $^
        
      階段二: 配置鴻蒙系統
      1. cd - 进入到整个鸿蒙工程的根目录
      2. hb set 调用 hb 工具的 set 参数。 hb 是鸿蒙构建写的一个 python 工具集合,这个工具的源码在 XR806 这个鸿蒙的工程中 build/lite/hb 目录。 里面 main.py 文件的 main() 函数是这个工具的入口函数。
        1. 针对 set 参数,会 import hb.set.set module, 执行该模块的 exec_command 函数
        2. hb.set.set 模块的 exec_command 函数会提示配置 product 目录。配置完成后,会配置 hb 的唯一的 config 对象(Config 类的单例模式). 关键的的内容为(以选择 wifi_skylark@xradio 为例子):
          • config.product = wifi_skylark
          • config.product_path = vendor/xradio/xr806
          • config.board config.kernel config.kernel_version config.dev_company 都是从 config.product 目录的 config.json 文件中获取的参数信息
          • config.device_path = device/xradio/xr806/liteos_m 这个路径比较重要!!!
      階段三: 編譯鴻蒙系統
      1. hb build -f -c gcc, 備註,因爲我使用的是 gcc 工具鏈,所以額外添加了參數 -c gcc. 執行的 hb.build.build 的 exec_command 函數. 這個是入口,該函數在文件 build/lite/build/build.py 中定義。特別地,在加載對應 module 的時候,會首先執行對應 module 的 add_options 函數,添加針對這個 module 的參數列表,下面步驟截取關鍵的內容展開描述:
        1. build.register_args('ohos_build_type', args.build_type[0]) # 如果沒有 -b 指定編譯類型,默認是 debug, 設置 build 對象的 ohos_build_type 爲 debug
        2. build.compiler = args.compiler[0] # 如果通過 -c 選項指定了編譯器類型,那麼會使用新的編譯器類型複製給 build 對象的 compiler 參數
        3. 如果帶有 -f 選項, args.full = true
        4. return build.build(args.full, cmd_args=cmd_args) 執行 build 構建過程,在文件 build/build_process.py 文件中定義
          1. self.check_in_device()
            • 使用階段二配置的鴻蒙工程參數,設置 build 對象的 product_path,device_path,ohos_kernel_type
            • 設置全局的 config 的 out_path 爲鴻蒙工程根目錄/out/${board}/${product} 目錄
            • 將 product_path 的 config.json 文件內容相關的參數列表,添加到 build 對象的 args_list 參數列表
          2. cmd_list = self.get_cmd(full_compile, ninja) -> self.get_cmd(True, True)
            • return [self.gn_build, self.ninja_build] 執行 build 對象的 gb_build 和 ninja_build
              • gn_build -> gn_path gen out/${board}/${product} --root=鴻蒙的根目錄 --dotfile=鴻蒙的根路徑/build/lite/.gn --script-executable=python3 --args=參數列表
              • ninja_build -> ninja_path -w dupbuild=warn -C out/${board}${product} + ninja_args
                特別地,因爲在整個編譯過程中不是執行編譯腳本,而是通過 hb.common.utils 工具的 exec_command 函數調用的這些動作,這個函數的一個重要作用是實現了輸出的重定向, 將編譯的過程輸出重定向到了文件中. 不管是 gn_build 還是 ninja_build 都是將這些編譯日志信息重定向到了文件 out/${board}/${product}/build.log 中.
            # 這裏對輸出進行了重定向, 講具體的編譯過程重定向到指定的文件中
            def exec_command(cmd, log_path='out/build.log', **kwargs):
                ...
            
      階段四:執行構建生成 img 文件

      經過前三個命令後就可以在 product 級別的 out 目錄 device/xradio/xr806/xr_skylark/out/ 中找到生成的 xr_system.img 文件了,具體這個文件是怎麼生成的呢。這個階段對階段三的 gn 構建部分進行展開闡述。

      • gn gen out/xradio/xr806 --root=. --dotfile=build/lite/.gn 參數列表
        1. --root 參數指定了 gn 構建的根目錄
        2. --dotfile 參數明確指定了構建的 .gn 文件, 默認會在 root 目錄查找 .gn 文件, 特別地 .gn 文件也會定義 root 變量,確定 gn 構建的根目錄. build/lite/.gn 文件內容是:
        # The location of the build configuration file.
        # gn build 的 config 文件
        buildconfig = "//build/lite/config/BUILDCONFIG.gn"
        # The source root location.
        # 重新定義了構建的 root 目錄
        root = "//build/lite"
        
        build/lite/config/BUILDCONFIG.gn 文件內容是:
        import("//build/lite/ohos_var.gni")
        import("${device_path}/config.gni") -> import("//device/xradio/xr806/liteos_m/config.gni")
        ...
        
        device/xradio/xr806/liteos_m/config.gni 文件內容是,涉及到 SDKconfig.gni 文件生成:
        import("//device/xradio/xr806/liteos_m/SDKconfig.gni") -> 這個文件是在階段一配置過程中生成的
        ...
        # Board related headfiles search path.
        SDKpath = "//device/xradio/xr806" -> 定義了 SDK 的路徑
        ...
        board_include_dirs += [
            ...
            "${SDKpath}/xr_skylark/project/${ProjectPath}", 添加工程路徑用來搜索頭文件
            ...
        ]
        ...
        
        device/xradio/xr806/liteos_m/SDKconfig.gni 文件內容是:
        ...
        ProjectPath = "demo/audio_demo" -> 定義了變量 ProjectPath
        ...
        
        到此,gn 的 config 過程暫時告一段落, 主要就是配置了一些環境變量、編譯選項等內容。下一步就是真正的構建了.因爲 root_path 是 //build/lite, 構建會去該目錄查找 BUILD.gn 文件.
        //build/lite/BUILD.gn 文件內容是:
        # 定义了 ohos 这个组
        group("ohos") {
          deps = []
          # 默認這裏爲空
          if (ohos_build_target == "") {
            # Step 1: Read product configuration profile.
            # 讀取 product_path 目錄下的 json 配置文件
            # product 級別 vendor/xradio/xr806 目錄下的 config.json 文件
            product_cfg = read_file("${product_path}/config.json", "json")
            # kernel 是 product_cfg 文件配置的類型 liteos_m
            kernel = product_cfg.kernel_type
            # Step 2: Loop subsystems configured by product.
            # 遍歷 config.json 文件中定義的所有的 subsystems
            foreach(product_configed_subsystem, product_cfg.subsystems) {
              subsystem_name = product_configed_subsystem.subsystem
              subsystem_info = {
              }
              # Step 3: Read OS subsystems profile.
              # 根據對應的的 subsystem, 讀取 components 對應目錄的 json 配置文件
              # subsystem 對應的配置文件保存在 //build/lite/components 目錄, 讀取對應名稱的 json 配置文件
              subsystem_info =
                  read_file("//build/lite/components/${subsystem_name}.json", "json")
              # Step 4: Loop components configured by product.
              # 遍歷具體的 subsystem 的 components 組件
              foreach(product_configed_component,
                      product_configed_subsystem.components) {
                # Step 5: Check whether the component configured by product is exist.
                # 查找是否找到了對應的 component, 如果至少找到一個就複製 component_found 爲 true
                component_found = false
                foreach(system_component, subsystem_info.components) {
                  if (product_configed_component.component ==
                      system_component.component) {
                    component_found = true
                  }
                }
                # 如果沒有找到那麼斷言錯誤
                assert(
                    component_found,
                    "Component \"${product_configed_component.component}\" not found" +
                        ", please check your product configuration.")
                # Step 6: Loop OS components and check validity of product configuration.
                # 如果在對應的 subsystem 的 json 配置文件中找到了對應的定義的 component 組件
                # 繼續從頭遍歷該 subsystem
                foreach(component, subsystem_info.components) {
                  kernel_valid = false
                  board_valid = false
                  # Step 6.1: Skip component which not configured by product.
                  # 如果找到了這個 component
                  if (component.component == product_configed_component.component) {
                    # Step 6.1.1: Loop OS components adapted kernel type.
                    # kernel 根據 product 的 json 配置文件已經初始化爲 liteos_m
                    # 遍歷這個 subsystem 的 component 的所有 adapted_kernel 配置參數
                    # 如果這個 component 已經適配了指定的 kernel 類型。 表示 component 有效
                    foreach(component_adapted_kernel, component.adapted_kernel) {
                    # 如果有定義的 kernel 類型,表示匹配,並且該 kernel 類型有效
                      if (component_adapted_kernel == kernel && kernel_valid == false) {
                        kernel_valid = true
                      }
                    }
                    # 如果該組件沒有適配指定的內核類型,那麼打印錯誤信息
                    assert(
                        kernel_valid,
                        "Invalid component configed, ${subsystem_name}:${product_configed_component.component} " + "not available for kernel: $kernel!")
                    # Step 6.1.2: Add valid component for compiling.
                    # 將該 component 的 targets 添加到 deps 依賴
                    foreach(component_target, component.targets) {
                      deps += [ component_target ]
                    }
                  }
                }
              }
            }
            # Step 7: Add device and product target by default.
            # 添加設備和 product 的依賴 !!! 這裏是重點
            # xr_system.img 文件生成靠的是依賴 ${device_path}/../ 路徑下的 BUILD.gn 文件
            deps += [ 
              "${device_path}/../",
              "${product_path}" ]
          } else {
            deps += string_split(ohos_build_target, "&&")
          }
        }
        
        以上內容將需要構建的依賴都包含 deps 中了,最終生成的 xr_system.img 的入口還是 ${device_path}/../ 這個依賴,下面進行詳細闡述。
        /device/xradio/xr806/liteos_m/../BUILD.gn 文件內容是:
        ...
        import("//build/lite/config/component/lite_component.gni") -> 定義了 build_ext_command 模板類
        ...
        build_ext_component("libSDK") {
          exec_path = rebase_path(".", root_build_dir) -> 將當前目錄設置爲相對內置變量 root_build_dir 的相對路徑
          outdir = rebase_path("$root_out_dir") -> 將 root_out_dir 設置爲相對系統絕對路徑的路徑格式,轉換到 ourdir 目錄
          # 构建的命令, 模板類展開後會通過這個 build.sh 腳本完成 img 的構建
          command = "./build.sh ${outdir}"
          deps = [
            "//build/lite/:ohos",
            "//kernel/liteos_m:kernel",
            "os:liteos_glue",
          ]
          if (IsBootloader == "false") {
            deps += [
              "adapter/hals:adapter",
              "adapter/console:app_console",
              "ohosdemo:ohosdemo" -> 這個是我測試自己添加的一個組件
            ]
          }
        }
        
        上述文件通過 build_ext_component 引用了一個模板類,具體的定義在文件 //build/lite/config/component/lite_component.gni, 內容爲:
        # 定义了一个模板类
        template("build_ext_component") {
          if (defined(invoker.version)) {
            print(invoker.version)
          }
          # 定義了同名的 action
          action(target_name) {
                ... -> 在這裏會調用到定義的 command 對象,執行 ./build.sh /系統絕對路徑/out/xr806/wifi_skylark
          }
          ...
        }
        
        通過 ./build.sh 最終就可以生成 xr_system.img 文件了。最終的實現在 project/project.mk 文件中定義, 整個 Makefile 的入口是在 device/xradio/xr806/xr_skylark/Makefile。在此僅僅闡述最後生成 img 執行的動作,截取自文件 device/xradio/xr806/xr_skylark/project/project.mk。內容爲:
        cd $(IMAGE_PATH) && \
        chmod a+r *.bin && \
        $(Q)$(CC) -E -P -CC $(CC_SYMBOLS) -I$(ROOT_PATH)/../include/generated -include autoconf.h -o $(PROJECT_IMG_CFG) - < $(IMAGE_CFG) && \
        $(SIGNPACK_GEN_CERT) && \
        chmod 777 $(IMAGE_TOOL) && $(IMAGE_TOOL) $(IMAGE_TOOL_OPT) -c $(PROJECT_IMG_CFG) -o $(IMAGE_NAME).img
        # 講 project 中的 bin 文件複製到頂層目錄下的 out 目錄中
        @test -d "$(ROOT_PATH)/out" || mkdir -p "$(ROOT_PATH)/out"
        $(Q)$(CP) -t $(ROOT_PATH)/out/ $(IMAGE_PATH)/*.bin $(IMAGE_PATH)/$(IMAGE_NAME).img *.map
        
      posted in XR系列-无线互联
      iysheng
      iysheng
    • 【XR806开发板试用】 E-Link Board 👉‍ 基础开发

      E-Link 指定的就是墨水显示屏。在这次试用 XR806 开发板的过程中,我计划是开发一款工作看板设备。放在办公桌旁边,可以同步更新并显示每天的工作计划,起到试试提醒自己好好工作  的目的。暂且叫这个项目 E-Link Board 了。

      这次算是第一次近距离的使用鸿蒙系统。所以也是怀着学习新知识的心态在进行这个项目。针对这个项目,涉及到了两个仓库:

      • E-Link Board 代码仓库
      • xr806 学习笔记仓库

      这篇文章描述针对这个项目做的基础开发工作,包括如下几点:
      xr806-Page-5.drawio.png


      • 在系统框架学习章节,输出了一点内容現在的工程是如何生成 xr_system.img。
      • 在 screen_demo 开发部分,涉及到了用 Kicad 对底板进行硬件设计、线程和屏幕驱动开发,具体的描述内容可以参看如下两篇内容:
        1. E-Link Board 底板设计
        2. screen_demo 软件设计
      posted in XR系列-无线互联
      iysheng
      iysheng
    • 【XR806开发板试用】 E-Link Board 👉‍ screen_app 开发

      解决的问题:为了改善在家做月子时候,家人希望时不时地进屋里看小孩,但是如果这时候小孩子在睡觉,或者妈妈在哺乳,如果贸然地进来是不是很不礼貌,纵使是敲门,这时候会不会吵到小孩子呢。如果有一个小看板可以放在客厅或者门口位置,孩子妈妈可以通过手机遥控修改看板上的内容,及时更新小孩子的状态,是不是可以减少贸然的尴尬呢?

      实现的方法:针对上述问题,我基于 XR806 设计了一款比较小巧的母婴看板设备。这个设备支持手机通过微信连连遥控看板的内容,及时更新小孩子的状态。

      这个设备外观是这样的:


      这张图片显示的图标是我使用到的一些软件的 logo。对了,还有我的微信头像。嘿嘿。这些和母婴看板有什么关系呢?

      再看一张截图:


      这张图,描述了整个母婴看板设备的层次图。XR806 通过 mqtt 连接腾讯云,此处要感谢@mocul ,参考了他的教程,少走了一些弯路。此外,重点还参考了如下几个文件:

      • device/xradio/xr806/xr_skylark/project/example/mqtt/main.c
      • device/xradio/xr806/xr_skylark/project/example/wlan/main.c
      • device/xradio/xr806/xr_skylark/src/cjson/json_test.c
      • device/xradio/xr806/xr_skylark/project/common/cmd/cmd_json.c

      分别实现了 MQTT 的移植以及 cJSON 格式数据解析

      特别地,通过参考 wlan/main.c 文件,实现了上电自动连接热点的功能。

      通过腾讯云注册了一个设备:


      有了这个设备,本来想尝试开发下腾讯连连 H5 面板呢,但是着实基础薄弱,不知道从何处着手看代码,只能偷懒直接拿着 demo 例程来用了。具体的 demo 在https://github.com/tencentyun/iotexplorer-h5-panel-demo。

      直接编译出来 js 和 css,上传到腾讯云自定义面板处:


      最后的效果是这样的:


      整个项目的代码在 gitee 上,https://gitee.com/iysheng/devboard_device_allwinner_xr806.git
      其中 notes 分支记录了整个项目的代码开发过程。

      为了更好的展示效果,我录制了一个小视频放在了 bilibili。效果的链接。

      XR806 母婴看板演示视频链接

      posted in XR系列-无线互联
      iysheng
      iysheng

    Latest posts made by iysheng

    • 【XR806开发板试用】 E-Link Board 👉‍ screen_app 开发

      解决的问题:为了改善在家做月子时候,家人希望时不时地进屋里看小孩,但是如果这时候小孩子在睡觉,或者妈妈在哺乳,如果贸然地进来是不是很不礼貌,纵使是敲门,这时候会不会吵到小孩子呢。如果有一个小看板可以放在客厅或者门口位置,孩子妈妈可以通过手机遥控修改看板上的内容,及时更新小孩子的状态,是不是可以减少贸然的尴尬呢?

      实现的方法:针对上述问题,我基于 XR806 设计了一款比较小巧的母婴看板设备。这个设备支持手机通过微信连连遥控看板的内容,及时更新小孩子的状态。

      这个设备外观是这样的:


      这张图片显示的图标是我使用到的一些软件的 logo。对了,还有我的微信头像。嘿嘿。这些和母婴看板有什么关系呢?

      再看一张截图:


      这张图,描述了整个母婴看板设备的层次图。XR806 通过 mqtt 连接腾讯云,此处要感谢@mocul ,参考了他的教程,少走了一些弯路。此外,重点还参考了如下几个文件:

      • device/xradio/xr806/xr_skylark/project/example/mqtt/main.c
      • device/xradio/xr806/xr_skylark/project/example/wlan/main.c
      • device/xradio/xr806/xr_skylark/src/cjson/json_test.c
      • device/xradio/xr806/xr_skylark/project/common/cmd/cmd_json.c

      分别实现了 MQTT 的移植以及 cJSON 格式数据解析

      特别地,通过参考 wlan/main.c 文件,实现了上电自动连接热点的功能。

      通过腾讯云注册了一个设备:


      有了这个设备,本来想尝试开发下腾讯连连 H5 面板呢,但是着实基础薄弱,不知道从何处着手看代码,只能偷懒直接拿着 demo 例程来用了。具体的 demo 在https://github.com/tencentyun/iotexplorer-h5-panel-demo。

      直接编译出来 js 和 css,上传到腾讯云自定义面板处:


      最后的效果是这样的:


      整个项目的代码在 gitee 上,https://gitee.com/iysheng/devboard_device_allwinner_xr806.git
      其中 notes 分支记录了整个项目的代码开发过程。

      为了更好的展示效果,我录制了一个小视频放在了 bilibili。效果的链接。

      XR806 母婴看板演示视频链接

      posted in XR系列-无线互联
      iysheng
      iysheng
    • 【XR806开发板试用】 E-Link Board 👉‍ 基础开发

      E-Link 指定的就是墨水显示屏。在这次试用 XR806 开发板的过程中,我计划是开发一款工作看板设备。放在办公桌旁边,可以同步更新并显示每天的工作计划,起到试试提醒自己好好工作  的目的。暂且叫这个项目 E-Link Board 了。

      这次算是第一次近距离的使用鸿蒙系统。所以也是怀着学习新知识的心态在进行这个项目。针对这个项目,涉及到了两个仓库:

      • E-Link Board 代码仓库
      • xr806 学习笔记仓库

      这篇文章描述针对这个项目做的基础开发工作,包括如下几点:
      xr806-Page-5.drawio.png


      • 在系统框架学习章节,输出了一点内容現在的工程是如何生成 xr_system.img。
      • 在 screen_demo 开发部分,涉及到了用 Kicad 对底板进行硬件设计、线程和屏幕驱动开发,具体的描述内容可以参看如下两篇内容:
        1. E-Link Board 底板设计
        2. screen_demo 软件设计
      posted in XR系列-无线互联
      iysheng
      iysheng
    • Reply: hal_rtc相关函数实现,只找到函数定义

      @zhugx 在 hal_rtc相关函数实现,只找到函数定义 中说:

      HAL_RTC_SetDDHHMMSS

      可以在 Linux 下使用 grep 搜索看看。

      ▸ grep "HAL_RTC_SetDDHHMMSS" -nr device/xradio/xr806/
      device/xradio/xr806/xr_skylark/include/driver/chip/hal_rtc.h:222:void HAL_RTC_SetDDHHMMSS(RTC_WeekDay wday, uint8_t hour, uint8_t minute, uint8_t second);
      device/xradio/xr806/xr_skylark/lib/xradio_v2/rom_symbol.ld:440:HAL_RTC_SetDDHHMMSS = 0xdad5;
      device/xradio/xr806/xr_skylark/lib/xradio_v3/rom_symbol.ld:496:HAL_RTC_SetDDHHMMSS = 0x14159;
      device/xradio/xr806/xr_skylark/project/bootloader/gcc/.project.ld:494:HAL_RTC_SetDDHHMMSS = 0x14159;
      grep: device/xradio/xr806/xr_skylark/project/bootloader/gcc/bootloader.elf: binary file matches
      device/xradio/xr806/xr_skylark/project/bootloader/gcc/bootloader.map:3513:                0x0000000000014159                HAL_RTC_SetDDHHMMSS = 0x14159
      device/xradio/xr806/xr_skylark/project/common/cmd/cmd_rtc.c:122:        HAL_RTC_SetDDHHMMSS(CMD_WDAY_TM2RTC(t.tm_wday), t.tm_hour, t.tm_min, t.tm_sec);
      grep: device/xradio/xr806/xr_skylark/project/common/cmd/cmd_rtc.o: binary file matches
      device/xradio/xr806/xr_skylark/project/demo/audio_demo/gcc/audio_demo.map:16368:                0x0000000000014159                HAL_RTC_SetDDHHMMSS = 0x14159
      device/xradio/xr806/xr_skylark/project/demo/audio_demo/gcc/audio_demo.map:38722:HAL_RTC_SetDDHHMMSS                               ../../../../project/common/cmd/cmd_rtc.o
      device/xradio/xr806/xr_skylark/project/demo/audio_demo/gcc/.project.ld:497:HAL_RTC_SetDDHHMMSS = 0x14159;
      grep: device/xradio/xr806/xr_skylark/project/demo/audio_demo/gcc/audio_demo.elf: binary file matches
      device/xradio/xr806/xr_skylark/project/example/rtc/main.c:39:#define RTC_SET_DDHHMMSS(wday, hour, minute, second)     HAL_RTC_SetDDHHMMSS(wday, hour, minute, second)
      device/xradio/xr806/xr_skylark/src/rom/rom_bin/out/rom.csv:343:'0000dad4,'00000060,'T,'HAL_RTC_SetDDHHMMSS
      device/xradio/xr806/xr_skylark/src/rom/rom_bin/src/driver/chip/hal_rtc.c:245:void HAL_RTC_SetDDHHMMSS(RTC_WeekDay wday, uint8_t hour, uint8_t minute, uint8_t second)
      device/xradio/xr806/xr_skylark/tags:15405:HAL_RTC_SetDDHHMMSS   src/rom/rom_bin/src/driver/chip/hal_rtc.c       /^void HAL_RTC_SetDDHHMMSS(RTC_WeekDay wday, uint8_t hour, uint8_t minute, uint8_t second)$/;"  f
      device/xradio/xr806/xr_skylark/out/audio_demo.map:16368:                0x0000000000014159                HAL_RTC_SetDDHHMMSS = 0x14159
      device/xradio/xr806/xr_skylark/out/audio_demo.map:38722:HAL_RTC_SetDDHHMMSS                               ../../../../project/common/cmd/cmd_rtc.o
      

      具体的你可以看下文件device/xraddevice/xradio/xr806/xr_skylark/src/rom/rom_bin/src/driver/chip/hal_rtc.c 这里有这些函数定义。

      posted in XR系列-无线互联
      iysheng
      iysheng
    • Reply: 求助,编译wifi模块时遇到问题

      @xisecret 這個是 Makefile 構建的語法啊,就是說 build 這個目標在構建的過程中,

      1. 依賴 __build
      2. 第一次構建 __build 的時候 sdk_cfg_rdy 爲 n 時,會依賴 include/generated/autoconf.h 頭文件,
      3. 第二次構建 __build 這個目標的時候,就依賴 all 和 image 這兩個目標了
      4. 接下來就會去找 all 和 image 這兩個木碧歐啊的依賴

      針對你這個問題,我今天放開了部分代碼,查看初步打印和你這個問題有點像,通過查看 out/xr806/wifi_skylark/error.log 文件,發現是 app_xip.bin 太大了,導致生成 image 的時候出問題了,通過 make menuconfig 取消了部分內容,讓生成的 app_xip.bin 文件大小降低下來就可以了。

      還是建議你看下出問題時的 error.log 文件,具體原因具體分析。
      2021-12-29_14-40.png

      posted in XR系列-无线互联
      iysheng
      iysheng
    • Reply: 求助,编译wifi模块时遇到问题

      根據打印,看下你的 out/xr806/wifi_skylark/error.log 有沒有什麼有用信息呢?

      posted in XR系列-无线互联
      iysheng
      iysheng
    • Reply: 請教現在的工程是如何生成 xr_system.img 的?

      最近幾天學習了構建的過程,再次記錄描述一下。

      該文件記錄 XR806 工程的編譯過程

      涉及到的組件
      * [GN](https://gn.googlesource.com/gn/+/main/docs/reference.md)
      * [ninja](https://ninja-build.org/)
      
      編譯命令
      階段一: 配置以及編譯扳機的原生靜態庫
      1. cd device/xradio/xr806/xr_skylark 切換到處理器層級目錄
      2. cp project/demo/audio_demo/gcc/defconfig .config 複製 demo 工程的配置文件
      3. make menuconfig;make build_clean 根據 demo 配置工程,並進行工程清理, 實際的目標定義在 project/prject.mk 文件中
        1. <a id='SDKconfig'>配置工程</a>,生成 ../liteos_m/SDKconfig.gni 文件,這一步很重要
        menuconfig: mconf
            $< ./Kconfig
            python config.py
        
        特別地在 python config.py 過程中會根據 .config 文件生成 ../liteos_m/SDKconfig.gni 文件,這個文件在後續構建鴻蒙的時候會用到.
        2.
        #  在文件 gcc/Makefile 中定義的 ROOT_PATH
        #  絕對路徑 device/xradio/xr806/xr_skylark 是處理器級別的
        ROOT_PATH := ../../../..
        build_clean: clean lib_clean lib_install_clean
        	-$(Q)-rm -rf $(ROOT_PATH)/out/*
        # 刪除編譯的工程文件
        clean:
        	$(Q)-rm -f $(PROJECT_LD) $(PROJECT).* *.bin $(OBJS) $(DEPS)
        	$(Q)-rm -rf $(ROOT_PATH)/out/*
        lib_clean:
        # 進入到 **src** 目錄執行對應的清除動作
        	$(Q)$(MAKE) $(S) -C $(ROOT_PATH)/src clean
        lib_install_clean:
        	$(Q)$(MAKE) $(S) -C $(ROOT_PATH)/src install_clean
        
      4. make lib -j 編譯設備層級的 lib 文件,这些 lib 文件在当前处理器级别的 src 目录,并且会将这些 .a 文件复制到当前处理器界别的 lib 目录。
        lib: __lib
        
        # 根據 .config 生成對應的 autoconf.h 頭文件
        # 執行的命令是 $(CONF) --syncconfig $(Kconfig) 文件就可以生成 include/generated/autoconf.h 頭文件
        include/generated/autoconf.h:
        	$(Q)cd $(ROOT_PATH); $(MAKE) prj=$(PRJ_PARENT_DIR)/$(PROJECT) $@; cd -
        
        ifeq ($(sdk_cfg_rdy), y)
        # 第二次開始編譯庫並執行對應 src 目錄的 Makefile
        __lib:
        # 执行 src 目录的 Makefile
        	$(Q)$(MAKE) $(S) -C $(ROOT_PATH)/src install
        else
        # 第一次生成頭文件
        __lib: include/generated/autoconf.h
        	$(Q)$(MAKE) $(S) $@ sdk_cfg_rdy=y
        endif
        
        install:
        	$(Q)$(MAKE) _install TARGET=install
        
        _install: $(SUBDIRS)
        
        # 分别去对应当的 SUBDIRS 中执行 install
        $(SUBDIRS):
        	$(Q)$(MAKE) $(S) -C $@ $(TARGET)
        
        # 以 src/console/ 目錄下的 Makefile 爲例
        
        # 编译 lib 的目标就是 install, 該目標定義在 src/lib.mk 文件中
        #  如果没有特殊指定,那么 lib 的安装目录文件在處理器級別的 lib/ 目录
        INSTALL_PATH ?= $(ROOT_PATH)/lib
        install: $(LIBS)
        	# 将生成的 .a 库文件移动到指定的目录
        	$(Q)$(CP) -t $(INSTALL_PATH) $^
        
      階段二: 配置鴻蒙系統
      1. cd - 进入到整个鸿蒙工程的根目录
      2. hb set 调用 hb 工具的 set 参数。 hb 是鸿蒙构建写的一个 python 工具集合,这个工具的源码在 XR806 这个鸿蒙的工程中 build/lite/hb 目录。 里面 main.py 文件的 main() 函数是这个工具的入口函数。
        1. 针对 set 参数,会 import hb.set.set module, 执行该模块的 exec_command 函数
        2. hb.set.set 模块的 exec_command 函数会提示配置 product 目录。配置完成后,会配置 hb 的唯一的 config 对象(Config 类的单例模式). 关键的的内容为(以选择 wifi_skylark@xradio 为例子):
          • config.product = wifi_skylark
          • config.product_path = vendor/xradio/xr806
          • config.board config.kernel config.kernel_version config.dev_company 都是从 config.product 目录的 config.json 文件中获取的参数信息
          • config.device_path = device/xradio/xr806/liteos_m 这个路径比较重要!!!
      階段三: 編譯鴻蒙系統
      1. hb build -f -c gcc, 備註,因爲我使用的是 gcc 工具鏈,所以額外添加了參數 -c gcc. 執行的 hb.build.build 的 exec_command 函數. 這個是入口,該函數在文件 build/lite/build/build.py 中定義。特別地,在加載對應 module 的時候,會首先執行對應 module 的 add_options 函數,添加針對這個 module 的參數列表,下面步驟截取關鍵的內容展開描述:
        1. build.register_args('ohos_build_type', args.build_type[0]) # 如果沒有 -b 指定編譯類型,默認是 debug, 設置 build 對象的 ohos_build_type 爲 debug
        2. build.compiler = args.compiler[0] # 如果通過 -c 選項指定了編譯器類型,那麼會使用新的編譯器類型複製給 build 對象的 compiler 參數
        3. 如果帶有 -f 選項, args.full = true
        4. return build.build(args.full, cmd_args=cmd_args) 執行 build 構建過程,在文件 build/build_process.py 文件中定義
          1. self.check_in_device()
            • 使用階段二配置的鴻蒙工程參數,設置 build 對象的 product_path,device_path,ohos_kernel_type
            • 設置全局的 config 的 out_path 爲鴻蒙工程根目錄/out/${board}/${product} 目錄
            • 將 product_path 的 config.json 文件內容相關的參數列表,添加到 build 對象的 args_list 參數列表
          2. cmd_list = self.get_cmd(full_compile, ninja) -> self.get_cmd(True, True)
            • return [self.gn_build, self.ninja_build] 執行 build 對象的 gb_build 和 ninja_build
              • gn_build -> gn_path gen out/${board}/${product} --root=鴻蒙的根目錄 --dotfile=鴻蒙的根路徑/build/lite/.gn --script-executable=python3 --args=參數列表
              • ninja_build -> ninja_path -w dupbuild=warn -C out/${board}${product} + ninja_args
                特別地,因爲在整個編譯過程中不是執行編譯腳本,而是通過 hb.common.utils 工具的 exec_command 函數調用的這些動作,這個函數的一個重要作用是實現了輸出的重定向, 將編譯的過程輸出重定向到了文件中. 不管是 gn_build 還是 ninja_build 都是將這些編譯日志信息重定向到了文件 out/${board}/${product}/build.log 中.
            # 這裏對輸出進行了重定向, 講具體的編譯過程重定向到指定的文件中
            def exec_command(cmd, log_path='out/build.log', **kwargs):
                ...
            
      階段四:執行構建生成 img 文件

      經過前三個命令後就可以在 product 級別的 out 目錄 device/xradio/xr806/xr_skylark/out/ 中找到生成的 xr_system.img 文件了,具體這個文件是怎麼生成的呢。這個階段對階段三的 gn 構建部分進行展開闡述。

      • gn gen out/xradio/xr806 --root=. --dotfile=build/lite/.gn 參數列表
        1. --root 參數指定了 gn 構建的根目錄
        2. --dotfile 參數明確指定了構建的 .gn 文件, 默認會在 root 目錄查找 .gn 文件, 特別地 .gn 文件也會定義 root 變量,確定 gn 構建的根目錄. build/lite/.gn 文件內容是:
        # The location of the build configuration file.
        # gn build 的 config 文件
        buildconfig = "//build/lite/config/BUILDCONFIG.gn"
        # The source root location.
        # 重新定義了構建的 root 目錄
        root = "//build/lite"
        
        build/lite/config/BUILDCONFIG.gn 文件內容是:
        import("//build/lite/ohos_var.gni")
        import("${device_path}/config.gni") -> import("//device/xradio/xr806/liteos_m/config.gni")
        ...
        
        device/xradio/xr806/liteos_m/config.gni 文件內容是,涉及到 SDKconfig.gni 文件生成:
        import("//device/xradio/xr806/liteos_m/SDKconfig.gni") -> 這個文件是在階段一配置過程中生成的
        ...
        # Board related headfiles search path.
        SDKpath = "//device/xradio/xr806" -> 定義了 SDK 的路徑
        ...
        board_include_dirs += [
            ...
            "${SDKpath}/xr_skylark/project/${ProjectPath}", 添加工程路徑用來搜索頭文件
            ...
        ]
        ...
        
        device/xradio/xr806/liteos_m/SDKconfig.gni 文件內容是:
        ...
        ProjectPath = "demo/audio_demo" -> 定義了變量 ProjectPath
        ...
        
        到此,gn 的 config 過程暫時告一段落, 主要就是配置了一些環境變量、編譯選項等內容。下一步就是真正的構建了.因爲 root_path 是 //build/lite, 構建會去該目錄查找 BUILD.gn 文件.
        //build/lite/BUILD.gn 文件內容是:
        # 定义了 ohos 这个组
        group("ohos") {
          deps = []
          # 默認這裏爲空
          if (ohos_build_target == "") {
            # Step 1: Read product configuration profile.
            # 讀取 product_path 目錄下的 json 配置文件
            # product 級別 vendor/xradio/xr806 目錄下的 config.json 文件
            product_cfg = read_file("${product_path}/config.json", "json")
            # kernel 是 product_cfg 文件配置的類型 liteos_m
            kernel = product_cfg.kernel_type
            # Step 2: Loop subsystems configured by product.
            # 遍歷 config.json 文件中定義的所有的 subsystems
            foreach(product_configed_subsystem, product_cfg.subsystems) {
              subsystem_name = product_configed_subsystem.subsystem
              subsystem_info = {
              }
              # Step 3: Read OS subsystems profile.
              # 根據對應的的 subsystem, 讀取 components 對應目錄的 json 配置文件
              # subsystem 對應的配置文件保存在 //build/lite/components 目錄, 讀取對應名稱的 json 配置文件
              subsystem_info =
                  read_file("//build/lite/components/${subsystem_name}.json", "json")
              # Step 4: Loop components configured by product.
              # 遍歷具體的 subsystem 的 components 組件
              foreach(product_configed_component,
                      product_configed_subsystem.components) {
                # Step 5: Check whether the component configured by product is exist.
                # 查找是否找到了對應的 component, 如果至少找到一個就複製 component_found 爲 true
                component_found = false
                foreach(system_component, subsystem_info.components) {
                  if (product_configed_component.component ==
                      system_component.component) {
                    component_found = true
                  }
                }
                # 如果沒有找到那麼斷言錯誤
                assert(
                    component_found,
                    "Component \"${product_configed_component.component}\" not found" +
                        ", please check your product configuration.")
                # Step 6: Loop OS components and check validity of product configuration.
                # 如果在對應的 subsystem 的 json 配置文件中找到了對應的定義的 component 組件
                # 繼續從頭遍歷該 subsystem
                foreach(component, subsystem_info.components) {
                  kernel_valid = false
                  board_valid = false
                  # Step 6.1: Skip component which not configured by product.
                  # 如果找到了這個 component
                  if (component.component == product_configed_component.component) {
                    # Step 6.1.1: Loop OS components adapted kernel type.
                    # kernel 根據 product 的 json 配置文件已經初始化爲 liteos_m
                    # 遍歷這個 subsystem 的 component 的所有 adapted_kernel 配置參數
                    # 如果這個 component 已經適配了指定的 kernel 類型。 表示 component 有效
                    foreach(component_adapted_kernel, component.adapted_kernel) {
                    # 如果有定義的 kernel 類型,表示匹配,並且該 kernel 類型有效
                      if (component_adapted_kernel == kernel && kernel_valid == false) {
                        kernel_valid = true
                      }
                    }
                    # 如果該組件沒有適配指定的內核類型,那麼打印錯誤信息
                    assert(
                        kernel_valid,
                        "Invalid component configed, ${subsystem_name}:${product_configed_component.component} " + "not available for kernel: $kernel!")
                    # Step 6.1.2: Add valid component for compiling.
                    # 將該 component 的 targets 添加到 deps 依賴
                    foreach(component_target, component.targets) {
                      deps += [ component_target ]
                    }
                  }
                }
              }
            }
            # Step 7: Add device and product target by default.
            # 添加設備和 product 的依賴 !!! 這裏是重點
            # xr_system.img 文件生成靠的是依賴 ${device_path}/../ 路徑下的 BUILD.gn 文件
            deps += [ 
              "${device_path}/../",
              "${product_path}" ]
          } else {
            deps += string_split(ohos_build_target, "&&")
          }
        }
        
        以上內容將需要構建的依賴都包含 deps 中了,最終生成的 xr_system.img 的入口還是 ${device_path}/../ 這個依賴,下面進行詳細闡述。
        /device/xradio/xr806/liteos_m/../BUILD.gn 文件內容是:
        ...
        import("//build/lite/config/component/lite_component.gni") -> 定義了 build_ext_command 模板類
        ...
        build_ext_component("libSDK") {
          exec_path = rebase_path(".", root_build_dir) -> 將當前目錄設置爲相對內置變量 root_build_dir 的相對路徑
          outdir = rebase_path("$root_out_dir") -> 將 root_out_dir 設置爲相對系統絕對路徑的路徑格式,轉換到 ourdir 目錄
          # 构建的命令, 模板類展開後會通過這個 build.sh 腳本完成 img 的構建
          command = "./build.sh ${outdir}"
          deps = [
            "//build/lite/:ohos",
            "//kernel/liteos_m:kernel",
            "os:liteos_glue",
          ]
          if (IsBootloader == "false") {
            deps += [
              "adapter/hals:adapter",
              "adapter/console:app_console",
              "ohosdemo:ohosdemo" -> 這個是我測試自己添加的一個組件
            ]
          }
        }
        
        上述文件通過 build_ext_component 引用了一個模板類,具體的定義在文件 //build/lite/config/component/lite_component.gni, 內容爲:
        # 定义了一个模板类
        template("build_ext_component") {
          if (defined(invoker.version)) {
            print(invoker.version)
          }
          # 定義了同名的 action
          action(target_name) {
                ... -> 在這裏會調用到定義的 command 對象,執行 ./build.sh /系統絕對路徑/out/xr806/wifi_skylark
          }
          ...
        }
        
        通過 ./build.sh 最終就可以生成 xr_system.img 文件了。最終的實現在 project/project.mk 文件中定義, 整個 Makefile 的入口是在 device/xradio/xr806/xr_skylark/Makefile。在此僅僅闡述最後生成 img 執行的動作,截取自文件 device/xradio/xr806/xr_skylark/project/project.mk。內容爲:
        cd $(IMAGE_PATH) && \
        chmod a+r *.bin && \
        $(Q)$(CC) -E -P -CC $(CC_SYMBOLS) -I$(ROOT_PATH)/../include/generated -include autoconf.h -o $(PROJECT_IMG_CFG) - < $(IMAGE_CFG) && \
        $(SIGNPACK_GEN_CERT) && \
        chmod 777 $(IMAGE_TOOL) && $(IMAGE_TOOL) $(IMAGE_TOOL_OPT) -c $(PROJECT_IMG_CFG) -o $(IMAGE_NAME).img
        # 講 project 中的 bin 文件複製到頂層目錄下的 out 目錄中
        @test -d "$(ROOT_PATH)/out" || mkdir -p "$(ROOT_PATH)/out"
        $(Q)$(CP) -t $(ROOT_PATH)/out/ $(IMAGE_PATH)/*.bin $(IMAGE_PATH)/$(IMAGE_NAME).img *.map
        
      posted in XR系列-无线互联
      iysheng
      iysheng
    • Reply: 编译 device/xradio/xr806/xr_skylark/project/example会有undefined reference to

      @allzhi 看一下你的 device/xradio/xr806/xr_skylark/project/linker_script/gcc/appos.ld 文件有没有包含这个两个 .a 库文件,如果没有,添加一下再试试呢。

      posted in XR系列-无线互联
      iysheng
      iysheng
    • Reply: XR806板子异常崩溃,无法重新下载固件的问题

      @cszzlsw 估计是下载的系统有问题了,换了 windows7 莫名其妙 就好了。Image 1.png

      posted in XR系列-无线互联
      iysheng
      iysheng
    • Reply: XR806板子异常崩溃,无法重新下载固件的问题

      @cszzlsw 我是在 linux 下,斷接之後還是有錯誤信息。
      2021-12-24_18-31.png

      請問該如何解決啊?

      posted in XR系列-无线互联
      iysheng
      iysheng
    • 請教現在的工程是如何生成 xr_system.img 的?

      最近看了幾天的編譯構建,目前還是沒有搞清楚 xr_system.img 是如何編譯出來的?希望有懂的人可以指點一下。

      posted in XR系列-无线互联
      iysheng
      iysheng