v853新封装?851?
Randolph 发布的帖子
-
回复: 整了个D1s的小板子跑毕设发布在 MR Series
更新一下水个贴。
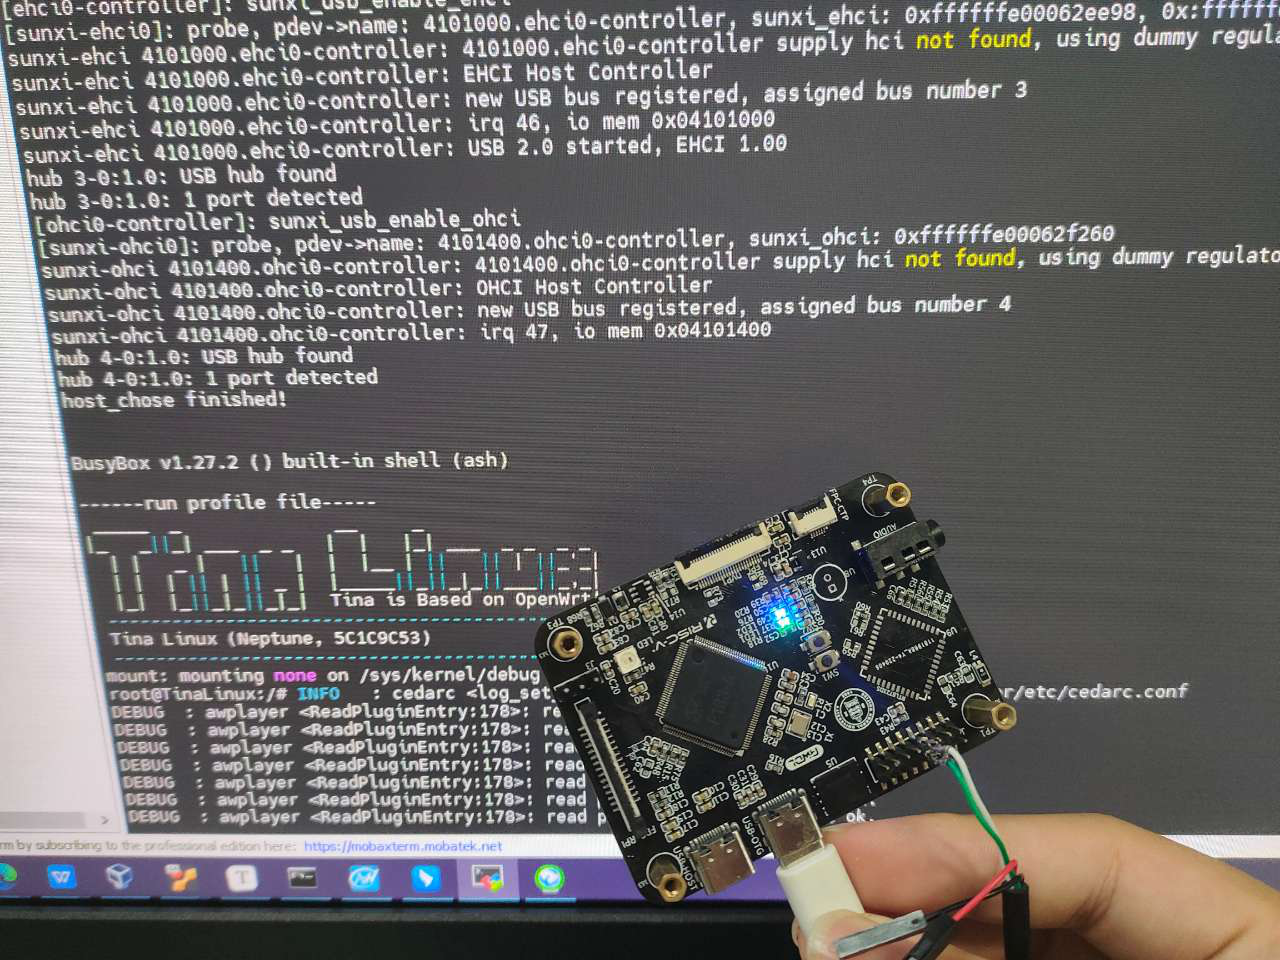
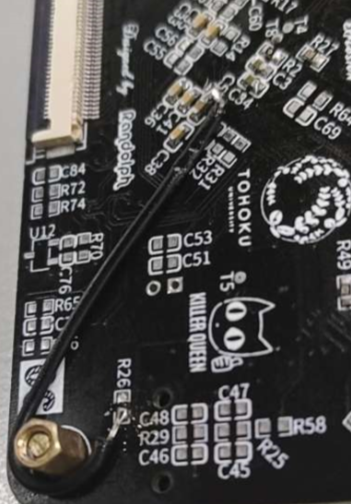
第一版各种问题还是挺多的,比如sd卡座封装画反了,画原理图脑抽把一个ddr供电口的网络标签搞成了文本 ,layout的时候也没注意,导致ddr没供电,只能跳线。。。。。
不过最后还是把系统启动了,皆大欢喜。放点图:

-
XR806开发板FreeRTOS SDK试用发布在 Wireless & Analog Series
1、根据文档下载SDK
git clone ssh://YOURNAME@sdk.allwinnertech.com/git_repo/XR806/xr806_sdk/xr806_sdk.git -b xr806_sdkYOURNAME是自己在客户平台的用户名,我这里的环境是官方给的Ubuntu14,之前编译D1的tinaLinux用的。
拉代码之前务必确认正确添加了本机公钥。
2、配置
可以看看目录结构:
allwinner@allwinner-VirtualBox:~/xr806_sdk$ tree -L 1
.
├── bin
├── ChangeLog.md
├── chip.mk
├── config.mk
├── gcc.mk
├── include
├── Kconfig
├── lib
├── Makefile
├── project
├── README.md
├── src
└── tools

6 directories, 7 files
打开README.md查看:
# XR806 SDK

XR806 SDK supports XR806 series wireless MCUs.


## Configuration

- Edit "gcc.mk" to define GCC path to your own path, eg.
```
  CC_DIR = ~/tools/gcc-arm-none-eabi-8-2019-q3-update/bin
```


## Building

- Building commands
```
  $                        # make sure in SDK top dir
  $ make PRJ=${prj} defconfig or  cp ${prj_defconfig} .config
                           # eg. make PRJ=demo/wlan_demo defconfig or copy project/demo/wlan_demo/gcc/defconfig .config
  $ make menuconfig        # check configuration, like board/XTAL/XIP/CacheSize/...
  $ make lib               # build libraries and copy them to "lib"
  $ make lib_clean         # remove files in "src" generated by `make lib`
  $ make lib_install_clean # Remove libraries in "lib" generated by `make lib`
  $ make                   # build the executable binary
  $ make clean             # remove files generated by `make`
  $ make image             # create the image file
  $ make image_clean       # remove files generated by `make image`
  $ make objdump           # generate the disassembled file
  $ make build             # same as `make lib && make && make image`
  $ make build_clean       # same as `make image_clean clean lib_clean lib_install_clean`
```


## Links

- SDK: https://github.com/XradioTech/xr806-sdk.git
- WiKi: https://github.com/XradioTech/xradiotech-wiki.git
- DOC: https://docs.xradiotech.com
根据提示需要先指定编译器的位置
下载一下相应的编译器并解压:
gcc-arm-none-eabi-8-2019-q3-update-linux.tar.bz2tar -jxvf gcc-arm-none-eabi-8-2019-q3-update-linux.tar.bz2然后修改gcc.mk中指向的目录即可,如下:
CC_DIR := ~/gcc-arm-none-eabi-8-2019-q3-update/bin后面详细列出了make方式,注意要在SDK最顶层下执行。
3、编译DEMO
首先需要执行一下:
make menuconfig然后保存退出即可。
然后执行:
make PRJ=demo/hello_demo可以看到结果:
   text	   data	    bss	    dec	    hex	filename
  39752	   1576	   2248	  43576	   aa38	hello_demo.elf
make[2]: Leaving directory `/home/allwinner/xr806_sdk/project/demo/hello_demo/gcc'
make[1]: Leaving directory `/home/allwinner/xr806_sdk/project/demo/hello_demo/gcc'
/home/allwinner/xr806_sdk
4、制作镜像
进入上一步的demo目录下:
cd project/demo/hello_demo/gcc/执行
make image可以看到:
Flash Layout:
sec bin 0 boot_40M.bin      :	flash_offs: 0x00000000(   0K)	data_size: 0x00002F28(  12K)
sec bin 1 app.bin           :	flash_offs: 0x00004000(  16K)	data_size: 0x00004920(  19K)
sec bin 2 app_xip.bin       :	flash_offs: 0x00029800( 166K)	data_size: 0x000058D0(  23K)

generate image: xr_system.img
cp -t ../../../../out/ ../image/"xr806"/*.bin ../image/"xr806"/xr_system.img *.map
回到SDK根目录下可以看到out文件夹,进入后可见输出文件:
allwinner@allwinner-VirtualBox:~/xr806_sdk/out$ ls
app.bin  app_xip.bin  boot_40M.bin  hello_demo.map  sys_sdd_40M.bin  wlan_bl.bin  wlan_fw.bin  xr_system.img
5、烧录
在SDK的tools文件夹下可见有烧录工具:
allwinner@allwinner-VirtualBox:~/xr806_sdk/tools$ ls
Blink.apk       fs_img_tools         mkimage.exe        phoenixMC.dll    settings.ini      SoundConfig.apk
config          HcidumpXr.7z         mkimage_mac64      phoenixMC.exe    settings_mac.ini
efuse_tool      map_parse_gcc_v3.py  phoenixMC          phoenixMC_mac64  signpack.sh
etfGuiTool.exe  mkimage              phoenixMC_cli.exe  sdd_editor       SmartConfig.apk
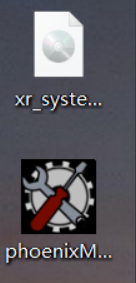
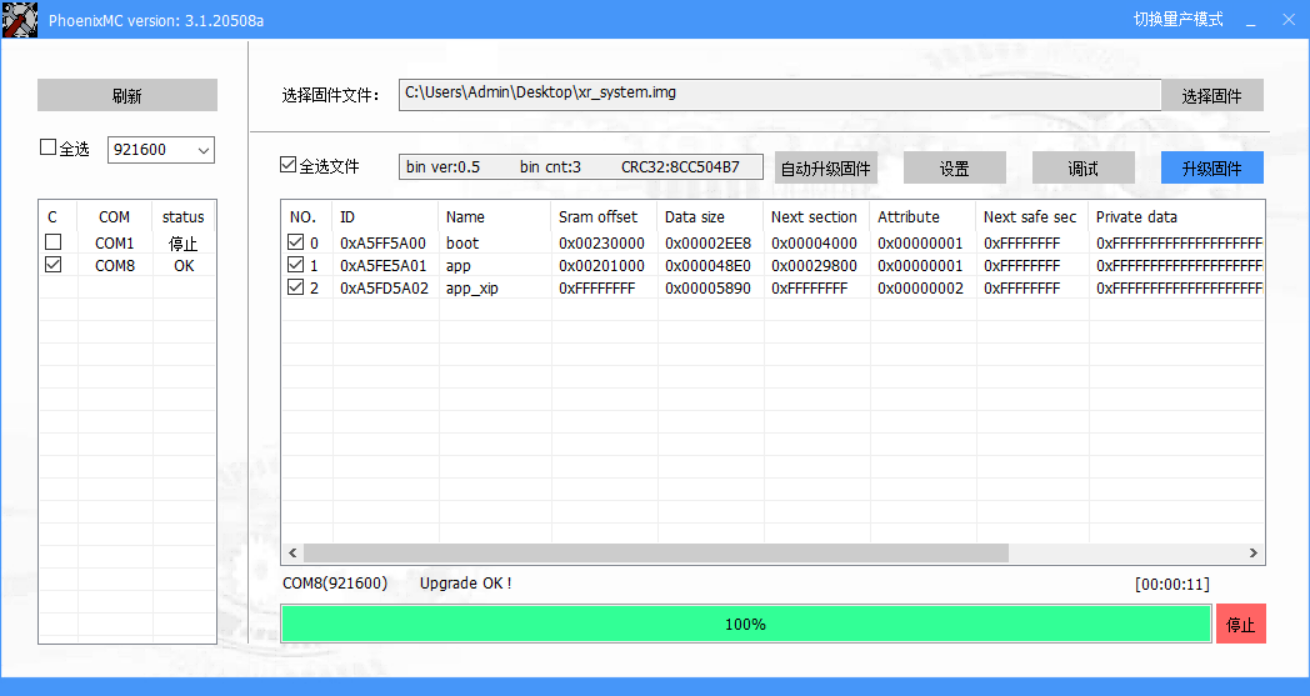
由于想偷懒,没在虚拟机下烧录,直接把img和工具都拖到Windows下:
完成烧录:
6、查看输出
我是用的是putty,波特率115200
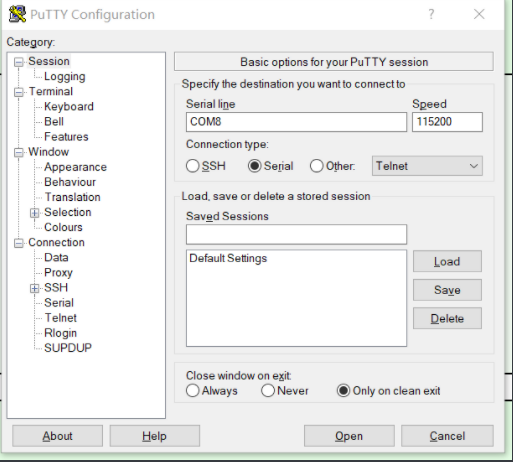
熟悉的helloworld:
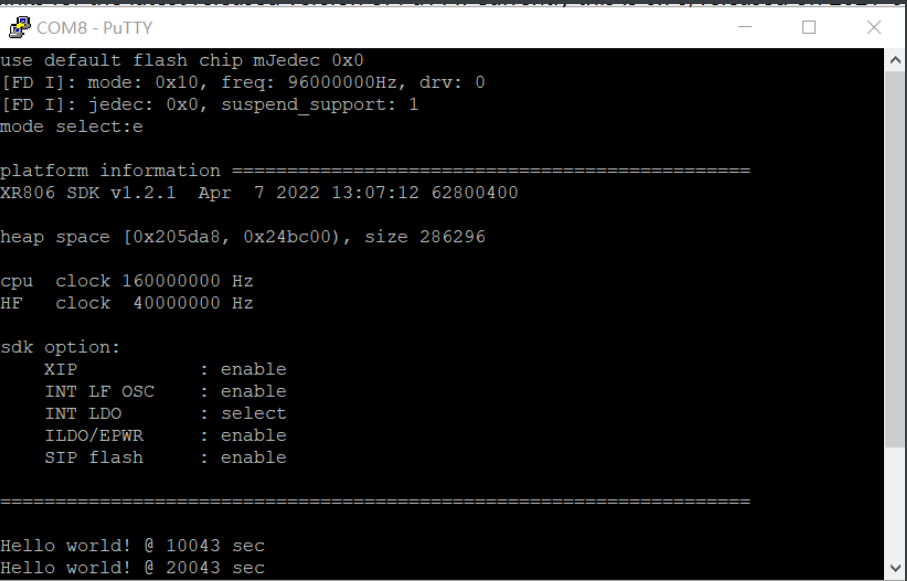
-
回复: 【开源直播】手把手教你用全志XR32芯片DIY一个自己的开发板(一:电路与PCB绘制)发布在 Wireless & Analog Series
@aldfaaa 是用的F1裸奔吗,我记得f1好像没有DCMI接口,可能F4有DCMI接口读起来好一点?
-
回复: 【DIY教程】XR806雪花灯发布在 Wireless & Analog Series
鸽了好久,今天正式开始更新教程。
虽然只是为了做一个雪花灯,但要考虑的因素还是很多的。
-
大小要刚好,直径为10cm以内的话差不多能刚好拿在手里,所以要稍微考虑用料尺寸。
-
色调要丰富,一个个led去布板子肯定是不理想的,且XR806板载引出IO不算特别多,想要达到可编程控制的花式效果最好还是采用WS2812这种多色的可以用pwm信号控制的灯珠。
-
摆脱电源线,由独立的电池供电,可充电,能给开发板和led同时供电是最理想的。
开发工具首选LCEDA,比较简单友好。先从原理图开始,XR806的开发板作为核心板肯定是不会再改动了,刚好有用户在元件库上传了一个XR806的原理图,一搜就有,检查了一下原理图引脚都是正确的,就直(lan)接(gou)拿来用好了
 ,不过封装库有点问题,layout的时候再改改就是了。
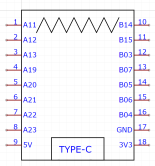
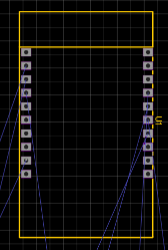
由于核心板已经相当于一个最小系统,就省下了一大堆启动电路什么的,调试的话肯定也是用板载的typec接口。但总得有个给电池充电的接口,这是免不了的。为了简单、方便我这种手残党焊接,我还是决定选择microUSB的端口作为充电接口:
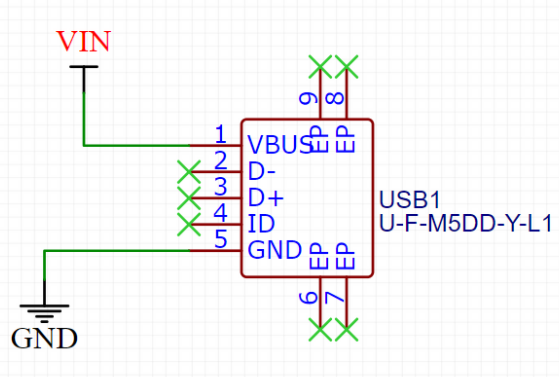
只需要正负极引入即可,封装的话可以随便挑选一些有过孔的,方便焊接就行。接下来最麻烦的地方来了:充电电源管理方案。
先看看选什么电池,虽然某宝上的很多锂电池包都声称带了防过充ic,但相信玩多了的话自然也没少炸过。追求安全的话还是得铅酸电池。but找了一圈貌似没有体积小且有5v输出的。所以还是随便找了一个带保护的锂电池,选价格稍微高一点的希望有点保障。

从电路功能上去看,就得回归到最开始,从我的目的出发:能给XR806雪花灯板子上的电池充电,并且电池可以给806和LED供电。自己从头搭这么一个功能电路对于我这样的手残党肯定是不太可能的,费事费力且失败率高,且搭出来也不符合我对体积的要求。所以我首先考虑的是就是集成方案了。
最常见的就是某4056/4057方案,后者体积小一点带防反接,除此之外没啥区别,可以看看datasheet中的相关描述:4056 是一款完整的单节锂离子电池采用恒定电流/恒定电压线性充电器。其底部 带有散热片的 SOP8/MSOP8 封装与较少的外部元件数目使得 TP4056 成为便携式应用的 理想选择。TP4056 可以适合 USB 电源和适配器电源工作。由于采用了内部 PMOSFET 架构,加上防倒充电路,所以不需要外部隔离二极管。 热反馈可对充电电流进行自动调节,以便在大功率操作或高环境温度条件下对芯片温度 加以限制。充电电压固定于 4.2V,而充电电流可通过一个电阻器进行外部设置。当充电 电流在达到最终浮充电压之后降至设定值 1/10 时,TP4056 将自动终止充电循环。 当输入电压(交流适配器或 USB 电源)被拿掉时,TP4056 自动进入一个低电流状 态,将电池漏电流降至 2uA 以下。TP4056 在有电源时也可置于停机模式,以而将供电 电流降至 55uA。TP4056 的其他特点包括电池温度检测、欠压闭锁、自动再充电和两个 用于指示充电、结束的 LED 状态引脚。如此一来要满足我们充电的需求是绰绰有余了,but还有一点非常重要,就是我们还需要给led供电和806供电,如果让电池直接供电,很明显还是要有一个稳压,这个时候怎么办呢?再加一个LDO?
当然这种麻烦的地方很多厂商肯定也想到过了,所以最后我找到了5400这个方案。看看他的相关描述:
5400是一款移动电源专用的单节锂离子电池充电器和恒定5V升压控制器,充电部分集高精度电压和充电电流调节器、预充、充电状态指示和充电截止等功能于一体,可以输出最大1A充电电流。而升压电路采用CMOS工艺制造的空载电流极低的VFM开关型DC/DC升压转换器。其具有极低的空载功耗(小于10uA),且升压输出驱动电流能力能达到1A。无需外部按键,可以即插即用。 充电部分为线性降压方式,内置PMOSFET,加上防倒灌电路,所以不需要外部检测电阻器和隔离二极管。热反馈可对充电电流进行自动调节,以便在大功率操作或高环境温度条件下对芯片温度加以限制,充满电压固定于4.2V。充电电流可通过一个电阻器进行外部设置。当电池达到4.2V之后,充电电流逐渐下降至设定电流值1/5,TP5400将自动终止充电。升压部分同样内置了功率NMOSFET,较小的内阻可以提供驱动能力达到5V/1A。较高的集成度使得TP5400只需少量的外围器件即可正常工作。TP5400还集成了充电温度保护,升压输入电源限流环路,可根据负载情况动态调节电流,并具有快速响应和过流关断功能。升压转换器采用变频的方式,因此较国内外同类产品具有极低的空载功耗、纹波、更强的驱动能力,以及更高的效率。又能充电,又能稳压供电,符合需求!封装也不大,8pin的ESOP。还要什么自行车呢
 。官方文档里也贴上了典型应用电路:
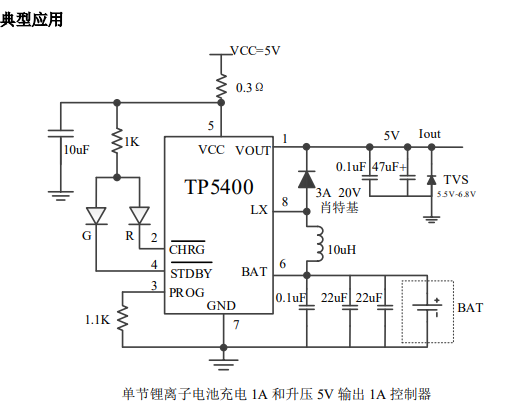
我一看,这不是基本上是完活了嘛,直接抄起来就完事
 。
。十分容易就从LC的元件库里搜到了器件,照葫芦画瓢搭建就完事了:
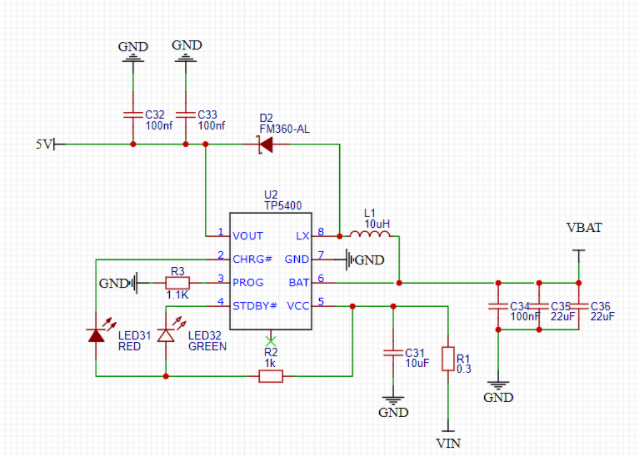 具体的功能原理的话自行查阅datasheet。
虽然这么随便不知道会不会有瑕疵,但还是保守起见,在电池接口处加一个双排拨码开关,可以保证功能部分和充电部分各自独立。
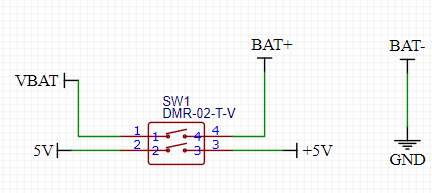
最后就是WS2812灯珠了,这个简单,一个个接上正负极后首位相连即可。
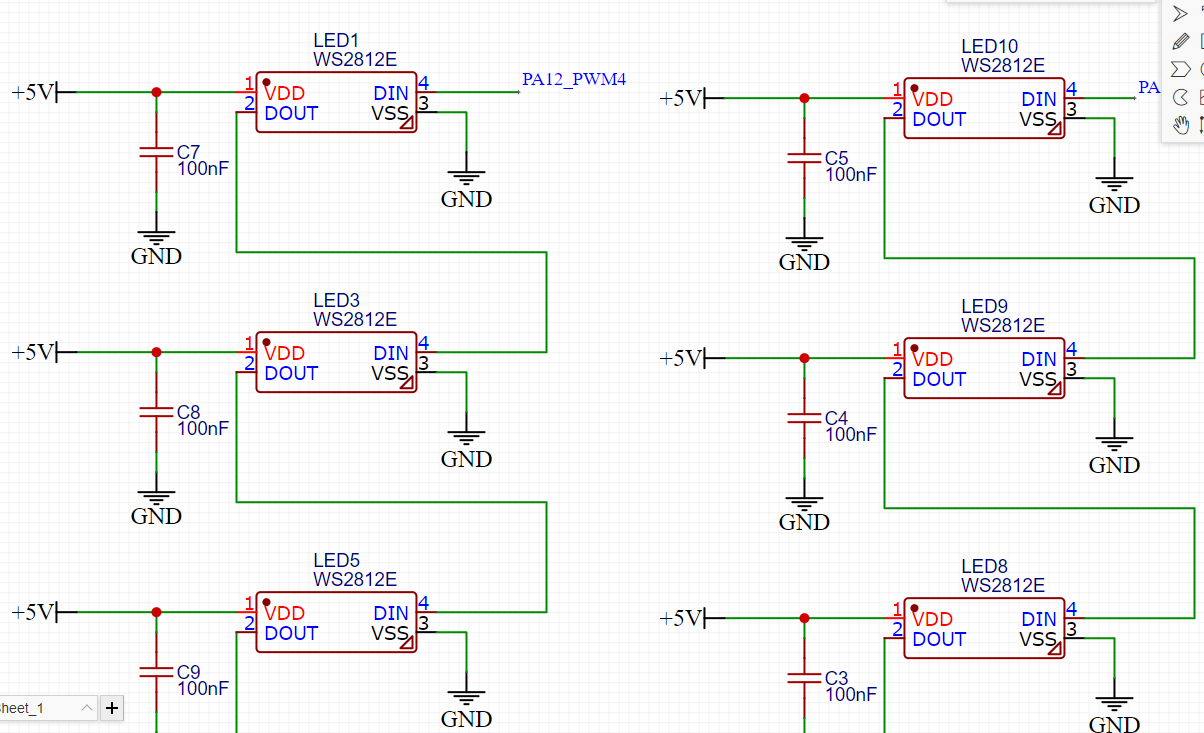
由于我规划的雪花有6个花瓣,所以我这边就先打算分别选806上6个有pwm功能的io,每个io分别控制5个LED。
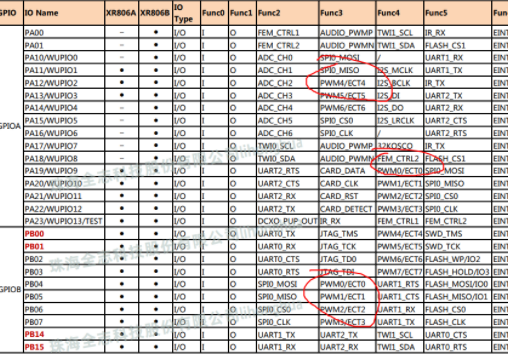
如果后续功能有异常也无所谓,大不了我们就采用精准延时的方法去挨个管脚点灯就是了。
把端口连接上开发板:
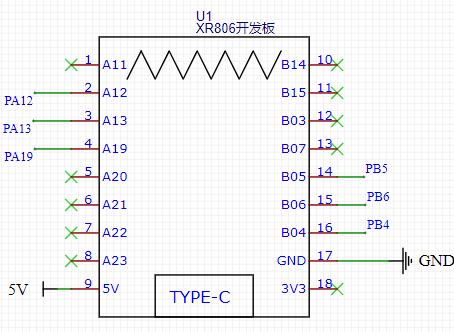
好了原理图到这里就基本结束了,贴个源文件Schematic_XR806雪花灯_2022-03-08.pdf ,接下来就是PCB部分! -
-
【DIY教程】XR806雪花灯发布在 Wireless & Analog Series
虽然冬奥会已经结束了,没有冰墩墩也不妨碍自己DIY点周边,所以搞个雪花灯玩玩

放点图:
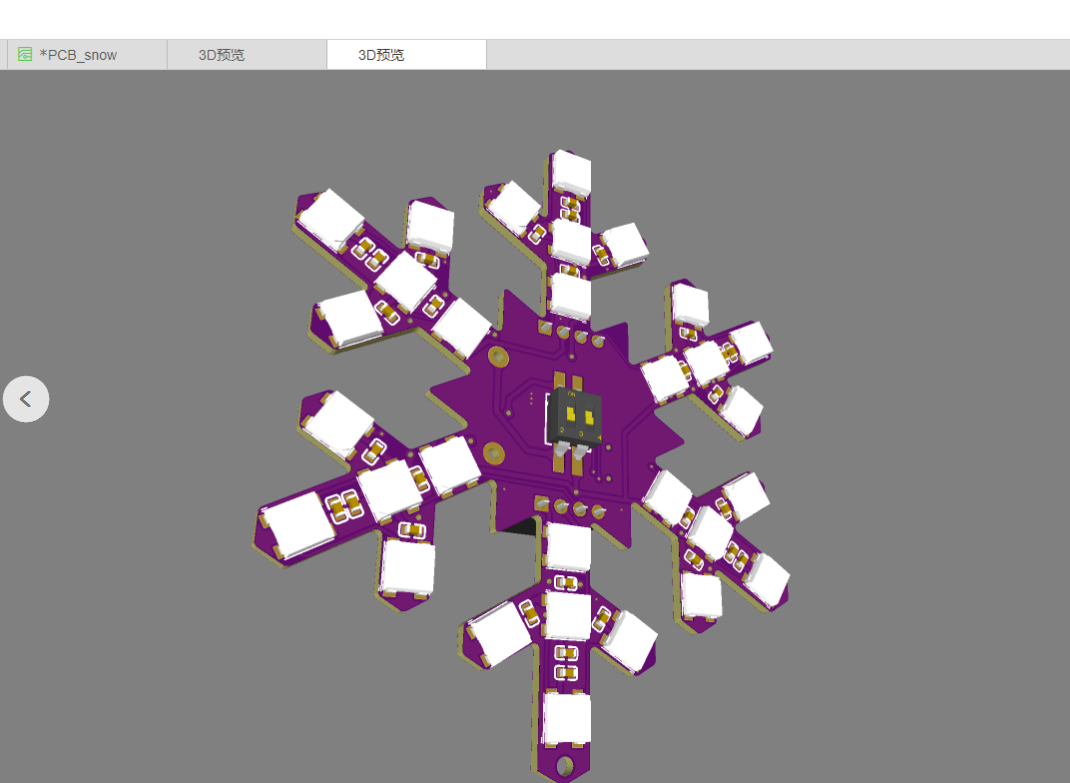
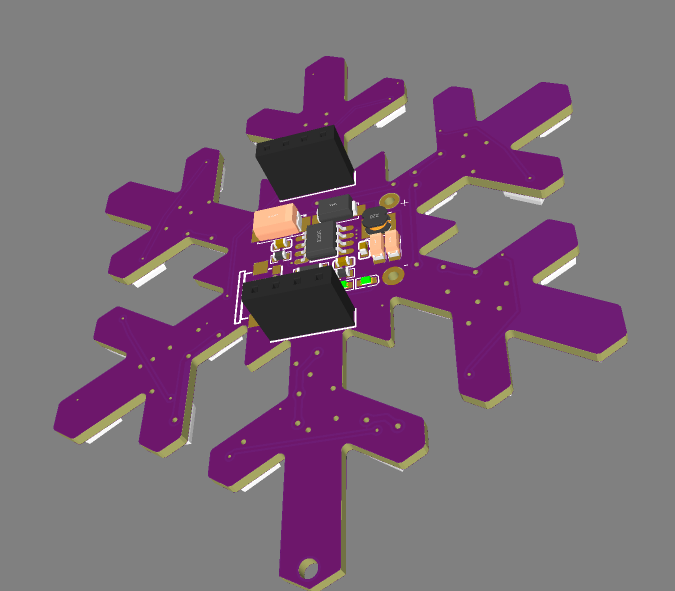
打板效果:
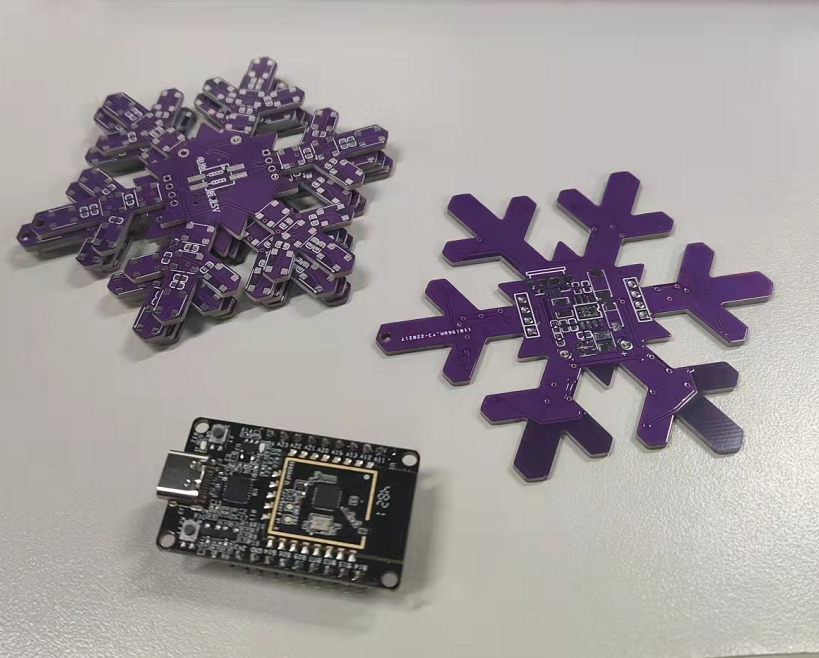
基于OSHW上的开源工程修改以适配XR806,感谢作者!附上链接在此。晚点贴完片试试效果。经过验证后会再开源出来并出个DIY教程

-
Linux下的sd卡烧写工具LiveSuit发布在 编译和烧写问题专区
介绍一下LiveSuit的使用方式。
LiveSuit是Ubuntu下的烧写工具,通过数据线将PC和开发板连接,把固件烧到开发板上,即Ubuntu版的PhoenixSuit,适用于Ubuntu系统开发者进行开发烧写。
LiveSuit下载链接:LiveSuit下载
github地址:https://github.com/linux-sunxi/sunxi-livesuite
使用方法:
#解压到任意目录之后: cd swusb #编译USB驱动 make #安装USB驱动 sudo insmod awusb.ko #返回上一级目录 cd .. ##执行脚本打开LiveSuit sudo ./LiveSuit.sh #选择固件,reboot efex重启设备或重启设备过程中串口按住"2"键跳到烧写模式即可 -
【XR806开发板试用】BLE试用之三:GATT读写示例发布在 Wireless & Analog Series
本示例通过演示 GATT 读写场景,简要介绍 GATT 命令的基本使用方法。
手机与开发板
烧录BLE工程后,在xr806的串口命令行依次执行ble init ble advertise on开始广播。
成功后有如下提示:
$ ble advertise on

*************************************************
[RandomAddress 62:77:A4:D1:10:44 ]
*************************************************
[cmd] Advertising started
<ACK> 200 OK
注册 GATT 服务,往串口输入命令,结果如下:
$ gatt metrics on

[cmd] Registering GATT metrics test Service.
[cmd] GATT write cmd metrics on.
<ACK> 200 OK
后需要下载nRF connect软件对周围设备扫描:
连接成功后可以看到 nRF Connect 跳转到以下界面了:
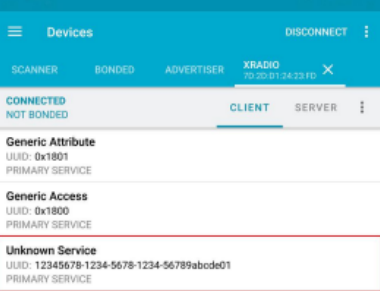
同时串口可以看到提示:
[cmd] Connected: 72:07:2F:49:AD:A1 (random)
[cmd] Remote LMP version 5.0 (0x09) subversion 0x0000 manufacturer 0x0046
[cmd] LE Features: 0x00000000000179fd
[cmd] LE conn param updated: int 0x0006 lat 0 to 500
[cmd] LE conn param updated: int 0x0027 lat 0 to 500
红色部分的 Service 即是步骤 4 所创建的 GATT 服务。点开“Unknown Service”,可以看到注册的服务 包括一个可读可写的属性。

进行读写操作:如写入值“0x010203”,按照下图的红色序号“①->②->③”操作,然后在红色序 号④可以看到数据正常写入。此时再进行读操作,点击蓝色的①,可以在蓝色序号②的位置看到读取的结果如下:
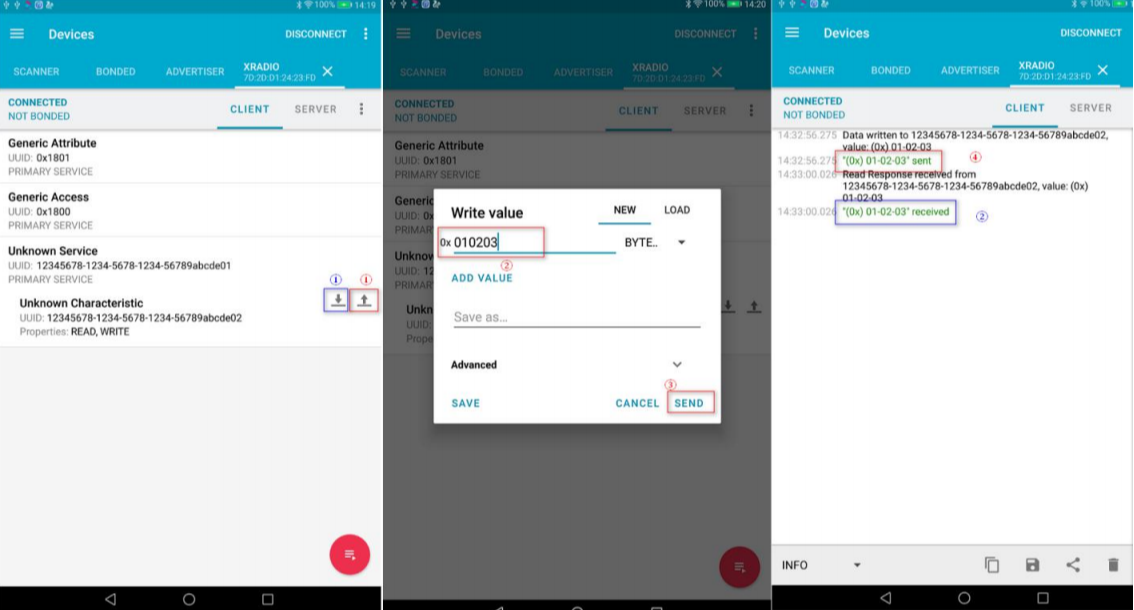
开发板互联
两块评估板完成烧写后,复位即可,示例代码自动运行。
分别执行
ble init评估板 B 执行“ble advertise on”命令开始广播:
$ble advertise on
*************************************************
[RandomAddress 5F:6F:67:DA:79:61 ] *************************************************
[cmd] Advertising started
<ACK> 200 OK
评估板 B 注册 GATT 服务,往串口输入命令
$gatt metrics on
[cmd] Registering GATT metrics test Service. [cmd] GATT write cmd metrics on. <ACK> 200 OK
评估板 A 开始扫描设备:
$>ble scan on可以看到一大串扫描结果,执行一段时间后执行
ble scan off关闭扫描
可以找到对应扫描结果地址
... [cmd] [DEVICE]: 5F:6F:67:DA:79:61 (random), AD evt type 4, RSSI -23 Xradio C:0 S:1 D:0 SR:1 E:0 Prim: LE
1M, Secn: No packets
...
评估板 A 开始连接 B:
$>ble connect 5F:6F:67:DA:79:61 random连接成功后,A 有以下打印:
*************************************************
[RandomAddress 56:25:4C:81:C7:1E ] *************************************************
[cmd] Connection pending
<ACK> 200 OK
$ [cmd] Connected: 5F:6F:67:DA:79:61 (random)
同时 B 也有成功连接的打印:
[cmd] Connected: 56:25:4C:81:C7:1E (random)
[cmd] Remote LMP version 5.0 (0x09) subversion 0x0110 manufacturer 0x063d
[cmd] LE Features: 0x00000000000179ff
进行服务的查找,往 A 评估板输入命令结果:
$>gatt discover
$ [cmd] Descriptor 2800 found: handle 1
[cmd] Descriptor 2803 found: handle 2
[cmd] Descriptor 2a05 found: handle 3
[cmd] Descriptor 2902 found: handle 4
[cmd] Descriptor 2800 found: handle 5
[cmd] Descriptor 2803 found: handle 6
[cmd] Descriptor 2a00 found: handle 7
[cmd] Descriptor 2803 found: handle 8
[cmd] Descriptor 2a01 found: handle 9
[cmd] Descriptor 2803 found: handle a
[cmd] Descriptor 2aa6 found: handle b
[cmd] Descriptor 2800 found: handle c
[cmd] Descriptor 2803 found: handle d
[cmd] Descriptor 12345678-1234-5678-1234-56789abcde02 found: handle e
[cmd] Discover complete
可以看到,“12345678-1234-5678-1234-56789abcde02”是评估板 B 注册的属性,可读可写,其 handle 是 e。
进行 GATT 写操作:评估板 A 往 handle 是 e 的属性写字符串“ab”:
$>gatt write e 0 ab string
[cmd] Write pending
<ACK> 200 OK
$ [cmd] Write complete: err 0x00
进行 GATT 读操作:评估板 A 往 handle 是 e 的属性读数据:
gatt read e
[cmd] Read pending
<ACK> 200 OK
$ [cmd] Read complete: err 0x00 length 2
[cmd] Read Value:
6162
其中 61/62 正是 a/b 的 ASCII 码,读写成功。
-
【XR806开发板试用】BLE试用之二:mesh&&PB-GATT配网发布在 Wireless & Analog Series
本文以 PB-GATT 方式对 Mesh 的配网场景进行演示说明。通过演示移动设备给 Mesh 节点配网场景,简要介绍 mesh 命令的基本使用方法。
对于XR806原生SDK用户,Mesh 命令集成在 cmd_mesh.c 文件中,烧录相应demo,通过 ble_demo 工程可以完成 mesh 节点配网场景演示,ble_demo 工程位于 XR806 SDK 的/project/demo/bluetooth/ble_demo 目录。具体可参考文档XR806_Mesh控制台命令_使用指南.pdf 。
对于XR806鸿蒙SDK用户,执行以下操作:
cd device/xradio/xr806/xr_skylark
cp project/demo/wlan_ble_demo/gcc/deconfig .config
make menuconfig
进入图像化配置界面,打开ble mesh的相关选项。
可以看到图形化配置界面:

在BLE host中可见配置:

进入mesh配置可见:
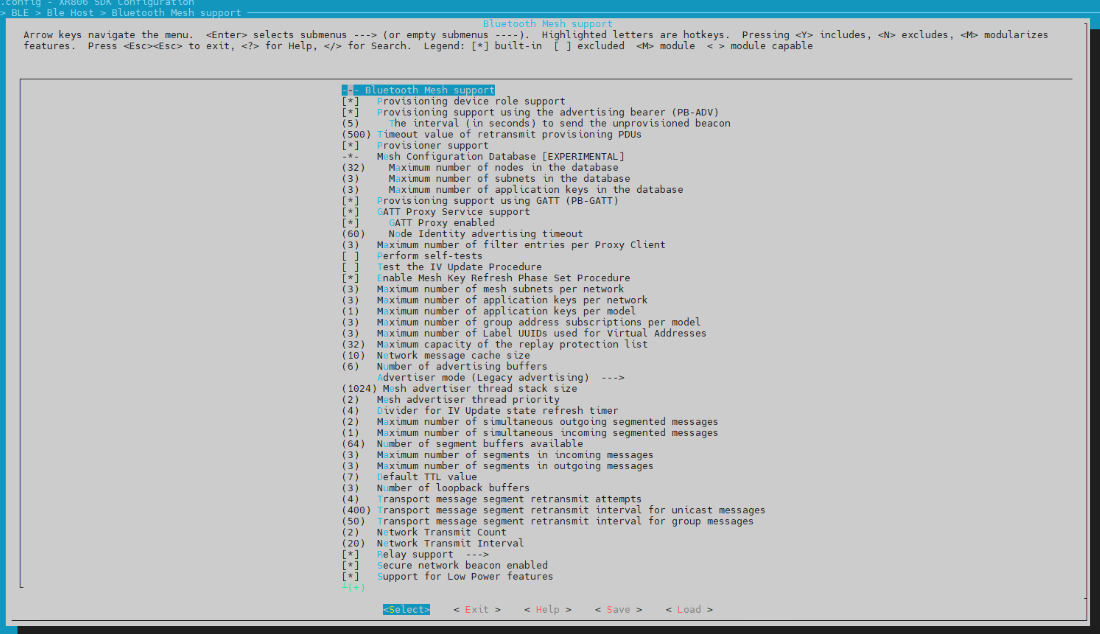
配置后保存退出。
继续执行
make build_clen
make lib -j
cd -
hb build -f
可能遇到以下问题
问题1:可能会遇到空间不足报错的问题。
解决方案可以参考:
也可以取消
device\xradio\xr806\BUILD.gn中其他内容的编译:
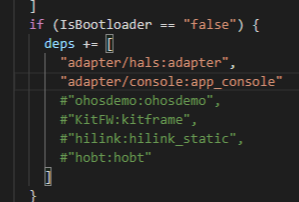
问题2:鸿蒙SDK没有BLE接口。
直接注释掉编译选项:
device/xradio/xr806/adapter/hals/BUILD.gn
编译完成后烧录镜像到开发板,通过串口打开命令行。
输入:
$ble init
$mesh init
可见:
== XRadio BLE HOST V2.5.0 ==
[cmd] Mesh initialized
[cmd] Use "pb-adv on" or "pb-gatt on" to enable advertising
<ACK> 200 OK
选用 PB-GATT 的承载方式:
$mesh pb-gatt on可见:
[bt] [INF] bt_mesh_prov_enable: Device UUID: 00000000-0000-0000-0000-00000000dddd
[cmd] PB-GATT enabled
<ACK> 200 OK
$ *************************************************
[RandomAddress 57:F1:07:D8:B6:91 ]
同时需要手机提前下载安装nRF Mesh软件。
打开软件配网:
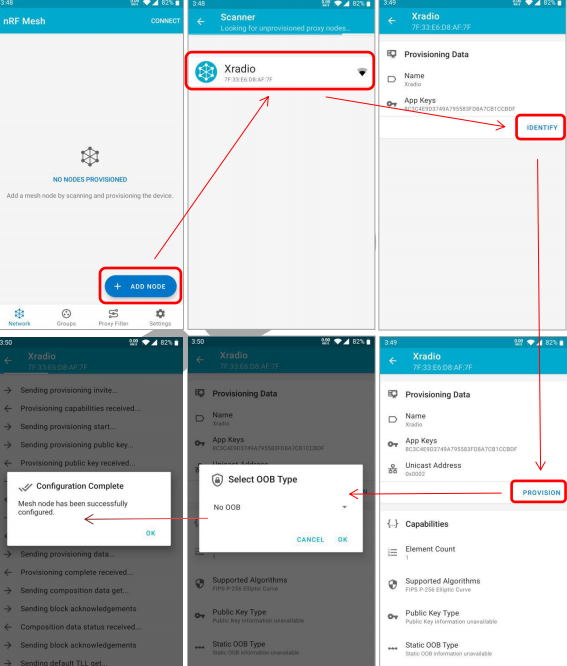
配网成功后,可以看到 nRF Mesh 网络列表看到该节点的信息,如下图。
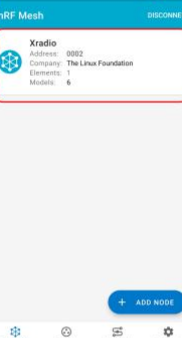
点击红色方框,进入节点配置页面,可以看到节点的元素、模型等信息。
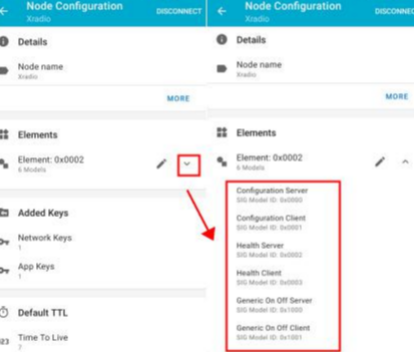
选择“Genenic On Off Server”模型进行操作:点击该模型选项,进入模型操作界面,如下图。进行模 型操作需要先进行“APP Key”绑定,点击“BIND KEY”,然后选择 App Key。
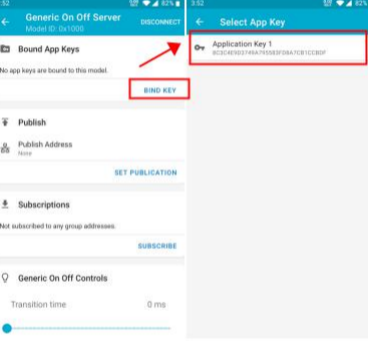
进行“Genenic On Off”:点击“ON”,就可以通过串口看到设备的 On/ Off 状态开了:
[cmd] onoff get(0)
[cmd] onoff set(1)
[cmd] onoff get(1)
[cmd] onoff get(1)
[cmd] onoff set(0)
[cmd] onoff set(0)
说明:Genenic On Off 操作会先去获取 OnOff 状态,然后再配置,配置完成后再获取一次状态。
完整log如下:
target thread = main usage = 21, fragment = 0, maxFreeSize = 92740, totalFreeSize = 92740, waterLine = 26932 ==================================================================== Hello! OpenHarmony! System tag : OpenHarmony 1.1.2_LTS ==================================================================== target thread = pm usage = 23, fragment = 0, maxFreeSize = 90660, totalFreeSize = 90660, waterLine = 29012 use default flash chip mJedec 0x0 [FD I]: mode: 0x10, freq: 96000000Hz, drv: 0 [FD I]: jedec: 0x0, suspend_support: 1 target thread = Looper usage = 25, fragment = 1, maxFreeSize = 86836, totalFreeSize = 87636, waterLine = 32836 mode select:e target thread = tcpip usage = 27, fragment = 1, maxFreeSize = 84776, totalFreeSize = 85252, waterLine = 34420 target thread = umac usage = 29, fragment = 1, maxFreeSize = 82716, totalFreeSize = 83020, waterLine = 36652 target thread = workqueue usage = 31, fragment = 1, maxFreeSize = 80360, totalFreeSize = 80440, waterLine = 39320 target thread = rx_proc usage = 34, fragment = 1, maxFreeSize = 77524, totalFreeSize = 77604, waterLine = 42068 target thread = BH usage = 36, fragment = 1, maxFreeSize = 75464, totalFreeSize = 75544, waterLine = 44128 wlan information =================================================== firmware: version : R0-XR_C07.08.52.65_02.84 May 27 2021 11:41:33-Y02.84 buffer : 8 driver: version : XR_V02.05 mac address: in use : 0c:6e:88:3e:12:01 in use : 0c:6e:88:3e:12:02 ==================================================================== target thread = wpas usage = 40, fragment = 1, maxFreeSize = 69996, totalFreeSize = 70288, waterLine = 53648 wlan mode:a [VFS INF] SPIFFS mount success. platform information =============================================== XR806 SDK v1.2.0 Jan 19 2022 10:44:04 heap space [0x22a884, 0x247c00), size 119676 cpu clock 160000000 Hz HF clock 40000000 Hz sdk option: XIP : enable INT LF OSC : enable SIP flash : enable mac address: efuse : 80:74:84:05:ba:a0 in use : 0c:6e:88:3e:12:01 ==================================================================== target thread = MainThread usage = 49, fragment = 0, maxFreeSize = 60068, totalFreeSize = 60068, waterLine = 59604 target thread = hiview usage = 52, fragment = 0, maxFreeSize = 55504, totalFreeSize = 55504, waterLine = 64168 console init success hiview init success.target thread = console usage = 54, fragment = 1, maxFreeSize = 53444, totalFreeSize = 53468, waterLine = 66228 $ $ ble init target thread = LogMemTask usage = 51, fragment = 11, maxFreeSize = 51384, totalFreeSize = 57576, waterLine = 66228 ble controller open version : 9.1.19 build sha1 : v9.1.19-20210601 build date : Jun 1 2021 build time : 19:32:17 platform : xr806 ble rf_init done! target thread = LinkLayer usage = 58, fragment = 4, maxFreeSize = 47752, totalFreeSize = 49292, waterLine = 70380 target thread = LinkLayerHwEvent usage = 60, fragment = 4, maxFreeSize = 44668, totalFreeSize = 46208, waterLine = 73464 target thread = CoexEvent usage = 61, fragment = 4, maxFreeSize = 43632, totalFreeSize = 45172, waterLine = 74500 BLE INIT ALL DONE! BT Coex. Init. OK. == XRadio BLE HOST V2.5.0 == target thread = Zephyr usage = 69, fragment = 2, maxFreeSize = 35484, totalFreeSize = 36096, waterLine = 83576 target thread = Zephyr usage = 72, fragment = 2, maxFreeSize = 31376, totalFreeSize = 31988, waterLine = 87700 target thread = Zephyr usage = 74, fragment = 3, maxFreeSize = 29316, totalFreeSize = 29928, waterLine = 89744 target thread = Zephyr usage = 81, fragment = 3, maxFreeSize = 20504, totalFreeSize = 21116, waterLine = 98556 [bt] [WRN] set_flow_control: Controller to host flow control not supported [bt] [INF] bt_init: No ID address. App must call settings_load() [cmd] Bluetooth initialized [bt] [INF] bt_dev_show_info: Identity: C6:42:D9:8F:39:BB (random) [bt] [INF] bt_dev_show_info: HCI: version 5.0 (0x09) revision 0x0113, manufacturer 0x063d [bt] [INF] bt_dev_show_info: LMP: version 5.0 (0x09) subver 0x0113 [cmd] Settings Loaded <ACK> 200 OK $ mesh init == XRadio BLE HOST V2.5.0 == target thread = Zephyr usage = 84, fragment = 4, maxFreeSize = 16396, totalFreeSize = 17008, waterLine = 102680 [cmd] Mesh initialized [cmd] Use "pb-adv on" or "pb-gatt on" to enable advertising <ACK> 200 OK $ mesh pb-gatt on [bt] [INF] bt_mesh_prov_enable: Device UUID: 00000000-0000-0000-0000-00000000dddd [cmd] PB-GATT enabled <ACK> 200 OK $ ************************************************* [RandomAddress 57:F1:07:D8:B6:91 ] ************************************************* [cmd] Connected: 78:C4:1B:66:EC:45 (random) [cmd] Remote LMP version 5.0 (0x09) subversion 0x0000 manufacturer 0x0046 [cmd] LE Features: 0x00000000000179fd [cmd] LE conn param updated: int 0x0006 lat 0 to 500 [cmd] Provisioning link opened on PB-GATT [cmd] LE conn param updated: int 0x0027 lat 0 to 500 [cmd] LE data len updated: TX (len: 251 time: 17040) RX (len: 69 time: 5392) [bt] [INF] bt_mesh_provision: Primary Element: 0x0003: [cmd] Provisioning link closed on PB-GATT [cmd] Local node provisioned, net_idx 0x0000 address 0x0003 [cmd] Disconnected: 78:C4:1B:66:EC:45 (random) (reason 0x13) [cmd] Connected: 78:C4:1B:66:EC:45 (random) [cmd] Remote LMP version 5.0 (0x09) subversion 0x0000 manufacturer 0x0046 [cmd] LE Features: 0x00000000000179fd [cmd] LE conn param updated: int 0x0006 lat 0 to 500 [cmd] LE conn param updated: int 0x0027 lat 0 to 500 [cmd] LE data len updated: TX (len: 251 time: 17040) RX (len: 69 time: 5392) [bt] [WRN] trans_ack: No matching TX context for ack [cmd] onoff get(0) [cmd] onoff set(1) [cmd] onoff get(1) [cmd] onoff get(1) [cmd] onoff set(0) [cmd] onoff get(0) [cmd] onoff get(0) [cmd] onoff set(1) [cmd] onoff get(1) [cmd] onoff get(1) [cmd] onoff set(0) [cmd] onoff get(0) -
【XR806开发板试用】BLE试用之一:控制台基础命令发布在 Wireless & Analog Series
XR806 SDK 集成了 Zephyr 项目的 Bluetooth 命令。SDK 中的 BLE 命令 主要封装在 cmd_ble.c、cmd_gatt.c 文件中,覆盖了 BLE 常用的功能场景。
首先需要进入XR806原生SDK下配置一些选项,路径为:
OpenHarmony_xr806/device/xradio/xr806/xr_skylark后执行:
make menuconfig可以看到图形化配置界面:

勾选上ble的全部内容即可:

同时也要在
\device\xradio\xr806\BUILD.gn路径下启用console命令行:
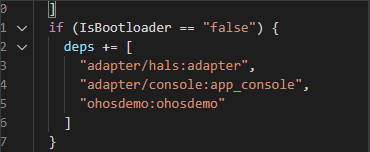
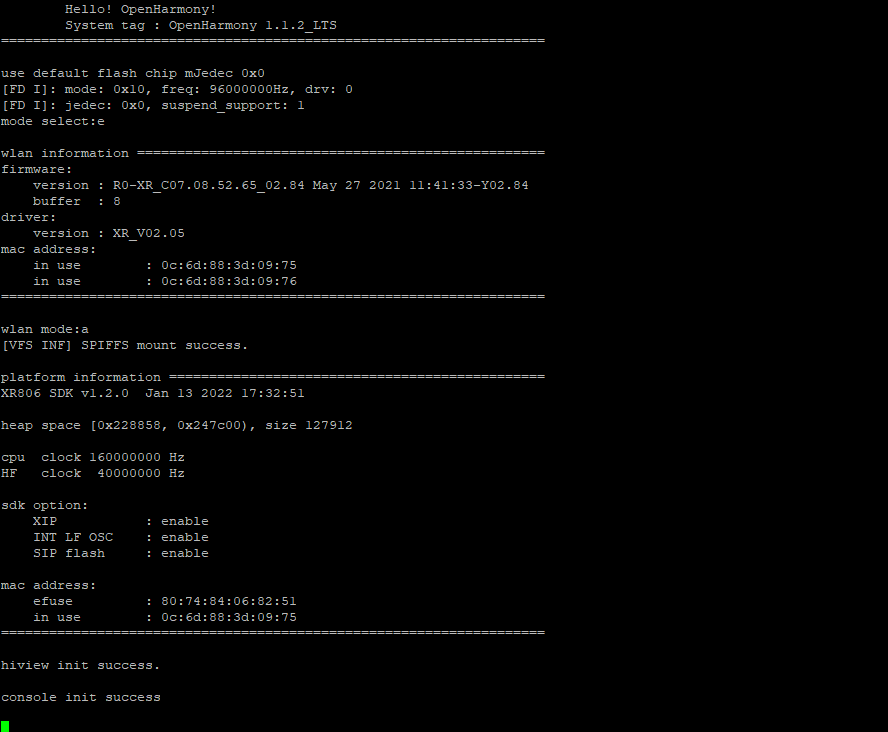
后烧录即可。(不用勾选编译鸿蒙系统也可以,此为原生接口测试用例)
可见log如下:
初始化命令:
ble init可见:
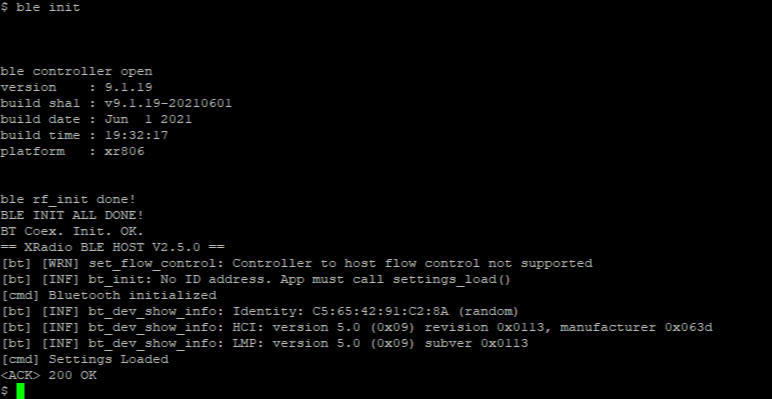
若系统启动后没有进行 BLE 初始化,执行其他 BLE 命令前都需要先执行该初始化命令。
反初始化命令:
ble deinit查看所有指令:
ble help显示BLE设备名称:
ble name创建BLE地址:
ble id-create xx:xx:xx:xx:xx:xx视系统设置允许创建多少个 BLE 私有地址,当前最多只允许 1 个私有地址存在,地址默认 为 random 类型,当前基本不使用。可在 ble init 之前调用,但不会存储到 flash 之中。
显示BLE地址:
显示当前私有地址信息。
ble id-show
选择BLE地址当前选择使用的BLE 地址.
ble id-select 0BLE扫描:
BLE 开启扫描:ble scan on
BLE 停止扫描:ble scan off
删除BLE地址:
ble id-delete <id>默认只有 1 个 BLE 私有地址,所以无法删除,当前无法正常使用。
后面会持续更新蓝牙广播等操作。
-
分享一款二次元PCB设计发布在 灌水区
分享一款二次元PCB设计,重新点燃了我的二次元之魂。
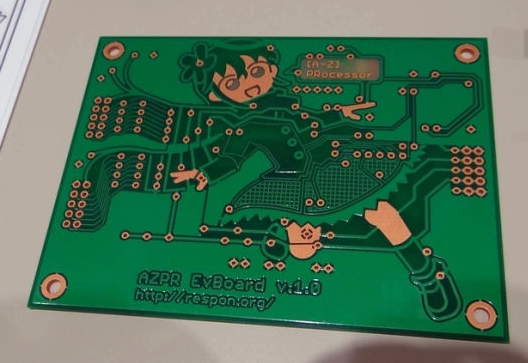
这个是我在翻CPU仿真相关的书籍时找到的一款配套开发板,这款CPU基板AZPR EvBoard(别名:基板少女) 由一个叫做" 从头开始做 CPU "的社团制作,搭载了XILINX公司的FPGA。可惜书是日文没有汉化。JLC打了几片看看:

可惜如今已经买不起赛灵思的片子了
-
【跑个算法】之模拟退火算法在D1的执行发布在 MR Series
前言:之前有做过一个VLSI布局布线相关的课题,学了一点关于模拟退火算法的毛皮,今天来跑个demo复(shui)习(tie)一下
 。
。Simulated annealing这种算法的出发点是基于物理中固体物质的退火过程与一般组合优化问题之间的相似性。模拟退火算法是一种通用的优化算法,其物理退火过程由以下三部分组成:
(1)加温过程
(2)等温过程
(3)冷却过程
其中加温过程对应算法设定的初始温度,等温过程对应算法的Metropolis(一种采样算法)抽样过程,冷却过程对应控制参数的下降。这里能量的变化就是目标函数,要得到的最优解就是能量最低状态。Metropolis准则是SA算法收敛于全局最优解的关键所在,Metropolis准则以一定的概率接受恶化解。
总的来说就一句话:相比于类似爬山算法这种贪心算法,SA可以跳出局部最优解。

理解的大概原理后,就来看看代码。
/*
 * 使用模拟退火算法(SA)求解TSP问题(以中国TSP问题为例)
 * 参考自《Matlab 智能算法30个案例分析》
 * 模拟退火的原理这里略去,可以参考上书或者相关论文
 * update: 16/12/11
 * author:lyrichu
 * email:919987476@qq.com
 */
#include<stdio.h>
#include<stdlib.h>
#include<string.h>
#include<time.h>
#include<math.h>
#define T0 50000.0  // 初始温度
#define T_end (1e-8)
#define q  0.98   // 退火系数
#define L 1000  // 每个温度时的迭代次数,即链长
#define N 31  // 城市数量
int city_list[N]; // 用于存放一个解
double city_pos[N][2] = {{1304,2312},{3639,1315},{4177,2244},{3712,1399},{3488,1535},{3326,1556},{3238,1229},{4196,1004},{4312,790},
    {4386,570},{3007,1970},{2562,1756},{2788,1491},{2381,1676},{1332,695},{3715,1678},{3918,2179},{4061,2370},{3780,2212},{3676,2578},{4029,2838},
    {4263,2931},{3429,1908},{3507,2367},{3394,2643},{3439,3201},{2935,3240},{3140,3550},{2545,2357},{2778,2826},{2370,2975}}; // 中国31个城市坐标
//函数声明
double distance(double *,double *); // 计算两个城市距离
double path_len(int *);  // 计算路径长度
void  init();  //初始化函数
void create_new(); // 产生新解
// 距离函数
double distance(double * city1,double * city2)
{
    double x1 = *city1;
    double y1 = *(city1+1);
    double x2 = *(city2);
    double y2 = *(city2+1);
    double dis = sqrt((x1-x2)*(x1-x2)+(y1-y2)*(y1-y2));
    return dis;
}

// 计算路径长度
double path_len(int * arr)
{
    double path = 0; // 初始化路径长度
    int index = *arr; // 定位到第一个数字(城市序号)
    for(int i=0;i<N-1;i++)
    {
        int index1 = *(arr+i);
        int index2 = *(arr+i+1);
        double dis = distance(city_pos[index1-1],city_pos[index2-1]);
        path += dis;
    }
    int last_index = *(arr+N-1); // 最后一个城市序号
    int first_index = *arr; // 第一个城市序号
    double last_dis = distance(city_pos[last_index-1],city_pos[first_index-1]);
    path = path + last_dis;
    return path; // 返回总的路径长度
}

// 初始化函数
void init()
{
    for(int i=0;i<N;i++)
        city_list[i] = i+1;  // 初始化一个解
}

// 产生一个新解
// 此处采用随机交叉两个位置的方式产生新的解
void create_new()
{
    double r1 = ((double)rand())/(RAND_MAX+1.0);
    double r2 = ((double)rand())/(RAND_MAX+1.0);
    int pos1 = (int)(N*r1); //第一个交叉点的位置
    int pos2 = (int)(N*r2);
    int temp = city_list[pos1];
    city_list[pos1] = city_list[pos2];
    city_list[pos2] = temp;   // 交换两个点
}

// 主函数
int main(void)
{
    srand((unsigned)time(NULL)); //初始化随机数种子
    time_t start,finish;
    start = clock(); // 程序运行开始计时
    double T;
    int count = 0; // 记录降温次数
    T = T0; //初始温度
    init(); //初始化一个解
    int city_list_copy[N]; // 用于保存原始解
    double f1,f2,df; //f1为初始解目标函数值,f2为新解目标函数值,df为二者差值
    double r; // 0-1之间的随机数,用来决定是否接受新解
    while(T > T_end) // 当温度低于结束温度时,退火结束
    {
        for(int i=0;i<L;i++)
        {
            memcpy(city_list_copy,city_list,N*sizeof(int)); // 复制数组
            create_new(); // 产生新解
            f1 = path_len(city_list_copy);
            f2 = path_len(city_list);
            df = f2 - f1;
            // 以下是Metropolis准则
            if(df >= 0)
            {
                r = ((double)rand())/(RAND_MAX);
                if(exp(-df/T) <= r) // 保留原来的解
                {
                    memcpy(city_list,city_list_copy,N*sizeof(int));
                }
            }
        }
        T *= q; // 降温
        count++;
    }
    finish = clock(); // 退火过程结束
    double duration = ((double)(finish-start))/CLOCKS_PER_SEC; // 计算时间
    printf("采用模拟退火算法,初始温度T0=%.2f,降温系数q=%.2f,每个温度迭代%d次,共降温%d次,得到的TSP最优路径为:\n",T0,q,L,count);
    for(int i=0;i<N-1;i++)  // 输出最优路径
    {
        printf("%d--->",city_list[i]);
    }
    printf("%d\n",city_list[N-1]);
    double len = path_len(city_list); // 最优路径长度
    printf("最优路径长度为:%lf\n",len);
    printf("程序运行耗时:%lf秒.\n",duration);
    return 0;
}
这是网上找到一个商旅问题的SA解决方法例子,稍加修改后交叉编译一下到开发板上执行。
保存为test.c文件到哪吒SDK下后,执行:
$/prebuilt/gcc/linux-x86/riscv/toolchain-thead-glibc/riscv64-glibc-gcc-thead_20200702/bin/riscv64-unknown-linux-gnu-gcc -o test -lm test.c用adb传送生成的可执行文件到开发板上,执行:
$chmod +x test
$./test
即可,下面看看执行效果:
D1s麻雀:
root@TinaLinux:/# ./test 采用模拟退火算法,初始温度T0=50000.00,降温系数q=0.98,每个温度迭代1000次,共降温1448次,得到的TSP最优路径为: 22--->18--->3--->17--->19--->16--->4--->2--->8--->9--->10--->7--->6--->5--->23--->11--->13--->12--->14--->15--->1--->29--->31--->30--->27--->28--->26--->25--->24--->20--->21 最优路径长度为:15385.425778 程序运行耗时:17.578781秒. root@TinaLinux:/# ./test 采用模拟退火算法,初始温度T0=50000.00,降温系数q=0.98,每个温度迭代1000次,共降温1448次,得到的TSP最优路径为: 5--->6--->7--->10--->9--->8--->2--->4--->16--->19--->17--->3--->18--->22--->21--->20--->24--->25--->26--->28--->27--->30--->31--->29--->1--->15--->14--->12--->13--->11--->23 最优路径长度为:15385.425778 程序运行耗时:17.594397秒. root@TinaLinux:/# ./test 采用模拟退火算法,初始温度T0=50000.00,降温系数q=0.98,每个温度迭代1000次,共降温1448次,得到的TSP最优路径为: 14--->15--->1--->29--->31--->30--->27--->28--->26--->25--->23--->4--->8--->9--->10--->2--->7--->6--->5--->16--->19--->17--->3--->18--->22--->21--->20--->24--->11--->13--->12 最优路径长度为:16245.867392 程序运行耗时:17.584901秒.D1-H哪吒:
root@TinaLinux:/# ./test
采用模拟退火算法,初始温度T0=50000.00,降温系数q=0.98,每个温度迭代1000次,共降温1448次,得到的TSP最优路径为:
4--->8--->9--->10--->2--->7--->6--->5--->23--->11--->13--->12--->14--->15--->1--->29--->31--->30--->27--->28--->26--->25--->24--->20--->21--->22--->18--->3--->17--->19--->16
最优路径长度为:15402.341890
程序运行耗时:17.511801秒.
root@TinaLinux:/# ./test
采用模拟退火算法,初始温度T0=50000.00,降温系数q=0.98,每个温度迭代1000次,共降温1448次,得到的TSP最优路径为:
15--->1--->29--->31--->30--->27--->28--->26--->22--->21--->20--->25--->24--->19--->17--->18--->3--->16--->4--->2--->8--->9--->10--->7--->6--->5--->23--->11--->13--->12--->14
最优路径长度为:15593.696331
程序运行耗时:17.513332秒.
root@TinaLinux:/# ./test
采用模拟退火算法,初始温度T0=50000.00,降温系数q=0.98,每个温度迭代1000次,共降温1448次,得到的TSP最优路径为:
12--->14--->15--->1--->31--->30--->25--->20--->21--->22--->18--->3--->17--->19--->24--->26--->28--->27--->29--->11--->23--->16--->4--->8--->9--->10--->2--->5--->6--->7--->13
最优路径长度为:16155.269857
程序运行耗时:17.514657秒.
可以看到时间都在17s左右,哪吒稍快一点点。不过可惜手里没有类似的开发板对比,只能拿一个猎奇一点的来对比:
H3夸克(稚晖君那个小电脑)
由于使用的是H3,就直接用GCC编译即可生成执行文件。
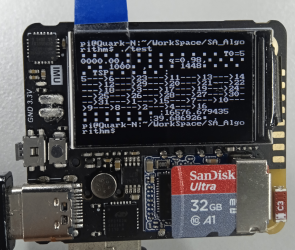
发现屏幕没有中字模哈哈,串口运行看看:pi@Quark-N:~/WorkSpace/SA_Algorithm$ ./test 采用模拟退火算法,初始温度T0=50000.00,降温系数q=0.98,每个温度迭代1000次,共降温1448次,得到的TSP最优路径为: 27--->30--->31--->1--->15--->14--->13--->12--->29--->11--->23--->5--->6--->7--->10--->9--->8--->2--->4--->16--->19--->17--->3--->18--->22--->21--->20--->24--->25--->26--->28 最优路径长度为:15683.072504 程序运行耗时:39.690700秒. pi@Quark-N:~/WorkSpace/SA_Algorithm$ ./test 采用模拟退火算法,初始温度T0=50000.00,降温系数q=0.98,每个温度迭代1000次,共降温1448次,得到的TSP最优路径为: 27--->31--->30--->25--->20--->24--->23--->5--->6--->11--->29--->1--->15--->14--->12--->13--->7--->10--->9--->8--->2--->4--->16--->19--->17--->3--->18--->22--->21--->26--->28 最优路径长度为:16072.436112 程序运行耗时:39.947321秒. pi@Quark-N:~/WorkSpace/SA_Algorithm$ ./test 采用模拟退火算法,初始温度T0=50000.00,降温系数q=0.98,每个温度迭代1000次,共降温1448次,得到的TSP最优路径为: 19--->16--->4--->8--->9--->10--->2--->7--->6--->5--->23--->24--->20--->25--->29--->11--->13--->12--->14--->15--->1--->31--->30--->27--->28--->26--->21--->22--->18--->3--->17 最优路径长度为:15996.839897 程序运行耗时:39.952181秒.将近40秒。而且不出所料,执行完后非常烫手(毕竟板子尺寸摆在那里)。前两者相比起来就较为风轻云淡。当然了这之间其实也没什么可比性,毕竟夸克还同时点着个屏幕,玩起来纯属娱乐哈哈,如果有大佬有兴趣也可以尝试优化一下,我还是希望起个抛砖引玉的作用
 。
。至于每次的结果为什么都不一样,简单按网上内容解释一下:SA算法本身是一种随机算法,转移向更差的解不是必然,而是概率性的,也就是说每次执行算法时,执行过程转移到的解可能都是完全不一样的。至于旅行商(Traveling Salesman Problem, TSP) 问题,本身属于NP-hard问题,找不到存在多项式时间复杂度的解。
如果要求精确的解,目前可行的方法有枚举、分支限界、动态规划等,但这些方法适用的数据范围都很小,一旦数据规模变大,它们都将无能为力。所以目前广泛使用的大都是一些随机算法,比如蚁群、遗传等,模拟退火就是其中的一种,这些算法的一大特点就是通过随机去逼近最优解,但也有可能得到错解。
最后贴上一个经典视频:
ok,今天的帖就水到这里。

-
麻雀使用ADB的问题发布在 MR Series
根据芒果派上手教程自己编译了镜像并烧录到sd卡执行,在尝试用adb从windows传输可执行文件到tina时遇到了如下问题:

然后去网上百度了一下,发现可能是有一部分位置被设置成了只读,在tina的shell中输入
mount结果如下:
root@TinaLinux:/# mount
/dev/root on / type squashfs (ro,noatime)
devtmpfs on /dev type devtmpfs (rw,relatime,size=21072k,nr_inodes=5268,mode=755)
proc on /proc type proc (rw,nosuid,nodev,noexec,noatime)
sysfs on /sys type sysfs (rw,nosuid,nodev,noexec,noatime)
tmpfs on /tmp type tmpfs (rw,nosuid,nodev,noatime)
devpts on /dev/pts type devpts (rw,nosuid,noexec,relatime,mode=600,ptmxmode=000)
debugfs on /sys/kernel/debug type debugfs (rw,noatime)
none on /sys/kernel/config type configfs (rw,relatime)
adb on /dev/usb-ffs/adb type functionfs (rw,relatime)
/dev/mmcblk0p1 on /mnt/SDCARD type vfat (rw,relatime,fmask=0000,dmask=0000,allow_utime=0022,codepage=437,iocharset=iso8859-1,shortname=mixed,errors=remount-ro)
root@TinaLinux:/#
对比D1执行相同程序的结果,下面是D1哪吒的:
root@TinaLinux:/# mount
/dev/root on /rom type squashfs (ro,noatime)
devtmpfs on /dev type devtmpfs (rw,relatime,size=503936k,nr_inodes=125984,mode=755)
proc on /proc type proc (rw,nosuid,nodev,noexec,noatime)
sysfs on /sys type sysfs (rw,nosuid,nodev,noexec,noatime)
tmpfs on /tmp type tmpfs (rw,nosuid,nodev,noatime)
/dev/by-name/UDISK on /overlay type ubifs (rw,relatime,assert=read-only,ubi=0,vol=8)
overlayfs:/overlay on / type overlay (rw,noatime,lowerdir=/,upperdir=/overlay/upper,workdir=/overlay/work)
devpts on /dev/pts type devpts (rw,nosuid,noexec,relatime,mode=600,ptmxmode=000)
debugfs on /sys/kernel/debug type debugfs (rw,noatime)
none on /sys/kernel/config type configfs (rw,relatime)
adb on /dev/usb-ffs/adb type functionfs (rw,relatime)
rw的意思就是Read&Write的权限都有,对比发现最后一行不太一样,可能是sd卡挂载分区的问题?不知道怎么操作,希望有大佬指点一下。
-
回复: 【XR806开发板试用】棋子分拣机发布在 Wireless & Analog Series
技术原理
关于技术实现,用到的材料主要有XR806开发板、两个9g的舵机,以及一个红外光传感器。
工作机制非常简单,如图所示:
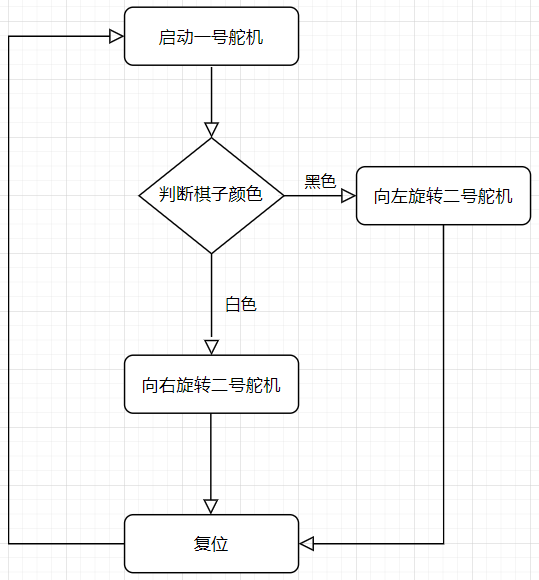
上电后舵机复位到初始状态,任何开始工作,由一号舵机把待分类的棋子推移到检测区域,由红外传感器判断棋子的颜色,白色返回值为1,黑色则为0。
硬件模型制作
这一部分看似工作量大,但其实是参考了网上一些开源的例程,只不过加以了尺寸改动。
实现方法可以用3d打印或者激光切割亚克力,我选择了后者因为时间相对简短。使用的建模软件为Solidworks2019,亚克力板厚度后3mm,画好零件后,搭建好装配体确认尺寸无误后转为dxf格式即可用CNC机床切割。(我是用了学校的CNC,网上切也很便宜哈)
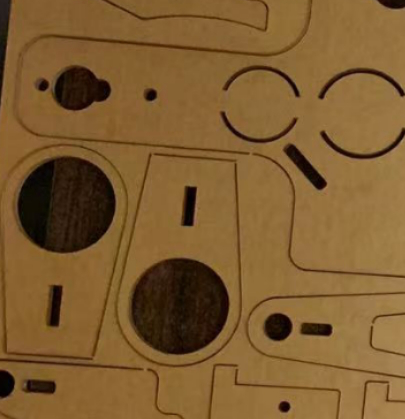
电路部分
使用的开发板为XR806,一款iot产品开发板,他最大的特点就是适配的轻鸿蒙,使用起来能有不错的体验。
需要驱动的设备就是两个舵机及一个红外传感器。
舵机就是一种位置伺服的驱动器,适用于那些需要角度不断变化并可以保持的控制系统。其工作原理是:控制信号由接收机的通道进入信号调制芯片,获得直流偏置电压。它内部有一个基准电路,产生周期为20ms,宽度为1.5ms的基准信号,将获得的直流偏置电压与电位器的电压比较,获得电压差输出。最后,电压差的正负输出到电机驱动芯片决定电机的正反转。当电机转速一定时,通过级联减速齿轮带动电位器旋转,使得电压差为0,电机停止转动。
以180度角度伺服为例,那么对应的控制关系是这样的:
0.5ms--------------0度;
1.0ms------------45度;
1.5ms------------90度;
2.0ms-----------135度;
2.5ms-----------180度;
拆开看看:
减速齿轮
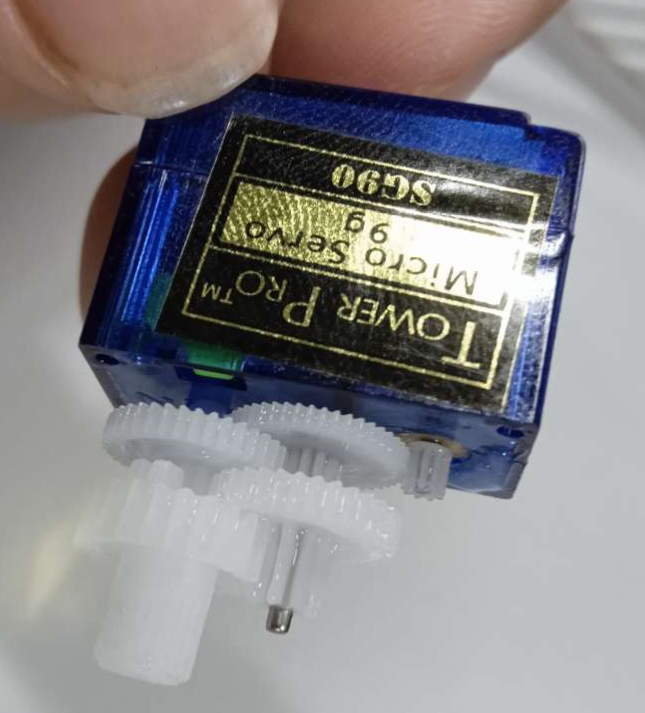
驱动电路
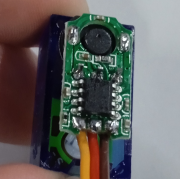
因为片子上的字眼实在太小,令人“望眼欲穿”,本来还想查查有没有技术文档研究一下,只能放弃先了。刚好鸿蒙也适配了pwm的接口驱动xr806,所以我们只要修改freq频率和duty占空比两个选项如下即可。
IoTPwmStart(PWM_OUTPUT_CH0,8,50);关于其他基础操作姿势可以参考我之前的一篇呼吸灯的demo帖子。还有一点值得一提的是关于这种舵机的输入信号口我是用806上的接口直接驱动的,并没有再拉高,内部是否需要或者有没有额外的驱动由于没有舵机内部电路的原理图也暂时无从得知,但总感觉在调节duty占空这一参数时舵机时而会不听使唤(占空比调制不准确),希望有大佬指点。
红外传感器原理则相对简单,一个红外发射管和一个红外接收管。模块通电后红外发射管向前方不断发射一定频率的红外线,
通过板载了一个电压比较器LM393

比较输出和输入的信号做出相应反馈,体现到我手里这块小板子上就是接收到红外信号为1,没有接收到(遇到黑色物体)则为0。所以读取判断值的代码相对简单:
IoTGpioGetInputVal(13,&mode);整体代码部分
openHarmony用的是gn和ninja编译,由很多种上手学习方式,如果说gn对标的是gcc脚本构建生成器,ninja就对应的是makefile构建系统文档了。
#Create by Randolph.

import("//device/xradio/xr806/liteos_m/config.gni")

static_library("app_GO")
{
   configs = []

   sources = ["main.c",]

   cflags = board_cflags

   include_dirs = board_include_dirs
   include_dirs += [
      "//kernel/liteos_m/kernel/arch/include",
      "//base/iot_hardware/peripheral/interfaces/kits",
      "//device/xradio/xr806/xr_skylark/src/rom/rom_bin/src/driver",
   ]
}
main.c
//Create by Randolph
#include "kernel/os/os.h"
#include "ohos_init.h"
#include "iot_pwm.h"
#include "driver/chip/hal_pwm.h"

#define PWM_OUTPUT_CH0     PWM_GROUP0_CH0  //front
#define PWM_OUTPUT_CH1     PWM_GROUP0_CH1  //back

static OS_Thread_t g_main_thread;

unsigned char mode;

static void Servo_init(void)
{
    IoTPwmInit(GPIO_PORT_A);
    IoTGpioInit(13);
}

static void Servo_reset(void)
{
    			printf("0/n");
		IoTPwmStart(PWM_OUTPUT_CH0,8,50);
		OS_MSleep(500);

        	printf("1/n");
		IoTPwmStart(PWM_OUTPUT_CH1,8,50);
		OS_MSleep(500);
}

static void Servo_start(void)
 {
        	printf("2/n");
		IoTPwmStart(PWM_OUTPUT_CH1,5,50);
		OS_MSleep(500);

        IoTGpioGetInputVal(13,&mode);
            printf("3/n");
		IoTPwmStart(PWM_OUTPUT_CH1,8,50);
		OS_MSleep(500);

        if(mode == 1)
        {
			printf("4/n");
		IoTPwmStart(PWM_OUTPUT_CH0,10,50);
		OS_MSleep(500);
        }
        else
        {
            printf("4/n");
		IoTPwmStart(PWM_OUTPUT_CH0,6,50);
		OS_MSleep(500);
        }
			printf("5/n");
		IoTPwmStart(PWM_OUTPUT_CH0,8,50);
		OS_MSleep(500);

 }

static void MainThread(void *arg)
{
    Servo_init();
    Servo_reset();
	while (1)
    {
        Servo_start();
	}
}

void PWM_TestMain(void)
{
	printf("Test Start\n");

	if (OS_ThreadCreate(&g_main_thread,"MainThread",MainThread, NULL, OS_THREAD_PRIO_APP, 4096) != OS_OK)
	{
		printf("[ERR] Create PWMLED_Task Failed\n");
	}
}

SYS_RUN(PWM_TestMain);
最后在编译选项中加上即可
"GO_sorting:app_GO"总结
到此基本功能是实现了,但有很多缺陷如我没有直观地体现出来分类后各种棋子的数量,也并没有给他加上控制开始和停止的操作。(没有一个对是否仍有棋子未被分类的判断机制)这些后续可以通过增加显示屏、替换红外传感器为压感贴片或者使用摄像头去学习判等等···最遗憾的是这个小demo暂时还没有发挥出XR806及鸿蒙的一些特征,如联网、连蓝牙。仅仅是个突发奇想的点子,希望能起到抛砖引玉的作用。后面我也会继续尝试给他加上其他功能。再贴上一些前置学习内容:
官方文档:https://xr806.docs.aw-ol.com/XR806开发板引脚功能表:https://bbs.aw-ol.com/topic/496/资料释放-xr806鸿蒙开发板引脚功能表
SDK获取到编译烧录:https://bbs.aw-ol.com/topic/499/xr806鸿蒙开发实战1-实操下载xr806鸿蒙代码并编译烧写
鸿蒙的外设接口:文件接口的头文件在:
base\iot_hardware\peripheral\interfaces\kits源码在:
device\xradio\xr806\adapter\hals\iot_hardware\wifiiot_lite带有iot字样的接口就是鸿蒙的接口。
端口复用:
Harmony\device\xradio\xr806\xr_skylark\project\common\board\xr806_OHOS\board_config.c可以看到关于pwm的相关端口配置
__xip_rodata static const GPIO_PinMuxParam g_pinmux_pwm[] = { { GPIO_PORT_A, GPIO_PIN_19, { GPIOA_P19_F4_PWM0_ECT0, GPIO_DRIVING_LEVEL_1, GPIO_PULL_NONE } }, { GPIO_PORT_A, GPIO_PIN_20, { GPIOA_P20_F4_PWM1_ECT1, GPIO_DRIVING_LEVEL_1, GPIO_PULL_NONE } }, { GPIO_PORT_A, GPIO_PIN_22, { GPIOA_P22_F4_PWM3_ECT3, GPIO_DRIVING_LEVEL_1, GPIO_PULL_NONE } }, { GPIO_PORT_A, GPIO_PIN_12, { GPIOA_P12_F3_PWM4_ECT4, GPIO_DRIVING_LEVEL_1, GPIO_PULL_NONE } }, { GPIO_PORT_A, GPIO_PIN_13, { GPIOA_P13_F3_PWM5_ECT5, GPIO_DRIVING_LEVEL_1, GPIO_PULL_NONE } }, { GPIO_PORT_B, GPIO_PIN_3, { GPIOB_P3_F4_PWM7_ECT7, GPIO_DRIVING_LEVEL_1, GPIO_PULL_NONE } }, };项目中所用到的引脚:
一号舵机信号线---------PA20
二号舵机信号线---------PA19
红外传感信号线---------PA13
用面包板引出开发板上的电源跟地供外设共用。
-
回复: 【XR806开发板试用】简单移植coremark并测试实际跑分发布在 Wireless & Analog Series
@endelszc05 大佬请教一下官网上怎么好像没有core_main.h这个文件了?
-
【XR806开发板试用】棋子分拣机发布在 Wireless & Analog Series
最近沉迷于看《棋魂》,突发奇想做个棋子分拣机器。刚好涉及到的材料与之前写的XR806例程能差不多对应上,就差一个外壳,于是圣诞节就宅在实验室画了草图,趁着月黑风高偷偷用学校的CNC切了一个模型,基于XR806开发板和openHarmony实现了分拣棋子的功能。
先放个效果视频:
时间仓促,做工不是很精细,功能上也有待继续完善,比如说显示计数界面和联网功能云云····后面会慢慢填坑 。
。
-
【XR806开发板试用】跑个步进电机发布在 Wireless & Analog Series
从垃圾堆里翻出来个电机,今天就玩它好了,对于电机的理解已经全部还给了大学老师,所以打算先研究一番:
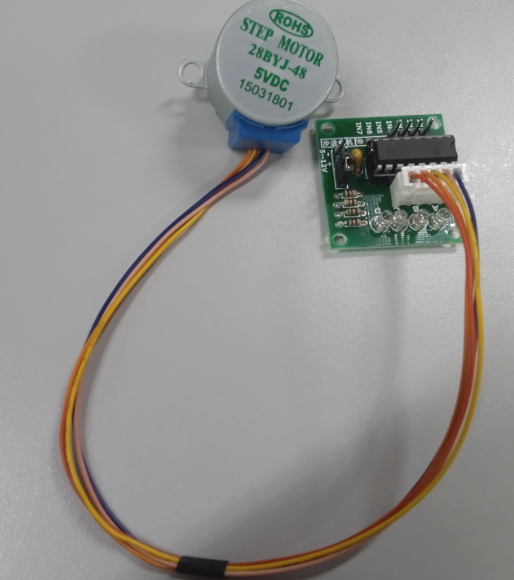
百度了一下,这个东西学名叫作四相五线步进电机,电机就是这个圆陀陀,板子是他的驱动器。板载芯片是ULN2003,TI出品。查了一下技术文档,就是一个集成的达令顿管放大器。
很早以前就了解过:步进电机是吃脉冲信号工作,转化信号成相应的角位移和线位移。输入一个脉冲信号,转子就转动一个角度或前进一步,其输出的角位移或线位移与输入的脉冲数成正比,转速与脉冲频率成正比。因此,步进电动机又称脉冲电动机。
步进电机相对于其它控制用途电机的最大区别是,它接收数字控制信号(电脉冲信号)并转化成与之相对应的角位移或直线位移。也就是说,它本身就可以把信号转化成运动。而且它可开环位置控制,输入一个脉冲信号就得到一个规定的位置增量,与传统的直流控制系统相比,其成本明显减低,几乎不必进行系统调整。所以他给我们带来了很大的方便。要是想要他执行起来也很简单,只要控制脉冲的数量、频率和电机绕组的相序,即可获得所需的转角、速度和方向。
从具体的硬件来看,我这里需要接六条线才能让这个电机跑起来,电源端口就不说了,IN1~IN4这四个通道口要怎么输入信号才是问题所在。
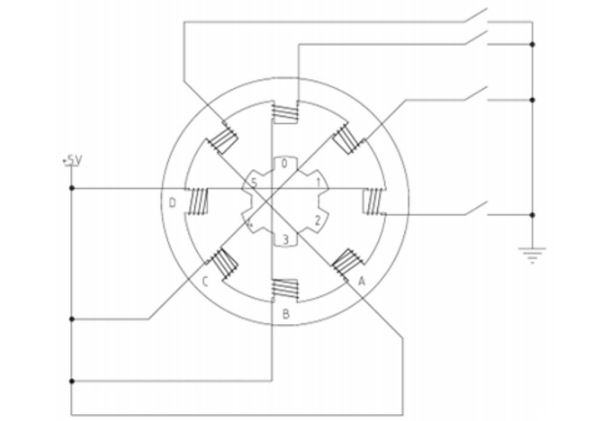
如上就是内部原理图,右侧四个开关其实就是我们的四个信号端口。右侧ABCD为定子,上面绕有线圈,为四相,与之相对应的对面四个定子上面也有线圈,相对应的两个定子之间线圈是相互连接形成一个绕组。
下面来分析一种运行模式,单四拍运行:假如说现在我闭合0对着的那个开关,则由高中学过的电能生磁原理,0对应的线圈就会产生磁力,同时他的下端,也就是对应的B线圈,也就一起导通了。接下来B断开,C导通产生磁力,1和C(这里指的是右上角那个端)就会因为两者间夹角最小而互相吸引靠近,吸引过去后C断开,D通电,继续把离他最近的2吸引过去,如此一来类推下去就形成了一个逆时针旋转的过程。
上述过程直到0被吸引到A相时,就是一个周期的完成,旋转角度为360/8=45度。
还有其他控制方法,如双拍工作、单双拍工作等等,可以根据需求调节精度速度等等···决定先放一边,适当做点容易让人有成就感的事情:用代码实现这个过程,把舵机跑起来。
了解了原理就用最简单的方法去实现好了。主要代码如下:
			IoTGpioSetOutputVal(12,0);
	IoTGpioSetOutputVal(13,0);
	IoTGpioSetOutputVal(19,1);
	IoTGpioSetOutputVal(20,1);
	OS_MSleep(2);
		IoTGpioSetOutputVal(12,1);
	IoTGpioSetOutputVal(13,0);
	IoTGpioSetOutputVal(19,0);
	IoTGpioSetOutputVal(20,1);
	OS_MSleep(2);
		IoTGpioSetOutputVal(12,1);
	IoTGpioSetOutputVal(13,1);
	IoTGpioSetOutputVal(19,0);
	IoTGpioSetOutputVal(20,0);
	OS_MSleep(2);
		IoTGpioSetOutputVal(12,0);
	IoTGpioSetOutputVal(13,1);
	IoTGpioSetOutputVal(19,1);
	IoTGpioSetOutputVal(20,0);
	OS_MSleep(2);
像前面几篇一样,烧录程序,将对应IO连接上驱动板后,通上电,电机就正常工作了。
当然光转起来有些过于简单了,所以打算加一些可控元素进去,也方便后面做各种开发。于是又从垃圾堆里翻到了这个:
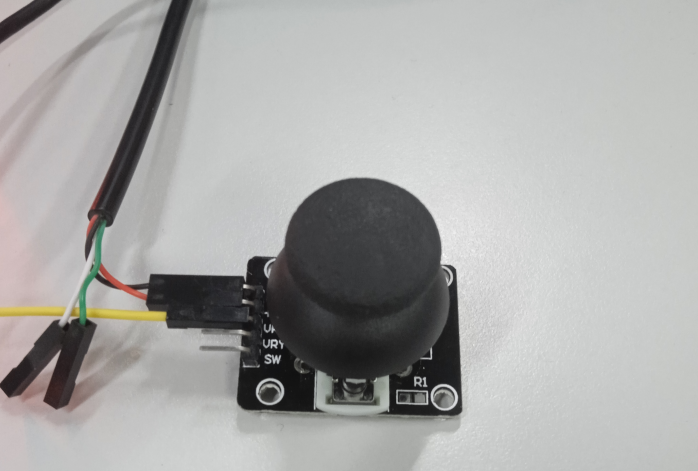
用翻出来的示波器研究了一下(没有万用表555),可以理解为由上下、左右两个方向的滑动变阻器和一个按键组成,总共三个信号输出口。保持在中间位置的时候测得是2.5v,移动向两边就是0跟5v,按下就是按钮。
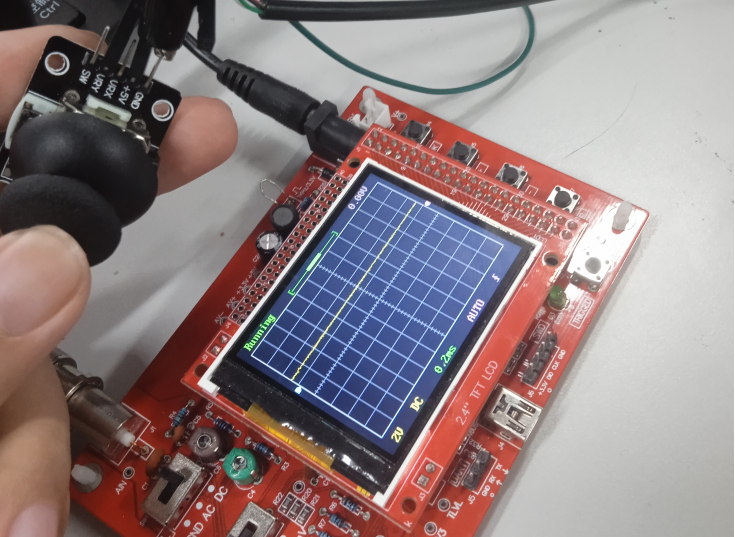
既然是输出模拟信号最合理就是用ADC检测,无奈鸿蒙1.x.x的版本貌似都还没适配好806的接口,hal库的代码也找不到说明文档,用hal库尝试配置了一下ADC一直没成功,只能放到后面解决了。。。
所以最终决定还是用GPIO接口去读电平高低,具体代码如下:
#Create by Randolph.


import("//device/xradio/xr806/liteos_m/config.gni")

static_library("app_Stepper")
{
   configs = []

   sources = ["main.c",]

   cflags = board_cflags

   include_dirs = board_include_dirs
   include_dirs += [
      "//kernel/liteos_m/kernel/arch/include",
      "//base/iot_hardware/peripheral/interfaces/kits",
            "//device/xradio/xr806/xr_skylark/src/rom/rom_bin/src/driver",
   ]
}
main.c
//Create by Randolph

#include <stdio.h>
#include "kernel/os/os.h"
#include "ohos_init.h"
#include "iot_gpio.h"


static OS_Thread_t g_main_thread;

unsigned char mode;

static void gpio_init(void)
{
	IoTGpioInit(11);
	IoTGpioInit(12);
	IoTGpioInit(13);
	IoTGpioInit(19);
	IoTGpioInit(20);
	IotGpioDir dir;
			IoTGpioSetDir(11, IOT_GPIO_DIR_IN);
	IoTGpioGetDir(11, &dir);
		IoTGpioSetDir(12, IOT_GPIO_DIR_OUT);
		IoTGpioSetDir(13, IOT_GPIO_DIR_OUT);
		IoTGpioSetDir(19, IOT_GPIO_DIR_OUT);
		IoTGpioSetDir(20, IOT_GPIO_DIR_OUT);
}

static void Servo_mode(unsigned char mode)
{
	if (mode == 1)
	{
			IoTGpioSetOutputVal(12,0);
	IoTGpioSetOutputVal(13,0);
	IoTGpioSetOutputVal(19,1);
	IoTGpioSetOutputVal(20,1);
	OS_MSleep(2);
		IoTGpioSetOutputVal(12,1);
	IoTGpioSetOutputVal(13,0);
	IoTGpioSetOutputVal(19,0);
	IoTGpioSetOutputVal(20,1);
	OS_MSleep(2);
		IoTGpioSetOutputVal(12,1);
	IoTGpioSetOutputVal(13,1);
	IoTGpioSetOutputVal(19,0);
	IoTGpioSetOutputVal(20,0);
	OS_MSleep(2);
		IoTGpioSetOutputVal(12,0);
	IoTGpioSetOutputVal(13,1);
	IoTGpioSetOutputVal(19,1);
	IoTGpioSetOutputVal(20,0);
	OS_MSleep(2);
	}
	else if (mode == 0)
	{
		IoTGpioSetOutputVal(12,0);
	IoTGpioSetOutputVal(13,1);
	IoTGpioSetOutputVal(19,1);
	IoTGpioSetOutputVal(20,0);
	OS_MSleep(2);
		IoTGpioSetOutputVal(12,1);
	IoTGpioSetOutputVal(13,1);
	IoTGpioSetOutputVal(19,0);
	IoTGpioSetOutputVal(20,0);
	OS_MSleep(2);
		IoTGpioSetOutputVal(12,1);
	IoTGpioSetOutputVal(13,0);
	IoTGpioSetOutputVal(19,0);
	IoTGpioSetOutputVal(20,1);
	OS_MSleep(2);
			IoTGpioSetOutputVal(12,0);
	IoTGpioSetOutputVal(13,0);
	IoTGpioSetOutputVal(19,1);
	IoTGpioSetOutputVal(20,1);
	OS_MSleep(2);
	}
}

static void MainThread(void *arg)
{
	while (1) {
		IoTGpioGetInputVal(11,&mode);
		Servo_mode(mode);
	}
}

void Stepper_TestMain(void)
{
	printf("Test Start\n");
    gpio_init();

	if (OS_ThreadCreate(&g_main_thread,"MainThread",MainThread, NULL, OS_THREAD_PRIO_APP, 4096) != OS_OK)
	{
		printf("[ERR] Create HelloWorld_Task Failed\n");
	}
}

SYS_RUN(Stepper_TestMain);
看看效果:
至于为什么要顶个风扇叶呢,一方面是方便观察转动,另一方面也算是致敬一张大部分程序员应该都见过的图:

ok,又水了一贴,今天也是平安夜,祝各位圣诞快乐!
也挖个坑:下周会整合一下前面的内容做个小作品放出来。Merry Christmas!
-
【新人上手】D1哪吒开发板Tina Linux 下WiFi的连接发布在 MR Series
16、查看wifi规格
支持2.4G wifi,支持13个工作信道(Channel1-13),提供wifi扫描命令,可搜索到附件的wifi list。
执行:
wifi_scan_results_test可以看到:
root@TinaLinux:/# wifi_scan_results_test ********************************* ***Start scan!*** ********************************* bssid / frequency / signal level / flags / ssid 0e:e0:df:1e:6a:36 2472 -39 [WPA2-PSK-CCMP][ESS] RANDOLPH ****************************** Wifi get_scan_results: Success! ******************************17、station模式
开机时如检测到曾经连接过wifi,则自动连接上一此连接的wifi。
执行:
wifi_connect_ap_test <ssid> <psk>可见:
root@TinaLinux:/# wifi_connect_ap_test  RANDOLPH xxxxxxxx
==================================
Connected to the AP(RANDOLPH)
Getting ip address(RANDOLPH)......
auto connected Successful  !!!!
==================================
Connecting to the network(RANDOLPH)......
sh: odhcp6c: not found
[   84.050715] wlan0: deauthenticating from 0e:e0:df:1e:6a:36 by local choice (reason=3)
[   84.085703] [WSM_WRN] Issue unjoin command(TX).
[   84.092916] [WSM_WRN] STA mode, send_deauth_to_self
[   84.098429] [TXRX_WRN] Issue unjoin command(TX) by self.
[   85.775478] wlan0: authenticate with 0e:e0:df:1e:6a:36 (try 1)
[   85.782532] [STA_WRN] [HT40][xradio_join_work][bss_ht_info]:
[   85.782532] [primary_chan  :0x0000000d]
[   85.782532] [ht_param      :0x00000000]
[   85.782532] [operation_mode:0x00000000]
[   85.782532] [stbc_param    :0x00000000]
[   85.782532] [basic_set[0]  :0x00000000]
[   85.810406] [STA_WRN] [HT40][xradio_join_work][PhyModeCfg:0x0007]
[   85.810406] [ModemFlags    :0x00000007]
[   85.810406] [ChWidthCfg    :0x00000000]
[   85.810406] [PriChCfg      :0x00000000]
[   85.810406] [BandCfg       :0x00000000]
[   85.810406] [STBC_Enable   :0x00000000]
[   85.810406] [PreambleCfg   :0x00000000]
[   85.810406] [SGI_Enable    :0x00000000]
[   85.810406] GF_Enable      :0x00000000]
[   85.867864] wlan0: authenticated
[   85.872260] wlan0: associate with 0e:e0:df:1e:6a:36 (try 1)
[   85.886562] wlan0: RX AssocResp from 0e:e0:df:1e:6a:36 (capab=0x411 status=0 aid=1)
[   85.895310] wlan0: associated
[   85.904359] [AP_WRN] arp_addr_cnt not clear at disconnecting,filter abnormal enable!!!
[   85.914312] [AP_WRN] [STA] ASSOC HTCAP 11N 58
[   85.919277] [AP_WRN] [HT40][xradio_bss_info_changed][ht_prot:0x00000000][HtProtMode:0x0000][Green:0x0000]
[   85.919673] [AP_WRN] [HT40][xradio_bss_info_changed][PhyModeCfg:0xd007]
[   85.919673] [ModemFlags    :0x00000007]
[   85.919673] [ChWidthCfg    :0x00000000]
[   85.919673] [PriChCfg      :0x00000000]
[   85.919673] [BandCfg       :0x00000000]
[   85.919673] [STBC_Enable   :0x00000000]
[   85.919673] [PreambleCfg   :0x00000001]
[   85.919673] [SGI_Enable    :0x00000001]
[   85.919673] [GF_Enable     :0x00000001]
Connected to the AP(RANDOLPH)
Getting ip address(RANDOLPH)......
Wifi connect ap : Success!
==================================
可以ping百度验证:
root@TinaLinux:/# ping baidu.com PING baidu.com (220.181.38.148): 56 data bytes 64 bytes from 220.181.38.148: seq=0 ttl=50 time=84.309 ms 64 bytes from 220.181.38.148: seq=1 ttl=50 time=75.818 ms 64 bytes from 220.181.38.148: seq=2 ttl=50 time=69.916 ms 64 bytes from 220.181.38.148: seq=3 ttl=50 time=71.139 ms 64 bytes from 220.181.38.148: seq=4 ttl=50 time=102.807 ms ^C --- baidu.com ping statistics --- 5 packets transmitted, 5 packets received, 0% packet loss round-trip min/avg/max = 69.916/80.797/102.807 ms18、Softap模式
支持softap模式,提供softap模式demo,开启后可被其他设备连入。
执行:
softap_up <ssid> <pwd> <broadcast/hidden>
softap_down
可见
root@TinaLinux:/# softap_up nezha 12345678 broadcast
***************************
Start hostapd test!
***************************
wpa2-psk!
Start to set softap!
Message is: OK
Set softap finished!
[  433.525126] [TXRX_WRN] drop=1771, fctl=0x00d0.
[  433.552706] wlan0: deauthenticating from 0e:e0:df:1e:6a:36 by local choice (reason=3)
[  433.589037] [WSM_WRN] Issue unjoin command(TX).
[  433.599152] [WSM_WRN] STA mode, send_deauth_to_self
[  433.604623] [TXRX_WRN] Issue unjoin command(TX) by self.
[  433.678548] [STA_WRN] !!! xradio_remove_interface: vif_id=0
[  435.741366] ieee80211_do_open: vif_type=2, p2p=0, ch=3, addr=40:3f:ea:5e:f0:32
[  435.758671] [STA] !!!xradio_vif_setup: id=0, type=2, p2p=0, addr=40:3f:ea:5e:f0:32
[  435.784698] [AP_WRN] BSS_CHANGED_ASSOC but driver is unjoined.
Start to start softap!
SoftAP started successfullyHaving catch sig_chld!
Message is: OK
Start softap finished!
打开手机wifi可见:
关闭则执行:
softap_down注意:是无法访问网络的。
19、自动搜索
已连接ap后,会自动搜索保存的列表,重启后自动连接。
20、信号强度获取
同16条,结果中可见。
-
【新人上手】D1哪吒开发板Tina Linux下分区烧写与分区只读发布在 MR Series
13、分区烧写
注意的是这一项需要用到flash.exe工具,以及一系列目标img文件。
首先进入Tina执行:
reboot bootloader进入模式后,在PC端运行platform-tools中的shell,输入:
fastboot.exe devices可见是否连接上开发板
C:\Users\xxxxxxx\Desktop\platform-tools>fastboot.exe devices
Android Fastboot        fastboot
后可以执行相关命令如下完成烧写或擦除:
fastboot.exe flash boot boot.img fastboot.exe flash rootfs rootfs.img fastboot.exe flash u-boot image/boot_package.fex fastboot.exe erase boot fastboot.exe reboot14、分区只读
rootfs分区只读。
Tina中执行:
mount可见
/dev/root 行(一般在第一行)有ro的字样,则说明rootfs分区为可读状态,结果如下:
root@TinaLinux:/# mount /dev/root on /rom type squashfs (ro,noatime) devtmpfs on /dev type devtmpfs (rw,relatime,size=504628k,nr_inodes=126157,mode=755) proc on /proc type proc (rw,nosuid,nodev,noexec,noatime) sysfs on /sys type sysfs (rw,nosuid,nodev,noexec,noatime) tmpfs on /tmp type tmpfs (rw,nosuid,nodev,noatime) /dev/by-name/UDISK on /overlay type ubifs (rw,relatime,assert=read-only,ubi=0,vol=8) overlayfs:/overlay on / type overlay (rw,noatime,lowerdir=/,upperdir=/overlay/upper,workdir=/overlay/work) devpts on /dev/pts type devpts (rw,nosuid,noexec,relatime,mode=600,ptmxmode=000) debugfs on /sys/kernel/debug type debugfs (rw,noatime) none on /sys/kernel/config type configfs (rw,relatime) adb on /dev/usb-ffs/adb type functionfs (rw,relatime) -
【新人上手】D1哪吒开发板Tina Linux下查看系统内存和测试存储器件读写速率发布在 MR Series
7、查看当前系统内存
查看内存指令:
系统优化满足运行内存≤32MB
echo 3 > /proc/sys/vm/drop_caches;
free
可以看到
root@TinaLinux:/# echo 3 > /proc/sys/vm/drop_caches; [ 1130.933910] ash (138): drop_caches: 3 root@TinaLinux:/# free total used free shared buffers cached Mem: 1021656 37612 984044 36 548 4204 -/+ buffers/cache: 32860 988796 Swap: 0 0 08、查看储存情况
SPI-Nand大小查看,方式一:
cat /proc/partitions可见
root@TinaLinux:/# cat /proc/partitions
major minor  #blocks  name

  31        0       1024 mtdblock0
  31        1       4096 mtdblock1
  31        2       1024 mtdblock2
  31        3     256000 mtdblock3
 254        0      20412 ubiblock0_5
以上所有相加即为262144KB=256M。
方式二:启动log中已经包含
[ 1.425770] sunxi-spinand-phy: TotalSize: 256 M9、SPI-Nand顺序写
SPI-Nand顺序写:>=2MB/s(四线)。
先切换到性能模式
root@TinaLinux:/# echo "performance"  /sys/devices/system/cpu/cpufreq/policy0/sc
aling_governor
后执行
tt /spec/storage/seq可见如下内容:
root@TinaLinux:/# tt /spec/storage/seq [DEBUG]: ---enter init_entry [DEBUG]: --before bind [ERROR]: bind socket fail [ERROR]: socket init fail [ERROR]: (dragonmat_init-289): init entry of socket_db failed ============================ tasks list ============================ /spec/storage/seq ============================ end ============================ [ 3863.564843] [BH_WRN] miss interrupt! ------------------- INFO ------------------- fast mode: false async mode: ddr total size: 1021656 KB cpu policy: performance flash device: overlayfs:/overlay flash device fs: ubifs flash device size: 176576 KB flash device free: 78956 KB test directory: /mnt/UDISK test file size: 73728 KB test block size: 4096 KB test times for average: 3 ------------------- END ------------------- filling ...... OK (4608KB in 5s) =========== the 1 times =========== clear cache sync real 0m 0.62s user 0m 0.00s sys 0m 0.02s [ 3870.916775] spec-seq.sh (700): drop_caches: 3 Iozone: Performance Test of File I/O Version $Revision: 3.489 $ Compiled for 64 bit mode. Build: linux Contributors:William Norcott, Don Capps, Isom Crawford, Kirby Collins Al Slater, Scott Rhine, Mike Wisner, Ken Goss Steve Landherr, Brad Smith, Mark Kelly, Dr. Alain CYR, Randy Dunlap, Mark Montague, Dan Million, Gavin Brebner, Jean-Marc Zucconi, Jeff Blomberg, Benny Halevy, Dave Boone, Erik Habbinga, Kris Strecker, Walter Wong, Joshua Root, Fabrice Bacchella, Zhenghua Xue, Qin Li, Darren Sawyer, Vangel Bojaxhi, Ben England, Vikentsi Lapa, Alexey Skidanov, Sudhir Kumar. Run began: Thu Jan 1 09:04:32 1970 Setting no_unlink Auto Mode SYNC Mode. Include fsync in write timing Read & Write sync mode active. File size set to 73728 kB Record Size 4096 kB Dedup+compress enabled Dedup activated 50 percent. Zero Percent 50 Command line used: iozone -i 0 -w -a -o -e -+r -s 73728k -r 4096k -f /mnt/UDISK/iozone.tmp -+M -+w 50 -+a 50 Output is in kBytes/sec Time Resolution = 0.000001 seconds. Processor cache size set to 1024 kBytes. Processor cache line size set to 32 bytes. File stride size set to 17 * record size. random random bkwd record stride kB reclen write rewrite read reread read write read rewrite read fwrite frewrite fread freread 73728 4096 1334 1303 iozone test complete. clear cache sync real 0m 1.51s user 0m 0.00s sys 0m 0.02s [ 3989.626106] spec-seq.sh (700): drop_caches: 3 Iozone: Performance Test of File I/O Version $Revision: 3.489 $ Compiled for 64 bit mode. Build: linux Contributors:William Norcott, Don Capps, Isom Crawford, Kirby Collins Al Slater, Scott Rhine, Mike Wisner, Ken Goss Steve Landherr, Brad Smith, Mark Kelly, Dr. Alain CYR, Randy Dunlap, Mark Montague, Dan Million, Gavin Brebner, Jean-Marc Zucconi, Jeff Blomberg, Benny Halevy, Dave Boone, Erik Habbinga, Kris Strecker, Walter Wong, Joshua Root, Fabrice Bacchella, Zhenghua Xue, Qin Li, Darren Sawyer, Vangel Bojaxhi, Ben England, Vikentsi Lapa, Alexey Skidanov, Sudhir Kumar. Run began: Thu Jan 1 09:06:31 1970 Auto Mode SYNC Mode. Include fsync in write timing Read & Write sync mode active. File size set to 73728 kB Record Size 4096 kB Dedup+compress enabled Dedup activated 50 percent. Zero Percent 50 Command line used: iozone -i 1 -a -o -e -+r -s 73728k -r 4096k -f /mnt/UDISK/iozone.tmp -+M -+w 50 -+a 50 Output is in kBytes/sec Time Resolution = 0.000001 seconds. Processor cache size set to 1024 kBytes. Processor cache line size set to 32 bytes. File stride size set to 17 * record size. random random bkwd record stride kB reclen write rewrite read reread read write read rewrite read fwrite frewrite fread freread 73728 4096 2040 1356 iozone test complete. /usr/bin/spec-seq.sh: line 208: arithmetic syntax error 2610 615266 iozone test complete. =========== the 2 times =========== clear cache sync real 0m 0.05s user 0m 0.02s sys 0m 0.00s [ 4023.326958] spec-seq.sh (700): drop_caches: 3 Iozone: Performance Test of File I/O Version $Revision: 3.489 $ Compiled for 64 bit mode. Build: linux Contributors:William Norcott, Don Capps, Isom Crawford, Kirby Collins Al Slater, Scott Rhine, Mike Wisner, Ken Goss Steve Landherr, Brad Smith, Mark Kelly, Dr. Alain CYR, Randy Dunlap, Mark Montague, Dan Million, Gavin Brebner, Jean-Marc Zucconi, Jeff Blomberg, Benny Halevy, Dave Boone, Erik Habbinga, Kris Strecker, Walter Wong, Joshua Root, Fabrice Bacchella, Zhenghua Xue, Qin Li, Darren Sawyer, Vangel Bojaxhi, Ben England, Vikentsi Lapa, Alexey Skidanov, Sudhir Kumar. Run began: Thu Jan 1 09:07:05 1970 Setting no_unlink Auto Mode SYNC Mode. Include fsync in write timing Read & Write sync mode active. File size set to 73728 kB Record Size 4096 kB Dedup+compress enabled Dedup activated 50 percent. Zero Percent 50 Command line used: iozone -i 0 -w -a -o -e -+r -s 73728k -r 4096k -f /mnt/UDISK/iozone.tmp -+M -+w 50 -+a 50 Output is in kBytes/sec Time Resolution = 0.000001 seconds. Processor cache size set to 1024 kBytes. Processor cache line size set to 32 bytes. File stride size set to 17 * record size. random random bkwd record stride kB reclen write rewrite read reread read write read rewrite read fwrite frewrite fread freread 73728 4096 2621 2653 iozone test complete. clear cache sync real 0m 0.03s user 0m 0.00s sys 0m 0.01s [ 4081.982781] spec-seq.sh (700): drop_caches: 3 Iozone: Performance Test of File I/O Version $Revision: 3.489 $ Compiled for 64 bit mode. Build: linux Contributors:William Norcott, Don Capps, Isom Crawford, Kirby Collins Al Slater, Scott Rhine, Mike Wisner, Ken Goss Steve Landherr, Brad Smith, Mark Kelly, Dr. Alain CYR, Randy Dunlap, Mark Montague, Dan Million, Gavin Brebner, Jean-Marc Zucconi, Jeff Blomberg, Benny Halevy, Dave Boone, Erik Habbinga, Kris Strecker, Walter Wong, Joshua Root, Fabrice Bacchella, Zhenghua Xue, Qin Li, Darren Sawyer, Vangel Bojaxhi, Ben England, Vikentsi Lapa, Alexey Skidanov, Sudhir Kumar. Run began: Thu Jan 1 09:08:03 1970 Auto Mode SYNC Mode. Include fsync in write timing Read & Write sync mode active. File size set to 73728 kB Record Size 4096 kB Dedup+compress enabled Dedup activated 50 percent. Zero Percent 50 Command line used: iozone -i 1 -a -o -e -+r -s 73728k -r 4096k -f /mnt/UDISK/iozone.tmp -+M -+w 50 -+a 50 Output is in kBytes/sec Time Resolution = 0.000001 seconds. Processor cache size set to 1024 kBytes. Processor cache line size set to 32 bytes. File stride size set to 17 * record size. random random bkwd record stride kB reclen write rewrite read reread read write read rewrite read fwrite frewrite fread freread 73728 4096 4787 606201 iozone test complete. =========== the 3 times =========== clear cache sync real 0m 0.04s user 0m 0.00s sys 0m 0.02s [ 4099.957266] spec-seq.sh (700): drop_caches: 3 Iozone: Performance Test of File I/O Version $Revision: 3.489 $ Compiled for 64 bit mode. Build: linux Contributors:William Norcott, Don Capps, Isom Crawford, Kirby Collins Al Slater, Scott Rhine, Mike Wisner, Ken Goss Steve Landherr, Brad Smith, Mark Kelly, Dr. Alain CYR, Randy Dunlap, Mark Montague, Dan Million, Gavin Brebner, Jean-Marc Zucconi, Jeff Blomberg, Benny Halevy, Dave Boone, Erik Habbinga, Kris Strecker, Walter Wong, Joshua Root, Fabrice Bacchella, Zhenghua Xue, Qin Li, Darren Sawyer, Vangel Bojaxhi, Ben England, Vikentsi Lapa, Alexey Skidanov, Sudhir Kumar. Run began: Thu Jan 1 09:08:22 1970 Setting no_unlink Auto Mode SYNC Mode. Include fsync in write timing Read & Write sync mode active. File size set to 73728 kB Record Size 4096 kB Dedup+compress enabled Dedup activated 50 percent. Zero Percent 50 Command line used: iozone -i 0 -w -a -o -e -+r -s 73728k -r 4096k -f /mnt/UDISK/iozone.tmp -+M -+w 50 -+a 50 Output is in kBytes/sec Time Resolution = 0.000001 seconds. Processor cache size set to 1024 kBytes. Processor cache line size set to 32 bytes. File stride size set to 17 * record size. random random bkwd record stride kB reclen write rewrite read reread read write read rewrite read fwrite frewrite fread freread 73728 4096 2749 2643 iozone test complete. clear cache sync real 0m 0.05s user 0m 0.00s sys 0m 0.01s [ 4157.455638] spec-seq.sh (700): drop_caches: 3 Iozone: Performance Test of File I/O Version $Revision: 3.489 $ Compiled for 64 bit mode. Build: linux Contributors:William Norcott, Don Capps, Isom Crawford, Kirby Collins Al Slater, Scott Rhine, Mike Wisner, Ken Goss Steve Landherr, Brad Smith, Mark Kelly, Dr. Alain CYR, Randy Dunlap, Mark Montague, Dan Million, Gavin Brebner, Jean-Marc Zucconi, Jeff Blomberg, Benny Halevy, Dave Boone, Erik Habbinga, Kris Strecker, Walter Wong, Joshua Root, Fabrice Bacchella, Zhenghua Xue, Qin Li, Darren Sawyer, Vangel Bojaxhi, Ben England, Vikentsi Lapa, Alexey Skidanov, Sudhir Kumar. Run began: Thu Jan 1 09:09:19 1970 Auto Mode SYNC Mode. Include fsync in write timing Read & Write sync mode active. File size set to 73728 kB Record Size 4096 kB Dedup+compress enabled Dedup activated 50 percent. Zero Percent 50 Command line used: iozone -i 1 -a -o -e -+r -s 73728k -r 4096k -f /mnt/UDISK/iozone.tmp -+M -+w 50 -+a 50 Output is in kBytes/sec Time Resolution = 0.000001 seconds. Processor cache size set to 1024 kBytes. Processor cache line size set to 32 bytes. File stride size set to 17 * record size. random random bkwd record stride kB reclen write rewrite read reread read write read rewrite read fwrite frewrite fread freread 73728 4096 4792 613387 iozone test complete. ------------------- SEQ SPEED ------------------- seq read: 4063 KB/s seq write: 2234 KB/s ------------------- end ------------------- ======================== Testcase Information ======================== </spec/storage/seq>: seq read: 4063 KB/s seq write: 2234 KB/s ---------------------------- /spec/storage/seq ---------------------------- * task path : /spec/storage/seq * task command : spec-seq.sh * run times(real/max) : 1/1 * run parallel : no * run alone : no * may reboot : no * run once time limit : 30758400s * run time limit : 30758400s * timeout with : pass * exit once failed : no * real-time log: yes * begin date : Thu Jan 1 09:04:19 1970 * end date : Thu Jan 1 09:09:37 1970 * result : * num pid pgid return begin end note * 0 699 698 0 01:04:19 01:09:37 * task resource : * user cpu time = 10.421 * system cpu time = 167.940 * maximum resident size = 11034kB * page faults break times (without I/O) = 50615 * page faults break times (with I/O) = 59 * input times = 0 * output times = 0 * wait resource actively times = 288124 * wait resource passively times = 2409102 * run log: real_time_log was set, None! ---------------------------- end ---------------------------- ============================ tasks result ============================ /spec/storage/seq - YES ============================ end ============================10、SPI-Nand顺序读
SPI-Nand顺序读:SPI-Nand顺序读:>=4MB/s(四线)
先切换到性能模式:
echo "performance" > /sys/devices/system/cpu/cpufreq/policy0/scaling_governor再执行测试命令 :
tt /spec/storage/seq结果如下:
root@TinaLinux:/# tt /spec/storage/seq [DEBUG]: ---enter init_entry [DEBUG]: --before bind [ERROR]: bind socket fail [ERROR]: socket init fail [ERROR]: (dragonmat_init-289): init entry of socket_db failed ============================ tasks list ============================ /spec/storage/seq ============================ end ============================ ------------------- INFO ------------------- fast mode: false async mode: ddr total size: 1021656 KB cpu policy: performance flash device: overlayfs:/overlay flash device fs: ubifs flash device size: 176576 KB flash device free: 49176 KB test directory: /mnt/UDISK test file size: 45056 KB test block size: 4096 KB test times for average: 3 ------------------- END ------------------- filling ... OK (3584KB in 2s) =========== the 1 times =========== clear cache sync real 0m 0.04s user 0m 0.00s sys 0m 0.01s [ 189.972171] spec-seq.sh (658): drop_caches: 3 Iozone: Performance Test of File I/O Version $Revision: 3.489 $ Compiled for 64 bit mode. Build: linux Contributors:William Norcott, Don Capps, Isom Crawford, Kirby Collins Al Slater, Scott Rhine, Mike Wisner, Ken Goss Steve Landherr, Brad Smith, Mark Kelly, Dr. Alain CYR, Randy Dunlap, Mark Montague, Dan Million, Gavin Brebner, Jean-Marc Zucconi, Jeff Blomberg, Benny Halevy, Dave Boone, Erik Habbinga, Kris Strecker, Walter Wong, Joshua Root, Fabrice Bacchella, Zhenghua Xue, Qin Li, Darren Sawyer, Vangel Bojaxhi, Ben England, Vikentsi Lapa, Alexey Skidanov, Sudhir Kumar. Run began: Thu Jan 1 08:03:12 1970 Setting no_unlink Auto Mode SYNC Mode. Include fsync in write timing Read & Write sync mode active. File size set to 45056 kB Record Size 4096 kB Dedup+compress enabled Dedup activated 50 percent. Zero Percent 50 Command line used: iozone -i 0 -w -a -o -e -+r -s 45056k -r 4096k -f /mnt/UDISK/iozone.tmp -+M -+w 50 -+a 50 Output is in kBytes/sec Time Resolution = 0.000001 seconds. Processor cache size set to 1024 kBytes. Processor cache line size set to 32 bytes. File stride size set to 17 * record size. random random bkwd record stride kB reclen write rewrite read reread read write read rewrite read fwrite frewrite fread freread 45056 4096 2358 2672 iozone test complete. clear cache sync real 0m 0.07s user 0m 0.00s sys 0m 0.02s [ 228.738321] spec-seq.sh (658): drop_caches: 3 Iozone: Performance Test of File I/O Version $Revision: 3.489 $ Compiled for 64 bit mode. Build: linux Contributors:William Norcott, Don Capps, Isom Crawford, Kirby Collins Al Slater, Scott Rhine, Mike Wisner, Ken Goss Steve Landherr, Brad Smith, Mark Kelly, Dr. Alain CYR, Randy Dunlap, Mark Montague, Dan Million, Gavin Brebner, Jean-Marc Zucconi, Jeff Blomberg, Benny Halevy, Dave Boone, Erik Habbinga, Kris Strecker, Walter Wong, Joshua Root, Fabrice Bacchella, Zhenghua Xue, Qin Li, Darren Sawyer, Vangel Bojaxhi, Ben England, Vikentsi Lapa, Alexey Skidanov, Sudhir Kumar. Run began: Thu Jan 1 08:03:50 1970 Auto Mode SYNC Mode. Include fsync in write timing Read & Write sync mode active. File size set to 45056 kB Record Size 4096 kB Dedup+compress enabled Dedup activated 50 percent. Zero Percent 50 Command line used: iozone -i 1 -a -o -e -+r -s 45056k -r 4096k -f /mnt/UDISK/iozone.tmp -+M -+w 50 -+a 50 Output is in kBytes/sec Time Resolution = 0.000001 seconds. Processor cache size set to 1024 kBytes. Processor cache line size set to 32 bytes. File stride size set to 17 * record size. random random bkwd record stride kB reclen write rewrite read reread read write read rewrite read fwrite frewrite fread freread 45056 4096 4951 599763 iozone test complete. =========== the 2 times =========== clear cache sync real 0m 0.04s user 0m 0.01s sys 0m 0.00s [ 240.340556] spec-seq.sh (658): drop_caches: 3 Iozone: Performance Test of File I/O Version $Revision: 3.489 $ Compiled for 64 bit mode. Build: linux Contributors:William Norcott, Don Capps, Isom Crawford, Kirby Collins Al Slater, Scott Rhine, Mike Wisner, Ken Goss Steve Landherr, Brad Smith, Mark Kelly, Dr. Alain CYR, Randy Dunlap, Mark Montague, Dan Million, Gavin Brebner, Jean-Marc Zucconi, Jeff Blomberg, Benny Halevy, Dave Boone, Erik Habbinga, Kris Strecker, Walter Wong, Joshua Root, Fabrice Bacchella, Zhenghua Xue, Qin Li, Darren Sawyer, Vangel Bojaxhi, Ben England, Vikentsi Lapa, Alexey Skidanov, Sudhir Kumar. Run began: Thu Jan 1 08:04:02 1970 Setting no_unlink Auto Mode SYNC Mode. Include fsync in write timing Read & Write sync mode active. File size set to 45056 kB Record Size 4096 kB Dedup+compress enabled Dedup activated 50 percent. Zero Percent 50 Command line used: iozone -i 0 -w -a -o -e -+r -s 45056k -r 4096k -f /mnt/UDISK/iozone.tmp -+M -+w 50 -+a 50 Output is in kBytes/sec Time Resolution = 0.000001 seconds. Processor cache size set to 1024 kBytes. Processor cache line size set to 32 bytes. File stride size set to 17 * record size. random random bkwd record stride kB reclen write rewrite read reread read write read rewrite read fwrite frewrite fread freread 45056 4096 2752 2643 iozone test complete. clear cache sync real 0m 0.04s user 0m 0.00s sys 0m 0.01s [ 276.075574] spec-seq.sh (658): drop_caches: 3 Iozone: Performance Test of File I/O Version $Revision: 3.489 $ Compiled for 64 bit mode. Build: linux Contributors:William Norcott, Don Capps, Isom Crawford, Kirby Collins Al Slater, Scott Rhine, Mike Wisner, Ken Goss Steve Landherr, Brad Smith, Mark Kelly, Dr. Alain CYR, Randy Dunlap, Mark Montague, Dan Million, Gavin Brebner, Jean-Marc Zucconi, Jeff Blomberg, Benny Halevy, Dave Boone, Erik Habbinga, Kris Strecker, Walter Wong, Joshua Root, Fabrice Bacchella, Zhenghua Xue, Qin Li, Darren Sawyer, Vangel Bojaxhi, Ben England, Vikentsi Lapa, Alexey Skidanov, Sudhir Kumar. Run began: Thu Jan 1 08:04:38 1970 Auto Mode SYNC Mode. Include fsync in write timing Read & Write sync mode active. File size set to 45056 kB Record Size 4096 kB Dedup+compress enabled Dedup activated 50 percent. Zero Percent 50 Command line used: iozone -i 1 -a -o -e -+r -s 45056k -r 4096k -f /mnt/UDISK/iozone.tmp -+M -+w 50 -+a 50 Output is in kBytes/sec Time Resolution = 0.000001 seconds. Processor cache size set to 1024 kBytes. Processor cache line size set to 32 bytes. File stride size set to 17 * record size. random random bkwd record stride kB reclen write rewrite read reread read write read rewrite read fwrite frewrite fread freread 45056 4096 4994 609400 iozone test complete. =========== the 3 times =========== clear cache sync real 0m 0.04s user 0m 0.00s sys 0m 0.01s [ 287.598598] spec-seq.sh (658): drop_caches: 3 Iozone: Performance Test of File I/O Version $Revision: 3.489 $ Compiled for 64 bit mode. Build: linux Contributors:William Norcott, Don Capps, Isom Crawford, Kirby Collins Al Slater, Scott Rhine, Mike Wisner, Ken Goss Steve Landherr, Brad Smith, Mark Kelly, Dr. Alain CYR, Randy Dunlap, Mark Montague, Dan Million, Gavin Brebner, Jean-Marc Zucconi, Jeff Blomberg, Benny Halevy, Dave Boone, Erik Habbinga, Kris Strecker, Walter Wong, Joshua Root, Fabrice Bacchella, Zhenghua Xue, Qin Li, Darren Sawyer, Vangel Bojaxhi, Ben England, Vikentsi Lapa, Alexey Skidanov, Sudhir Kumar. Run began: Thu Jan 1 08:04:49 1970 Setting no_unlink Auto Mode SYNC Mode. Include fsync in write timing Read & Write sync mode active. File size set to 45056 kB Record Size 4096 kB Dedup+compress enabled Dedup activated 50 percent. Zero Percent 50 Command line used: iozone -i 0 -w -a -o -e -+r -s 45056k -r 4096k -f /mnt/UDISK/iozone.tmp -+M -+w 50 -+a 50 Output is in kBytes/sec Time Resolution = 0.000001 seconds. Processor cache size set to 1024 kBytes. Processor cache line size set to 32 bytes. File stride size set to 17 * record size. random random bkwd record stride kB reclen write rewrite read reread read write read rewrite read fwrite frewrite fread freread 45056 4096 2720 2630 iozone test complete. clear cache sync real 0m 0.10s user 0m 0.00s sys 0m 0.03s [ 323.735964] spec-seq.sh (658): drop_caches: 3 Iozone: Performance Test of File I/O Version $Revision: 3.489 $ Compiled for 64 bit mode. Build: linux Contributors:William Norcott, Don Capps, Isom Crawford, Kirby Collins Al Slater, Scott Rhine, Mike Wisner, Ken Goss Steve Landherr, Brad Smith, Mark Kelly, Dr. Alain CYR, Randy Dunlap, Mark Montague, Dan Million, Gavin Brebner, Jean-Marc Zucconi, Jeff Blomberg, Benny Halevy, Dave Boone, Erik Habbinga, Kris Strecker, Walter Wong, Joshua Root, Fabrice Bacchella, Zhenghua Xue, Qin Li, Darren Sawyer, Vangel Bojaxhi, Ben England, Vikentsi Lapa, Alexey Skidanov, Sudhir Kumar. Run began: Thu Jan 1 08:05:25 1970 Auto Mode SYNC Mode. Include fsync in write timing Read & Write sync mode active. File size set to 45056 kB Record Size 4096 kB Dedup+compress enabled Dedup activated 50 percent. Zero Percent 50 Command line used: iozone -i 1 -a -o -e -+r -s 45056k -r 4096k -f /mnt/UDISK/iozone.tmp -+M -+w 50 -+a 50 Output is in kBytes/sec Time Resolution = 0.000001 seconds. Processor cache size set to 1024 kBytes. Processor cache line size set to 32 bytes. File stride size set to 17 * record size. random random bkwd record stride kB reclen write rewrite read reread read write read rewrite read fwrite frewrite fread freread 45056 4096 4948 604526 iozone test complete. ------------------- SEQ SPEED ------------------- seq read: 4964 KB/s seq write: 2610 KB/s ------------------- end ------------------- ---------------------------- /spec/storage/seq ---------------------------- * task path : /spec/storage/seq * task command : spec-seq.sh * run times(real/max) : 1/1 * run parallel : no * run alone : no * may reboot : no * run once time limit : 30758400s * run time limit : 30758400s * timeout with : pass * exit once failed : no * real-time log: yes * begin date : Thu Jan 1 08:03:05 1970 * end date : Thu Jan 1 08:05:37 1970 * result : * num pid pgid return begin end note * 0 657 656 0 00:03:05 00:05:37 * task resource : * user cpu time = 9.25 * system cpu time = 103.770 * maximum resident size = 11028kB * page faults break times (without I/O) = 50224 * page faults break times (with I/O) = 57 * input times = 0 * output times = 0 * wait resource actively times = 168110 * wait resource passively times = 1460900 * run log: real_time_log was set, None! ---------------------------- end ---------------------------- ======================== Testcase Information ======================== </spec/storage/seq>: seq read: 4964 KB/s seq write: 2610 KB/s [ 359.764953] [BH_WRN] miss interrupt! ============================ tasks result ============================ /spec/storage/seq - YES11、SPI-Nand随机写/读
SPI-Nand随机写:>=120iops(四线)
先切换到性能模式:
echo "performance" > /sys/devices/system/cpu/cpufreq/policy0/scaling_governor再执行测试命令 :
tt /spec/storage/rand结果如下:
root@TinaLinux:/# tt /spec/storage/rand [DEBUG]: ---enter init_entry [DEBUG]: --before bind [ERROR]: bind socket fail [ERROR]: socket init fail [ERROR]: (dragonmat_init-289): init entry of socket_db failed ============================ tasks list ============================ /spec/storage/rand ============================ end ============================ ------------------- INFO ------------------- fast mode: true async mode: ddr total size: 1021656 KB cpu policy: performance flash device: overlayfs:/overlay flash device fs: ubifs flash device size: 176576 KB flash device free: 175568 KB test directory: /mnt/UDISK test file size: 166788 KB test block size: 4 KB test times for average: 3 ------------------- END ------------------- initializing ..... OK (166788KB in 124s) =========== the 1 times =========== clear cache real 0m 0.04s user 0m 0.00s sys 0m 0.01s [ 3650.078789] spec-rand.sh (810): drop_caches: 3 Iozone: Performance Test of File I/O Version $Revision: 3.489 $ Compiled for 64 bit mode. Build: linux Contributors:William Norcott, Don Capps, Isom Crawford, Kirby Collins Al Slater, Scott Rhine, Mike Wisner, Ken Goss Steve Landherr, Brad Smith, Mark Kelly, Dr. Alain CYR, Randy Dunlap, Mark Montague, Dan Million, Gavin Brebner, Jean-Marc Zucconi, Jeff Blomberg, Benny Halevy, Dave Boone, Erik Habbinga, Kris Strecker, Walter Wong, Joshua Root, Fabrice Bacchella, Zhenghua Xue, Qin Li, Darren Sawyer, Vangel Bojaxhi, Ben England, Vikentsi Lapa, Alexey Skidanov, Sudhir Kumar. Run began: Thu Jan 1 09:00:52 1970 Auto Mode Setting no_unlink SYNC Mode. Read & Write sync mode active. File size set to 166788 kB Record Size 4 kB Dedup+compress enabled Dedup activated 50 percent. Zero Percent 50 Command line used: iozone -a -w -i 2 -o -+r -s 166788k -r 4k -f /mnt/UDISK/iozone.tmp -+M -+w 50 -+a 50 Output is in kBytes/sec Time Resolution = 0.000001 seconds. Processor cache size set to 1024 kBytes. Processor cache line size set to 32 bytes. File stride size set to 17 * record size. random random bkwd record stride kB reclen write rewrite read reread read write read rewrite read fwrite frewrite fread freread 166788 4 3054 1058 iozone test complete. =========== the 2 times =========== clear cache real 0m 0.27s user 0m 0.00s sys 0m 0.10s [ 3866.126220] spec-rand.sh (810): drop_caches: 3 Iozone: Performance Test of File I/O Version $Revision: 3.489 $ Compiled for 64 bit mode. Build: linux Contributors:William Norcott, Don Capps, Isom Crawford, Kirby Collins Al Slater, Scott Rhine, Mike Wisner, Ken Goss Steve Landherr, Brad Smith, Mark Kelly, Dr. Alain CYR, Randy Dunlap, Mark Montague, Dan Million, Gavin Brebner, Jean-Marc Zucconi, Jeff Blomberg, Benny Halevy, Dave Boone, Erik Habbinga, Kris Strecker, Walter Wong, Joshua Root, Fabrice Bacchella, Zhenghua Xue, Qin Li, Darren Sawyer, Vangel Bojaxhi, Ben England, Vikentsi Lapa, Alexey Skidanov, Sudhir Kumar. Run began: Thu Jan 1 09:04:28 1970 Auto Mode Setting no_unlink SYNC Mode. Read & Write sync mode active. File size set to 166788 kB Record Size 4 kB Dedup+compress enabled Dedup activated 50 percent. Zero Percent 50 Command line used: iozone -a -w -i 2 -o -+r -s 166788k -r 4k -f /mnt/UDISK/iozone.tmp -+M -+w 50 -+a 50 Output is in kBytes/sec Time Resolution = 0.000001 seconds. Processor cache size set to 1024 kBytes. Processor cache line size set to 32 bytes. File stride size set to 17 * record size. random random bkwd record stride kB reclen write rewrite read reread read write read rewrite read fwrite frewrite fread freread 166788 4 3533 1798 iozone test complete. =========== the 3 times =========== clear cache real 0m 0.31s user 0m 0.00s sys 0m 0.12s [ 4009.745178] spec-rand.sh (810): drop_caches: 3 Iozone: Performance Test of File I/O Version $Revision: 3.489 $ Compiled for 64 bit mode. Build: linux Contributors:William Norcott, Don Capps, Isom Crawford, Kirby Collins Al Slater, Scott Rhine, Mike Wisner, Ken Goss Steve Landherr, Brad Smith, Mark Kelly, Dr. Alain CYR, Randy Dunlap, Mark Montague, Dan Million, Gavin Brebner, Jean-Marc Zucconi, Jeff Blomberg, Benny Halevy, Dave Boone, Erik Habbinga, Kris Strecker, Walter Wong, Joshua Root, Fabrice Bacchella, Zhenghua Xue, Qin Li, Darren Sawyer, Vangel Bojaxhi, Ben England, Vikentsi Lapa, Alexey Skidanov, Sudhir Kumar. Run began: Thu Jan 1 09:06:51 1970 Auto Mode Setting no_unlink SYNC Mode. Read & Write sync mode active. File size set to 166788 kB Record Size 4 kB Dedup+compress enabled Dedup activated 50 percent. Zero Percent 50 Command line used: iozone -a -w -i 2 -o -+r -s 166788k -r 4k -f /mnt/UDISK/iozone.tmp -+M -+w 50 -+a 50 Output is in kBytes/sec Time Resolution = 0.000001 seconds. Processor cache size set to 1024 kBytes. Processor cache line size set to 32 bytes. File stride size set to 17 * record size. random random bkwd record stride kB reclen write rewrite read reread read write read rewrite read fwrite frewrite fread freread 166788 4 3573 1819 iozone test complete. ------------------- RAND SPEED ------------------- random read: 3386 KB/s random write: 1558 KB/s random read iops: 846 random write iops: 389 ------------------- end ------------------- ---------------------------- /spec/storage/rand ---------------------------- * task path : /spec/storage/rand * task command : spec-rand.sh * run times(real/max) : 1/1 * run parallel : no * run alone : no * may reboot : no * run once time limit : 30758400s * run time limit : 30758400s * timeout with : pass * exit once failed : no * real-time log: yes * begin date : Thu Jan 1 08:58:42 1970 * end date : Thu Jan 1 09:09:11 1970 * result : * num pid pgid return begin end note * 0 809 808 0 00:58:42 01:09:11 * task resource : * user cpu time = 20.769 * system cpu time = 363.649 * maximum resident size = 11032kB * page faults break times (without I/O) = 43552 * page faults break times (with I/O) = 27 * input times = 0 * output times = 0 * wait resource actively times = 688130 * wait resource passively times = 5592580 * run log: real_time_log was set, None! ---------------------------- end ---------------------------- ======================== Testcase Information ======================== </spec/storage/rand>: random read: 3386 KB/s random write: 1558 KB/s random read iops: 846 random write iops: 389 ============================ tasks result ============================ /spec/storage/rand - YES ============================ end ============================12、TF卡
支持最大128G TF卡,支持热拔插,提供命令查看储存情况。
插了卡的情况下执行:
cat /proc/partitions结果如下:
root@TinaLinux:/# cat /proc/partitions
major minor  #blocks  name

  31        0       1024 mtdblock0
  31        1       4096 mtdblock1
  31        2       1024 mtdblock2
  31        3     256000 mtdblock3
 254        0      20412 ubiblock0_5
 179        0   31205376 mmcblk0
 179        1       4032 mmcblk0p1
 179        2        252 mmcblk0p2
 179        3        252 mmcblk0p3
 179        4      10332 mmcblk0p4
 179        5      20412 mmcblk0p5
 179        6        504 mmcblk0p6
 179        7      14112 mmcblk0p7
 259        0   31133724 mmcblk0p8
取mmcblk0前的数字,例如31205376 KB,换算得31.1G,往上取整,即为32G卡。
-
【新人上手】D1哪吒开发板Tina Linux下查看DDR参数、内核版本、uboot版本和系统版本发布在 MR Series
继续上一个贴的内容。
3、查看DDR大小和频率
支持DDR3,1GB,最高频率792MHz
启动时会有日志打印
如:[230]DRAM CLK = 792 MHz [232]DRAM Type = 3 (2:DDR2,3:DDR3) [235]DRAMC ZQ value: 0x7b7bfb [238]DRAM ODT value: 0x42. [241]ddr_efuse_type: 0x0 [244]DRAM SIZE =1024 M4、查看当前内核版本
根目录执行:
ubus call system board结果如下:
root@TinaLinux:/# ubus call system board { "kernel": "5.4.61", "hostname": "TinaLinux", "model": "sun20iw1p1", "release": { "distribution": "tina.kunyao.20211213.091259", "version": "Neptune", "revision": "5C1C9C53", "target": "d1-nezha\/generic v3.5", "description": "tina.kunyao.20211213.091259 4.0.0" } }5、查看当前uboot版本
上电可以看到log打印:
U-Boot 2018.05-00088-g778d823e36或执行命令:
cat /proc/cmdline如下
root@TinaLinux:/# cat /proc/cmdline ubi.mtd=sys ubi.block=0,rootfs earlyprintk=sunxi-uart,0x02500000 clk_ignore_unused initcall_debug=0 console=ttyS0,115200 loglevel=8 root=/dev/ubiblock0_5 rootfstype=squashfs init=/sbin/init partitions=mbr@ubi0_0:boot-resource@ubi0_1:env@ubi0_2:env-redund@ubi0_3:boot@ubi0_4:rootfs@ubi0_5:dsp0@ubi0_6:recovery@ubi0_7:UDISK@ubi0_8: cma=8M snum= mac_addr= wifi_mac= bt_mac= specialstr= gpt=1 androidboot.hardware=sun20iw1p1 boot_type=5 androidboot.boot_type=5 gpt=1 uboot_message=2018.05-00026-g53b07c0278(12/10/206、查看当前Tina系统版本
ubus call system board结果如下:
root@TinaLinux:/# ubus call system board { "kernel": "5.4.61", "hostname": "TinaLinux", "model": "sun20iw1p1", "release": { "distribution": "tina.kunyao.20211213.091259", "version": "Neptune", "revision": "5C1C9C53", "target": "d1-nezha\/generic v3.5", "description": "tina.kunyao.20211213.091259 4.0.0" -
【新人上手】D1哪吒开发板Tina Linux下动态调CPU频率和电压发布在 MR Series
公布一些测试用例,分别广大开发者调试:
1、查看cpu频率的方法
根目录下执行
cat /sys/devices/system/cpu/cpufreq/policy0/cpuinfo_cur_freq结果如下:
root@TinaLinux:/# cat /sys/devices/system/cpu/cpufreq/policy0/cpuinfo_cur_freq
1008000
如果遇到没有路径下的可执行项的情况,则可以参考以下帖子重新配置镜像并烧录:
超频教程
menuconfig参考2、调频调压测试命令
根目录下执行
/usr/bin/cpufreq.sh 10000 500000其中第一个参数10000指的是每个子用例循环测试数times,由于脚本中有3个子用例,因此总的调频数是30000。
第二个参数500000指测试时间间隔,单位为us,一般不建议低于100000us。
结果如下:
root@TinaLinux:/# /usr/bin/cpufreq.sh 10000 500000TEST_NUMBERS(from tinatest): 10000TEST_INTERVAL(from tinatest): 500000TEST_NUMBERS(from shell): 10000TEST_INTERVAL(from shell): 500000===>>cpufreq test(seq) startNo.1freq_target=720000set cpufreq[720000] OKNo.2freq_target=816000set cpufreq[816000] OKNo.3freq_target=912000set cpufreq[912000] OKNo.4freq_target=1008000set cpufreq[1008000] OKNo.5freq_target=480000set cpufreq[480000] OK测试过程无死机,无异常报错信息,测试完成时会打印如下信息,即测试通过
=================all cpufreq test done!!!=================== -
回复: 【XR806开发板试用】新建任务及点灯那些事发布在 Wireless & Analog Series
由于手上没什么外设,决定继续从led下手。用鸿蒙的接口来实现个呼吸灯。根据OpenHarmony的要求,适配了OpenHarmony后就只有一个接口,没有原生接口了,所以之后的文档中我就不区别对待了,统一指OpenHarmony接口。
关于呼吸灯的原理,就是PWM(Pulse Width Modulation),即脉宽调制信号,应用非常广泛。最主要的特点为可以通过改变数字信号的占空比,从而达到模拟信号的效果。因此理论上只要带宽足够,任何模拟值都可以使用PWM信号进行编码。
接下来我们开始对XR806进行PWM实验:1、在Harmony\device\xradio\xr806\ohosdemo下新建任务文件夹如Breath_LED,分别添加BUILD.gn文件和main.c文件
其中BUILD.gn文件内容如下:
import("//device/xradio/xr806/liteos_m/config.gni")

static_library("app_BreathLED")
{
   configs = []

   sources = ["main.c",]

   cflags = board_cflags

   include_dirs = board_include_dirs
   include_dirs += [
      "//kernel/liteos_m/kernel/arch/include",
      "//base/iot_hardware/peripheral/interfaces/kits",
      "//device/xradio/xr806/xr_skylark/src/rom/rom_bin/src/driver",
   ]
}
其中静态库必须以app_xxx的格式命名。
2、从代码编辑器中打开文件夹,找到device\xradio\xr806\adapter\hals\iot_hardware\wifiiot_lite 文件夹下内容,此为专门的外设接口,能看到flash、gpio、i2c、pwm等参考源文件,文件接口的头文件在base\iot_hardware\peripheral\interfaces\kits。这里我们打开iot_pwm.c文件,可以看到如下函数:
1、IoTPwmInit(unsigned int port)
2、IoTPwmDeinit(unsigned int port)
3、IoTPwmStart(unsigned int port, unsigned short duty,
			 unsigned int freq)
4、IoTPwmStop(unsigned int port)
其中 IoTPwmInit 和 IoTPwmDeinit 就是port的初始化跟去初始化,填入端口参数即可使用。IoTPwmStart 和 IoTPwmStop 就是pwm的开启与关闭。
3、接下来我们就可以开始写main.c文件的内容了。
#include <stdio.h>
#include "kernel/os/os.h"
#include "ohos_init.h"
#include "iot_pwm.h"

#define PWM_OUTPUT_CHL        	PWM_GROUP1_CH2

static OS_Thread_t g_main_thread;

static void Breath_LED_init()
{
    IoTPwmInit(GPIO_PORT_A);//初始化pwm端口,设置时钟信号源和分频系数等
}

 static void Breath_LED_start(void)
 {
    unsigned char counter = 1;

	for(counter = 1; counter<99; counter++)
	{
		IoTPwmStart(PWM_OUTPUT_CHL,counter,100);//升频
		OS_MSleep(10);
	}
	for(counter = 99; counter >1; counter--)
	{
		IoTPwmStart(PWM_OUTPUT_CHL,counter,100);//降频
		OS_MSleep(10);
	}

 }

static void MainThread(void *arg)
{
    Breath_LED_init();
	while (1)
    {
        Breath_LED_start();
	}
}

void PWM_TestMain(void)//实际入口,负责创建线程
{
	printf("Test Start\n");

	if (OS_ThreadCreate(&g_main_thread,"MainThread",MainThread, NULL, OS_THREAD_PRIO_APP, 4096) != OS_OK)
	{
		printf("[ERR] Create PWMLED_Task Failed\n");
	}
}

SYS_RUN(PWM_TestMain);
//Harmony线程入口,在utils/native/lite/include/ohos_init.h中定义,读者可以改成其他入口类型检查差异
4、配置复用端口
关于端口信息可以在PWM_CH_ID这个枚举体中查看到:
typedef enum { PWM_GROUP0_CH0 = 0U, /*!< bit 0 PORTA_PIN8 or PORTA_PIN19 */ PWM_GROUP0_CH1 = 1U, /*!< bit 1 PORTA_PIN9 or PORTA_PIN20 */ PWM_GROUP1_CH2 = 2U, /*!< bit 2 PORTA_PIN10 or PORTA_PIN21 */ PWM_GROUP1_CH3 = 3U, /*!< bit 3 PORTA_PIN11 or PORTA_PIN22 */ PWM_GROUP2_CH4 = 4U, /*!< bit 4 PORTA_PIN12 or PORTB_PIN0 */ PWM_GROUP2_CH5 = 5U, /*!< bit 5 PORTA_PIN13 or PORTB_PIN1 */ PWM_GROUP3_CH6 = 6U, /*!< bit 6 PORTA_PIN14 or PORTB_PIN2 */ PWM_GROUP3_CH7 = 7U, /*!< bit 7 PORTA_PIN15 or PORTB_PIN3 */ PWM_CH_NUM = 8U, PWM_CH_NULL = PWM_CH_NUM, } PWM_CH_ID;由于笔者的开发板上的led连接的是pin21,故在选择PWM通道时应该选择通道二,也就是PWM_GROUP_CH2, 但是值得注意的一点是有的开发板配置时考虑到IO复用问题,并没有开启相应的端口,因此需要手动配置一下。
打开
Harmony\device\xradio\xr806\xr_skylark\project\common\board\xr806_OHOS\board_config.c可以看到关于pwm的相关端口配置
__xip_rodata
static const GPIO_PinMuxParam g_pinmux_pwm[] = {
	{ GPIO_PORT_A, GPIO_PIN_19,  { GPIOA_P19_F4_PWM0_ECT0, GPIO_DRIVING_LEVEL_1, GPIO_PULL_NONE } },
	{ GPIO_PORT_A, GPIO_PIN_20,  { GPIOA_P20_F4_PWM1_ECT1, GPIO_DRIVING_LEVEL_1, GPIO_PULL_NONE } },
	{ GPIO_PORT_A, GPIO_PIN_22,  { GPIOA_P22_F4_PWM3_ECT3, GPIO_DRIVING_LEVEL_1, GPIO_PULL_NONE } },
	{ GPIO_PORT_A, GPIO_PIN_12,  { GPIOA_P12_F3_PWM4_ECT4, GPIO_DRIVING_LEVEL_1, GPIO_PULL_NONE } },
	{ GPIO_PORT_A, GPIO_PIN_13,  { GPIOA_P13_F3_PWM5_ECT5, GPIO_DRIVING_LEVEL_1, GPIO_PULL_NONE } },
	{ GPIO_PORT_B, GPIO_PIN_3,   { GPIOB_P3_F4_PWM7_ECT7,  GPIO_DRIVING_LEVEL_1, GPIO_PULL_NONE } },
};
可以看到其中是没有pin21的信息的,所以需要手动添加一句
{ GPIO_PORT_A, GPIO_PIN_21, { GPIOA_P21_F4_PWM2_ECT2, GPIO_DRIVING_LEVEL_1, GPIO_PULL_NONE } },这样就可以正常开启pwm了。
如果在其他开发中遇到调用sdk后编译正常开发板却没有响应的情况,也可以产看关于引脚复用的文档寻找问题。
5、编译烧录
最后不要忘记在/Harmony\device\xradio\xr806\ohosdemo\BUILD.gn中加入我们的任务
group("ohosdemo") {
    deps = [
        #"iot_peripheral:app_peripheral",
        #"handsome_demo:app_handsome",
        #"wlan_demo:app_WlanTest",
        "Breath_LED:app_BreathLED"
    ]
}
根目录命令行执行hb build -f,然后就可以跟hello world中一样过程烧录了。
烧录后就可以看到板载呼吸灯的效果了。
-
【XR806开发板试用】新建任务及点灯那些事发布在 Wireless & Analog Series
现在我们已经成功地完成了helloworld了,接下来就是一些个性化的开发了
首当其冲就是最基础的IO开发
下面演示如何添加自己的任务文件到系统中
1、在
Harmony\device\xradio\xr806\ohosdemo下新建文件夹,比如起名IO_TEST。
并新建main.c文件和BUILD.gn文件(建议严格按这个形式命名),后续文
件数变多的情况下也可以在任务路径下分别新建头文件和c文件的文件夹,并重新指定路径即可。

2、接下来是BUILD.gn文件(关于GN跨平台工具,想具体学习可以参考此文章https://www.cnblogs.com/bigben0123/p/12643839.html)gn文件内容如下
#Create by Randolph.

import("//device/xradio/xr806/liteos_m/config.gni")

static_library("app_IO")
{
   configs = []

   sources = ["main.c",]

   cflags = board_cflags

   include_dirs = board_include_dirs
   include_dirs += [
      "//kernel/liteos_m/kernel/arch/include",
   ]
}
此处要注意的是。对static_library静态库的声明需要按照app_xxx的格式写入
3、完成了之后,c文件能自主发挥的空间就很大了。先放上代码
//Create by Randolph #include <stdio.h> #include "kernel/os/os.h" #include "ohos_init.h" #include "driver/chip/hal_gpio.h" #define GPIO_OUTPUT_PORT GPIO_PORT_A static OS_Thread_t g_main_thread; static void gpio_output_init(void) { GPIO_InitParam param; param.driving = GPIO_DRIVING_LEVEL_1; param.mode = GPIOx_Pn_F1_OUTPUT; param.pull = GPIO_PULL_NONE; HAL_GPIO_Init(GPIO_OUTPUT_PORT, GPIO_PIN_21, ¶m);//led灯对应IO } static void gpio_output_ctl(uint8_t level) { HAL_GPIO_WritePin(GPIO_OUTPUT_PORT, GPIO_PIN_21, level ? GPIO_PIN_HIGH : GPIO_PIN_LOW); } // static void gpio_output_deinit(void) // { // HAL_GPIO_DeInit(GPIO_OUTPUT_PORT, GPIO_PIN_15); // } // gpio_output_deinit();//GPIO去初始化,如果IO要去做别的事情就可以执行,我这边只点灯 static void gpio_output_test(void) { printf("gpio output test start.\n"); uint8_t i; uint8_t level = 1; for (i = 0; i < 10; i++) { gpio_output_ctl(level); printf("gpio level write %d\n", level); level = (!level & 0x01); OS_MSleep(500); } printf("gpio output test end.\n"); } static void MainThread(void *arg) { printf("Hello,XR806 This is Randolph!\n"); while (1) { gpio_output_test(); } } void IO_TestMain(void) { printf("Test Start\n"); gpio_output_init(); if (OS_ThreadCreate(&g_main_thread,"MainThread",MainThread, NULL, OS_THREAD_PRIO_APP, 4096) != OS_OK) { printf("[ERR] Create HelloWorld_Task Failed\n"); } } SYS_RUN(IO_TestMain);此处就跟玩stm32一类的主控一样了,大部分都是调用hal库,另外在
Harmony\device\xradio\xr806\xr_skylark\project\example路径内也有很多现成的例子可以参考。
当然也可以用鸿蒙的外设接口,不用原生SDK的。文件接口的头文件在:base\iot_hardware\peripheral\interfaces\kits源码在:
device\xradio\xr806\adapter\hals\iot_hardware\wifiiot_lite带有iot字样的接口就是鸿蒙的接口。
4、最后在
Harmony\device\xradio\xr806\ohosdemo\BUILD.gn路径下增加我们新建的任务文件信息如下:
"IO_TEST:app_IO"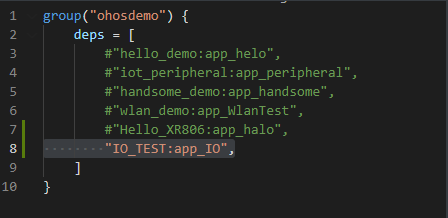
别忘记注释掉之前的hello world!保存后,回到Harmony跟目录执行hb build -f
并在phoenixMC.exe中烧录镜像,就可以看到板子上的灯闪烁起来啦!
同时也可以从串口看到调试信息:

点灯完成! -
回复: 【XR806开发板试用】系列之二 - I2C外设使用及控制OLED屏显示发布在 Wireless & Analog Series
@hu_710774265 可以看看板级配置文件,在
Harmony\device\xradio\xr806\xr_skylark\project\common\board\xr806_OHOS\board_config.c可以看到关于i2c的相关端口配置。
比如我的是这样

-
【XR806开发板试用】从Say hello开始发布在 Wireless & Analog Series
很早入了XR806,一直没整理出来点东西分享,打算开个坑,分享一些简单例程,也打算做一个完整度高的小作品,慢慢填坑哈哈。
XR806的一大亮点就是适配了鸿蒙系统,总的来说,鸿蒙系统也是有类型的,分三类
-
轻量系统(mini system)
面向MCU类处理器例如Arm Cortex-M、RISC-V 32位的设备,硬件资源极其有限,支持的设备最小内存为128KiB,可以提供多种轻量级网络协议,轻量级的图形框架,以及丰富的IOT总线读写部件等。可支撑的产品如智能家居领域的连接类模组、传感器设备、穿戴类设备等。
-
小型系统(small system)
面向应用处理器例如Arm Cortex-A的设备,支持的设备最小内存为1MiB,可以提供更高的安全能力、标准的图形框架、视频编解码的多媒体能力。可支撑的产品如智能家居领域的IP Camera、电子猫眼、路由器以及智慧出行域的行车记录仪等。
-
标准系统(standard system)
面向应用处理器例如Arm Cortex-A的设备,支持的设备最小内存为128MiB,可以提供增强的交互能力、3D GPU以及硬件合成能力、更多控件以及动效更丰富的图形能力、完整的应用框架。可支撑的产品如高端的冰箱显示屏。
806用到的就应该是轻量级,而对初学者来说也有必要一提的是这个跟手机上的HarmonyOS是不一样的,可以理解为openHarmony是HarmonyOS的地基。
再者是鸿蒙系统的编译方式:gn和ninja。
如果说gn对标的是gcc脚本构建生成器,ninja(日语发音,忍者的意思,西方好像很喜欢这些东西hh)就对应的是makefile构建系统文档了。
对于gn可以执行
gn help这是一个非常广泛的内置帮助,如下:
PDC-XRseries@AwExdroid94:~/workspace/openHarmony_lzc$ gn help deps
deps: Private linked dependencies.

  A list of target labels.

  Specifies private dependencies of a target. Private dependencies are
  propagated up the dependency tree and linked to dependent targets, but do not
  grant the ability to include headers from the dependency. Public configs are
  not forwarded.
可以看到使用方法。
linux环境下下载好源码就可以开始探索了:
//根目录下执行 tree -L 1
//可见
.
├── applications
├── base
├── build
├── build.py -> build/lite/build.py
├── developtools
├── device
├── docs
├── domains
├── drivers
├── foundation
├── kernel
├── ohos_config.json
├── out
├── prebuilts
├── test
├── third_party
├── utils
└── vendor
编译的流程如下:
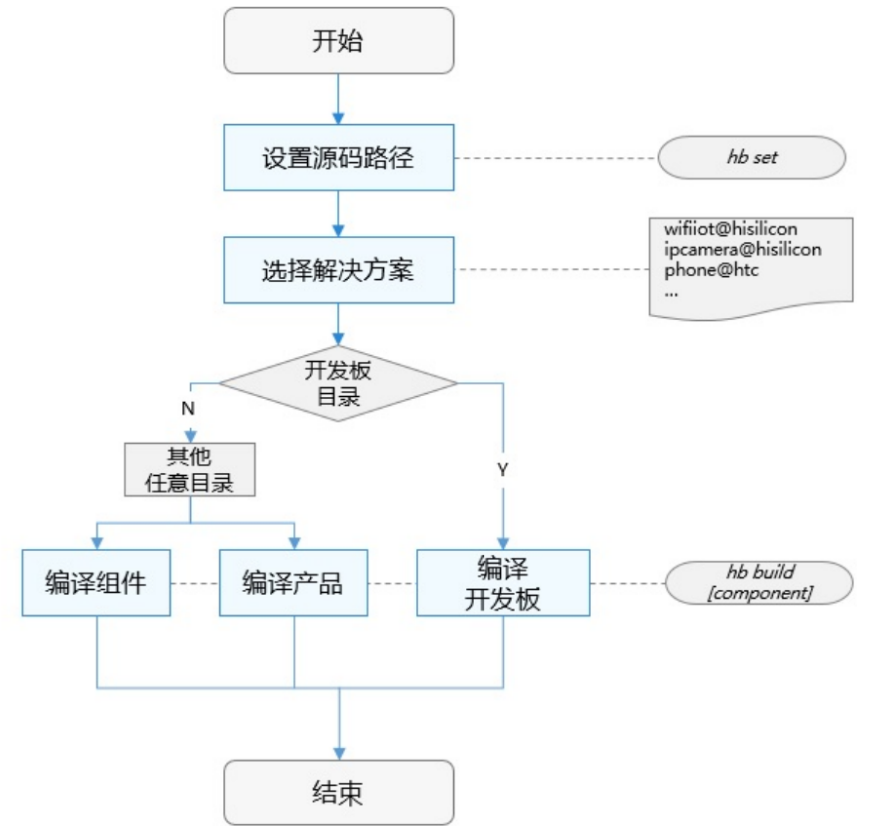
其中在 /Harmony/device/xradio/xr806/ohosdemo 路径下的是一些基于系统的测试用例
都是已经写好了的,可以直接调用
调用方法如下
-
编辑器打开上述路径下BUILG.gn文件如下
group("ohosdemo") {
    deps = [
        #"hello_demo:app_helo",
        #"iot_peripheral:app_peripheral",
        #"handsome_demo:app_handsome",
        #"wlan_demo:app_WlanTest",
    ]
}
要执行哪个task直接取消“#”的注释就可以了
修改后记得保存文件!
接下来我们来看看hello_demo的效果
-
注释掉之后,回到根目录Harmony执行
hb build -f生成的镜像文件会存在
Harmony\device\xradio\xr806\xr_skylark\out\xr_system.img 这个路径下,然后在windows系统下打开(也有Linux下的方法,这里就不展开了)
\device\xradio\xr806\xr_skylark\tools这个路径下的工具phoenixMC.exe烧录工具

-
打开后,链接开发板,通过设备管理器确认com口编号(一般是会显示ch340,如果没有安装驱动的话,百度安装一下就好了)
如果识别不到com可以尝试拔插一下数据线,点击刷新。

串口传输速度可以调快一点,选择好固件后点击升级固件
烧录完成
4.烧录完成后需要复位一下,按下rst后通过串口助手,选择好自己电脑上的com口查看输出信息,也可以提前从main文件里修改它打招呼的姿势

比如说:

输出成功!
接下来会放出更多内容。
-
-
回复: Tina进不去shell发布在 MR Series
上面这个问题是在使用menuconfig配置了cpu power management后发生的
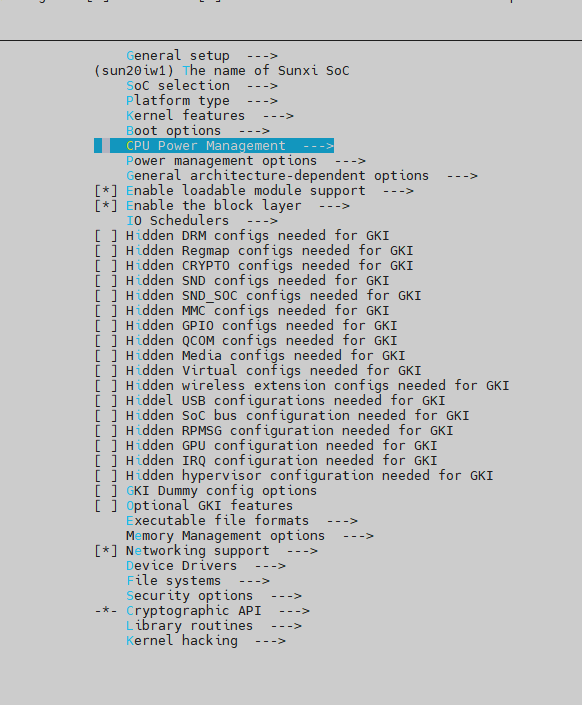
勾选了cpu frequency scaling的最后一项目。
但目前发现即使把勾选的选项去除重新编译也会出现以上问题,难以理解。 -
Tina进不去shell发布在 MR Series
想尝试给D1s修改频率,在lichee/linux-5.4下执行
make ARCH=riscv menuconfig根据
https://bbs.aw-ol.com/topic/753/faq-全志d1芯片-如何对d1主频进行调节?_=1639014588235
配置了一模一样的频率选项后编译打包烧录,遇到了进不去shell的情况,大佬们帮忙看一下这个是什么情况。[696]fes begin commit:e943759 [698]set pll start [700]fix vccio detect value:0xc0 [703]periph0 has been enabled [706]set pll end [708][pmu]: bus read error [710]board init ok [712]beign to init dram [714]ZQ value = 0x2e [716]get_pmu_exist() = -1 [719]ddr_efuse_type: 0xa [721]trefi:7.8ms [723][AUTO DEBUG] single rank and full DQ! [727]ddr_efuse_type: 0xa [729]trefi:7.8ms [731][AUTO DEBUG] rank 0 row = 13 [734][AUTO DEBUG] rank 0 bank = 4 [738][AUTO DEBUG] rank 0 page size = 2 KB [741]DRAM BOOT DRIVE INFO: V0.33 [744]DRAM CLK = 408 MHz [747]DRAM Type = 2 (2:DDR2,3:DDR3) [750]DRAMC read ODT off. [752]DRAM ODT off. [754]ddr_efuse_type: 0xa [757]DRAM SIZE =64 M [759]dram_tpr4:0x0 [760]PLL_DDR_CTRL_REG:0xf8002100 [763]DRAM_CLK_REG:0xc0000000 [766][TIMING DEBUG] MR2= 0x0 [771]DRAM simple test OK. [773]init dram ok U-Boot 2018.05-00022-g8848582aac (Dec 05 2021 - 08:25:33 +0000) Allwinner Technology [04.209]DRAM: 64 MiB [04.214]Relocation Offset is: 01edf000 [04.245]secure enable bit: 0 [04.251]CPU=1008 MHz,PLL6=600 Mhz,AHB=200 Mhz, APB1=100Mhz MBus=300Mhz [04.258]flash init start [04.260]workmode = 16,storage type = 0 try card 2 set card number 2 get card number 2 [04.268][mmc]: mmc driver ver uboot2018:2021-11-19 15:38:00 [04.278][mmc]: get sdc_type fail and use default host:tm4. [04.313][mmc]: Is not Boot mode! [04.316][mmc]: SUNXI SDMMC Controller Version:0x50310 [04.328][mmc]: ************Try SD card 2************ [04.333][mmc]: mmc 2 cmd timeout 100 status 100 [04.337][mmc]: smc 2 err, cmd 8, RTO [04.340][mmc]: mmc 2 close bus gating and reset [04.346][mmc]: mmc 2 cmd timeout 100 status 100 [04.350][mmc]: smc 2 err, cmd 55, RTO [04.353][mmc]: mmc 2 close bus gating and reset [04.357][mmc]: ************Try MMC card 2************ [04.366][mmc]: mmc 2 cmd timeout 100 status 100 [04.370][mmc]: smc 2 err, cmd 1, RTO [04.374][mmc]: mmc 2 close bus gating and reset [04.378][mmc]: Card did not respond to voltage select! [04.383][mmc]: ************SD/MMC 2 init error!************ [04.388][mmc]: mmc init product failed MMC init failed try emmc fail [04.406]sunxi-spinand: AW SPINand MTD Layer Version: 1.5 20200407 [04.412]sunxi-spinand-phy: AW SPINand Phy Layer Version: 1.9 20200306 [04.484]sunxi-spinand-phy: request spi0 gpio ok [04.488]sunxi-spinand-phy: request general tx dma channel ok! [04.493]sunxi-spinand-phy: request general rx dma channel ok! [04.499]sunxi-spinand-phy: set spic0 clk to 20 Mhz [04.503]sunxi-spinand-phy: init spic0 clk ok sspi->base_addr = 0x4025000, the SPI control register: [VER] 0x4025000 = 0x00010001, [GCR] 0x4025004 = 0x00000083, [TCR] 0x4025008 = 0x00000184 [ICR] 0x4025010 = 0x00000f00, [ISR] 0x4025014 = 0x00000032, [FCR] 0x4025018 = 0x00200020 [FSR] 0x402501c = 0x00000000, [WCR] 0x4025020 = 0x00000000, [CCR] 0x4025024 = 0x00000002 [SDC] 0x4025028 = 0x00002000, [BCR] 0x4025030 = 0x00000000, [TCR] 0x4025034 = 0x00000000 [BCC] 0x4025038 = 0x00000000, [DMA] 0x4025088 = 0x000000e5 [04.549]sunxi-spinand-phy: not detect any munufacture from id table [04.566]sunxi-spinand-phy: get spi-nand Model from fdt fail [04.572]sunxi-spinand-phy: get phy info from fdt fail [04.576]sunxi-spinand-phy: not detect munufacture from fdt [04.582]sunxi-spinand-phy: detect munufacture from id table: Winbond [04.588]sunxi-spinand-phy: detect spinand id: ff21aaef ffffffff [04.593]sunxi-spinand-phy: ========== arch info ========== [04.598]sunxi-spinand-phy: Model: W25N01GVZEIG [04.604]sunxi-spinand-phy: Munufacture: Winbond [04.609]sunxi-spinand-phy: DieCntPerChip: 1 [04.613]sunxi-spinand-phy: BlkCntPerDie: 1024 [04.618]sunxi-spinand-phy: PageCntPerBlk: 64 [04.622]sunxi-spinand-phy: SectCntPerPage: 4 [04.627]sunxi-spinand-phy: OobSizePerPage: 64 [04.631]sunxi-spinand-phy: BadBlockFlag: 0x0 [04.636]sunxi-spinand-phy: OperationOpt: 0x7 [04.640]sunxi-spinand-phy: MaxEraseTimes: 65000 [04.645]sunxi-spinand-phy: EccFlag: 0x0 [04.650]sunxi-spinand-phy: EccType: 2 [04.654]sunxi-spinand-phy: EccProtectedType: 3 [04.659]sunxi-spinand-phy: ======================================== [04.665]sunxi-spinand-phy: [04.667]sunxi-spinand-phy: ========== physical info ========== [04.673]sunxi-spinand-phy: TotalSize: 128 M [04.677]sunxi-spinand-phy: SectorSize: 512 B [04.681]sunxi-spinand-phy: PageSize: 2 K [04.685]sunxi-spinand-phy: BlockSize: 128 K [04.689]sunxi-spinand-phy: OOBSize: 64 B [04.693]sunxi-spinand-phy: ======================================== [04.699]sunxi-spinand-phy: [04.702]sunxi-spinand-phy: ========== logical info ========== [04.707]sunxi-spinand-phy: TotalSize: 128 M [04.711]sunxi-spinand-phy: SectorSize: 512 B [04.716]sunxi-spinand-phy: PageSize: 4 K [04.719]sunxi-spinand-phy: BlockSize: 256 K [04.724]sunxi-spinand-phy: OOBSize: 128 B [04.728]sunxi-spinand-phy: ======================================== [04.745]sunxi-spinand-phy: block lock register: 0x00 [04.750]sunxi-spinand-phy: feature register: 0x19 [04.755]sunxi-spinand-phy: sunxi physic nand init end [05.074]sunxi-spinand-phy: set spic0 clk to 100 Mhz [05.984]sunxi-spinand-phy: Sample mode:2 min_delay:5920 max_delay:14320 right_delay:0) [06.797]Loading Environment from SUNXI_FLASH... OK [06.812]try to burn key [06.816]out of usb burn from boot: not need burn key [06.820]Net: [06.822]No ethernet found. Hit any key to stop autoboot: 0 sunxi work mode=0x10 run usb efex delay time 2500 weak:otg_phy_config usb init ok set address 0x21 set address 0x21 ok SUNXI_EFEX_ERASE_TAG erase_flag = 0x12 origin_erase_flag = 0x1 FEX_CMD_fes_verify_status FEX_CMD_fes_verify last err=0 the 0 mbr table is ok the 1 mbr table is ok the 2 mbr table is ok the 3 mbr table is ok *************MBR DUMP*************** total mbr part 7 part[0] name :boot-resource part[0] classname :DISK part[0] addrlo :0x8000 part[0] lenlo :0x1f8 part[0] user_type :32768 part[0] keydata :0 part[0] ro :0 part[1] name :env part[1] classname :DISK part[1] addrlo :0x81f8 part[1] lenlo :0x1f8 part[1] user_type :32768 part[1] keydata :0 part[1] ro :0 part[2] name :env-redund part[2] classname :DISK part[2] addrlo :0x83f0 part[2] lenlo :0x1f8 part[2] user_type :32768 part[2] keydata :0 part[2] ro :0 part[3] name :boot part[3] classname :DISK part[3] addrlo :0x85e8 part[3] lenlo :0x5000 part[3] user_type :32768 part[3] keydata :0 part[3] ro :0 part[4] name :rootfs part[4] classname :DISK part[4] addrlo :0xd5e8 part[4] lenlo :0xf000 part[4] user_type :32768 part[4] keydata :0 part[4] ro :0 part[5] name :rootfs_data part[5] classname :DISK part[5] addrlo :0x1c5e8 part[5] lenlo :0x2800 part[5] user_type :32768 part[5] keydata :0 part[5] ro :0 part[6] name :UDISK part[6] classname :DISK part[6] addrlo :0x1ede8 part[6] lenlo :0x0 part[6] user_type :0 part[6] keydata :0 part[6] ro :0 common1(partition3) need it, here is a weak func total part: 8 mbr 0, 8000, 8000 boot-resource 1, 1f8, 8000 env 2, 1f8, 8000 env-redund 3, 1f8, 8000 boot 4, 5000, 8000 rootfs 5, f000, 8000 rootfs_data 6, 2800, 8000 UDISK 7, 0, 0 [09.829]erase blk 0 to blk 32 [09.832]sunxi-spinand-phy: [SPINAND]: ecc error 0x2 [09.838]sunxi-spinand-phy: [SPINAND]: ecc error 0x2 [09.844]sunxi-spinand-phy: [SPINAND]: ecc error 0x2 [09.850]sunxi-spinand-phy: [SPINAND]: ecc error 0x2 [09.856]sunxi-spinand-phy: [SPINAND]: ecc error 0x2 [09.862]sunxi-spinand-phy: [SPINAND]: ecc error 0x2 [09.868]sunxi-spinand-phy: [SPINAND]: ecc error 0x2 [09.874]sunxi-spinand-phy: [SPINAND]: ecc error 0x2 [09.880]sunxi-spinand-phy: [SPINAND]: ecc error 0x2 [09.888]sunxi-spinand-phy: [SPINAND]: ecc error 0x2 [09.896]sunxi-spinand-phy: [SPINAND]: ecc error 0x2 need erase flash: 18 [09.930]mtdparts: mtdparts=nand:1024k@0(boot0)ro,3072k@1048576(uboot)ro,1024k@4194304(secure_storage)ro,-(sys) device nand0 <nand>, # parts = 4 #: name size offset mask_flags 0: boot0 0x00100000 0x00000000 1 1: uboot 0x00300000 0x00100000 1 2: secure_storage 0x00100000 0x00400000 1 3: sys 0x07b00000 0x00500000 0 active partition: nand0,0 - (boot0) 0x00100000 @ 0x00000000 defaults: mtdids : nand0=nand mtdparts: mtdparts=nand:1024k@0(boot0)ro,3072k@1048576(uboot)ro,1024k@4194304(secure_storage)ro,-(sys) [09.991]MTD info (4) [09.993]pagesize: 0x1000 [09.995]blksize: 0x40000 [09.998]num offset bytes name [10.001]0 0x00000000 0x00100000 boot0 [10.005]1 0x00100000 0x00300000 uboot [10.008]2 0x00400000 0x00100000 secure_storage [10.013]3 0x00500000 0x07b00000 sys [10.016]ubi attach the last part of mtd device: NO.3 [10.140]ubi0: attaching mtd4 [10.372]ubi0: scanning is finished [10.415]ubi0: attached mtd4 (name "sys", size 123 MiB) [10.420]ubi0: PEB size: 262144 bytes (256 KiB), LEB size: 258048 bytes [10.426]ubi0: min./max. I/O unit sizes: 4096/4096, sub-page size 2048 [10.432]ubi0: VID header offset: 2048 (aligned 2048), data offset: 4096 [10.438]ubi0: good PEBs: 492, bad PEBs: 0, corrupted PEBs: 0 [10.444]ubi0: user volume: 8, internal volumes: 1, max. volumes count: 128 [10.450]ubi0: max/mean erase counter: 2/1, WL threshold: 4096, image sequence number: 0 [10.458]ubi0: available PEBs: 0, total reserved PEBs: 492, PEBs reserved for bad PEB handling: 20 [10.467]erase blk 0 to blk 32 [10.487]erase blk 40 to blk 1024 [11.356]sunxi-spinand: spinand secure storage ok for phy blk 32 and 33 [11.367]Item0 (Map) magic is bad [11.370]the secure storage map is empty [11.543]sunxi-spinand: write secure storage itme 0 ok [11.548]erase secure storage: 0 ok SUNXI_EFEX_MBR_TAG mbr size = 0x10000 force mbr device nand0 <nand>, # parts = 4 #: name size offset mask_flags 0: boot0 0x00100000 0x00000000 1 1: uboot 0x00300000 0x00100000 1 2: secure_storage 0x00100000 0x00400000 1 3: sys 0x07b00000 0x00500000 0 active partition: nand0,0 - (boot0) 0x00100000 @ 0x00000000 defaults: mtdids : nand0=nand mtdparts: mtdparts=nand:1024k@0(boot0)ro,3072k@1048576(uboot)ro,1024k@4194304(secure_storage)ro,-(sys) [11.603]MTD info (4) [11.605]pagesize: 0x1000 [11.607]blksize: 0x40000 [11.609]num offset bytes name [11.613]0 0x00000000 0x00100000 boot0 [11.616]1 0x00100000 0x00300000 uboot [11.620]2 0x00400000 0x00100000 secure_storage [11.624]3 0x00500000 0x07b00000 sys [11.628]MBR info (unalign): [11.630]partno addr sects type name [11.635]0 0x00000000 0x00008000 0x00000001 mbr [11.640]1 0x00008000 0x000001f8 0x00008000 boot-resource [11.646]2 0x000081f8 0x000001f8 0x00008000 env [11.650]3 0x000083f0 0x000001f8 0x00008000 env-redund [11.656]4 0x000085e8 0x00005000 0x00008000 boot [11.661]5 0x0000d5e8 0x0000f000 0x00008000 rootfs [11.666]6 0x0001c5e8 0x00002800 0x00008000 rootfs_data [11.671]7 0x0001ede8 0x00000000 0x00000000 UDISK [11.676]ubi attach the last part of mtd device: NO.3 [11.681]MBR info (align): [11.683]partno addr sects type name [11.688]0 0x00002800 0x000081f0 0x00000001 mbr [11.693]1 0x0000a9f0 0x000001f8 0x00008000 boot-resource [11.698]2 0x0000abe8 0x000001f8 0x00008000 env [11.703]3 0x0000ade0 0x000001f8 0x00008000 env-redund [11.709]4 0x0000afd8 0x000050b8 0x00008000 boot [11.713]5 0x00010090 0x0000f030 0x00008000 rootfs [11.718]6 0x0001f0c0 0x00002958 0x00008000 rootfs_data [11.724]7 0x00021a18 0x00000000 0x00000000 UDISK [11.729]ubi attach the last part of mtd device: NO.3 [11.733]ubi attatch mtd, name: sys [11.737]ubi0: detaching mtd4 [11.741]ubi0: mtd4 is detached [11.744]ubi0: attaching mtd4 [11.855]ubi0: scanning is finished [11.858]ubi0: empty MTD device detected [11.905]ubi0: attached mtd4 (name "sys", size 123 MiB) [11.910]ubi0: PEB size: 262144 bytes (256 KiB), LEB size: 258048 bytes [11.916]ubi0: min./max. I/O unit sizes: 4096/4096, sub-page size 2048 [11.922]ubi0: VID header offset: 2048 (aligned 2048), data offset: 4096 [11.929]ubi0: good PEBs: 492, bad PEBs: 0, corrupted PEBs: 0 [11.934]ubi0: user volume: 0, internal volumes: 1, max. volumes count: 128 [11.940]ubi0: max/mean erase counter: 0/0, WL threshold: 4096, image sequence number: 0 [11.948]ubi0: available PEBs: 468, total reserved PEBs: 24, PEBs reserved for bad PEB handling: 20 Creating static volume mbr of size 17031168 Creating dynamic volume boot-resource of size 258048 Creating dynamic volume env of size 258048 Creating dynamic volume env-redund of size 258048 Creating dynamic volume boot of size 10579968 Creating dynamic volume rootfs of size 31481856 Creating dynamic volume rootfs_data of size 5419008 No size specified -> Using max size (55480320) [13.349]reset last volume size to 0x1a748 Creating dynamic volume UDISK of size 55480320 [13.456]fill gap start: volume mbr sects 0x7f80 [31.859]fill gap end: volume mbr [31.862]update partition map [31.865]logical area info: 468 258048 last_lba: 235871 [31.884]logical area info: 468 258048 last_lba: 235871 [31.902]logical area info: 468 258048 last_lba: 235871 [31.919]logical area info: 468 258048 last_lba: 235871 [31.937]logical area info: 468 258048 last_lba: 235871 [31.955]logical area info: 468 258048 last_lba: 235871 [31.973]logical area info: 468 258048 last_lba: 235871 [31.991]logical area info: 468 258048 last_lba: 235871 [32.008]logical area info: 468 258048 last_lba: 235871 [32.026]logical area info: 468 258048 last_lba: 235871 [32.044]logical area info: 468 258048 last_lba: 235871 [32.062]logical area info: 468 258048 last_lba: 235871 [32.079]logical area info: 468 258048 last_lba: 235871 [32.097]logical area info: 468 258048 last_lba: 235871 [32.115]logical area info: 468 258048 last_lba: 235871 [32.132]logical area info: 468 258048 last_lba: 235871 [32.150]logical area info: 468 258048 last_lba: 235871 [32.168]logical area info: 468 258048 last_lba: 235871 [32.186]logical area info: 468 258048 last_lba: 235871 [32.204]logical area info: 468 258048 last_lba: 235871 [32.221]logical area info: 468 258048 last_lba: 235871 [32.239]logical area info: 468 258048 last_lba: 235871 [32.257]logical area info: 468 258048 last_lba: 235871 [32.274]logical area info: 468 258048 last_lba: 235871 [32.292]logical area info: 468 258048 last_lba: 235871 FEX_CMD_fes_verify_status FEX_CMD_fes_verify last err=0 [32.357]fill gap start: volume boot-resource sects 0x158 [32.530]fill gap end: volume boot-resource FEX_CMD_fes_verify_value, start 0x8000, size high 0x0:low 0x14000 FEX_CMD_fes_verify_value 0xe6f75b5c [32.615]fill gap start: volume env sects 0xf8 [32.786]fill gap end: volume env FEX_CMD_fes_verify_value, start 0x81f8, size high 0x0:low 0x20000 FEX_CMD_fes_verify_value 0xbd8750e7 [32.879]fill gap start: volume env-redund sects 0xf8 [33.051]fill gap end: volume env-redund FEX_CMD_fes_verify_value, start 0x83f0, size high 0x0:low 0x20000 FEX_CMD_fes_verify_value 0xbd8750e7 [36.455]fill gap start: volume boot sects 0x1d3c [37.534]fill gap end: volume boot FEX_CMD_fes_verify_value, start 0x85e8, size high 0x0:low 0x658800 FEX_CMD_fes_verify_value 0xb4160524 [41.671]fill gap start: volume rootfs sects 0xc300 [47.993]fill gap end: volume rootfs FEX_CMD_fes_verify_value, start 0xd5e8, size high 0x0:low 0x5a0000 FEX_CMD_fes_verify_value 0xc6b4b9c8 bootfile_mode=4 SUNXI_EFEX_BOOT1_TAG boot1 size = 0x10c000, max size = 0x200000 uboot size = 0x10c000 storage type = 0 [49.070]uboot blk range [8-32) [49.073]download uboot to block 8 (9 blocks) len 1072K [49.574]download uboot to block 17 (9 blocks) len 1072K FEX_CMD_fes_verify_status FEX_CMD_fes_verify last err=0 bootfile_mode=4 SUNXI_EFEX_BOOT0_TAG boot0 size = 0x14000 dram para[0] = 198 dram para[1] = 2 dram para[2] = 7b7bf9 dram para[3] = 0 dram para[4] = d2 dram para[5] = 400000 dram para[6] = a63 dram para[7] = 2 dram para[8] = 0 dram para[9] = 0 dram para[10] = 45994e dram para[11] = 121210a dram para[12] = 43032 dram para[13] = b4787896 dram para[14] = 0 dram para[15] = 48484848 dram para[16] = 48 dram para[17] = 1621121e dram para[18] = 0 dram para[19] = 0 dram para[20] = 0 dram para[21] = 30010 dram para[22] = 35 dram para[23] = b4006003 dram para[24] = 0 dram para[25] = 0 dram para[26] = 0 dram para[27] = 0 dram para[28] = 0 dram para[29] = 0 dram para[30] = 0 dram para[31] = 0 storage type = 0 [50.175]download boot0 to block 0 len 80K [50.217]download boot0 to block 1 len 80K [50.258]download boot0 to block 2 len 80K [50.300]download boot0 to block 3 len 80K [50.341]download boot0 to block 4 len 80K [50.382]download boot0 to block 5 len 80K [50.424]download boot0 to block 6 len 80K [50.465]download boot0 to block 7 len 80K FEX_CMD_fes_verify_status FEX_CMD_fes_verify last err=0 sunxi_efex_next_action=2 exit usb next work 2 ▒[164]HELLO! BOOT0 is starting! [167]BOOT0 commit : e943759 [170]set pll start [172]periph0 has been enabled [175]set pll end [176][pmu]: bus read error [179]board init ok [181]ZQ value = 0x2e [183]get_pmu_exist() = -1 [185]DRAM BOOT DRIVE INFO: V0.33 [188]DRAM CLK = 408 MHz [190]DRAM Type = 2 (2:DDR2,3:DDR3) [194]DRAMC read ODT off. [196]DRAM ODT off. [198]ddr_efuse_type: 0xa [201]DRAM SIZE =64 M [203]dram_tpr4:0x0 [204]PLL_DDR_CTRL_REG:0xf8002100 [207]DRAM_CLK_REG:0xc0000000 [210][TIMING DEBUG] MR2= 0x0 [215]DRAM simple test OK. [217]dram size =64 [219]spinand UBOOT_START_BLK_NUM 8 UBOOT_LAST_BLK_NUM 32 [224]block from 8 to 32 [283]Check is correct. [285]dma 0x30338 int is not used yet [289]dma 0x30338 int is free, you do not need to free it again [294]Entry_name = opensbi [297]Entry_name = u-boot [302]Entry_name = dtb ▒304]Jump to second Boot. U-Boot 2018.05-00022-g8848582aac (Dec 05 2021 - 08:25:33 +0000) Allwinner Technology [00.315]DRAM: 64 MiB [00.317]Relocation Offset is: 01edf000 [00.322]secure enable bit: 0 [00.324]CPU=1008 MHz,PLL6=600 Mhz,AHB=200 Mhz, APB1=100Mhz MBus=300Mhz [00.331]flash init start [00.333]workmode = 0,storage type = 0 sspi->base_addr = 0x4025000, the SPI control register: [VER] 0x4025000 = 0x00010001, [GCR] 0x4025004 = 0x00000083, [TCR] 0x4025008 = 0x00000184 [ICR] 0x4025010 = 0x00000f00, [ISR] 0x4025014 = 0x00000032, [FCR] 0x4025018 = 0x00200020 [FSR] 0x402501c = 0x00000000, [WCR] 0x4025020 = 0x00000000, [CCR] 0x4025024 = 0x00000002 [SDC] 0x4025028 = 0x00000080, [BCR] 0x4025030 = 0x00000000, [TCR] 0x4025034 = 0x00000000 [BCC] 0x4025038 = 0x20000000, [DMA] 0x4025088 = 0x000000e5 [00.380]sunxi-spinand-phy: not detect any munufacture from id table [00.387]sunxi-spinand-phy: get spi-nand Model from fdt fail [00.392]sunxi-spinand-phy: get phy info from fdt fail device nand0 <nand>, # parts = 4 #: name size offset mask_flags 0: boot0 0x00100000 0x00000000 1 1: uboot 0x00300000 0x00100000 1 2: secure_storage 0x00100000 0x00400000 1 3: sys 0x07b00000 0x00500000 0 active partition: nand0,0 - (boot0) 0x00100000 @ 0x00000000 defaults: mtdids : nand0=nand mtdparts: mtdparts=nand:1024k@0(boot0)ro,3072k@1048576(uboot)ro,1024k@4194304(secure_storage)ro,-(sys) [00.506]ubi0: attaching mtd4 [00.603]ubi0: scanning is finished [00.610]ubi0: attached mtd4 (name "sys", size 123 MiB) [00.615]ubi0: PEB size: 262144 bytes (256 KiB), LEB size: 258048 bytes [00.621]ubi0: min./max. I/O unit sizes: 4096/4096, sub-page size 2048 [00.627]ubi0: VID header offset: 2048 (aligned 2048), data offset: 4096 [00.633]ubi0: good PEBs: 492, bad PEBs: 0, corrupted PEBs: 0 [00.639]ubi0: user volume: 8, internal volumes: 1, max. volumes count: 128 [00.645]ubi0: max/mean erase counter: 2/1, WL threshold: 4096, image sequence number: 0 [00.653]ubi0: available PEBs: 0, total reserved PEBs: 492, PEBs reserved for bad PEB handling: 20 [00.662]sunxi flash init ok [00.664]line:703 init_clocks [00.667]drv_disp_init request pwm success, pwm7:pwm7:0x2000c00. fdt get node offset faill: hdmi [00.685]unable to map hdmi registers [00.688]drv_disp_init finish [00.691]boot_gui_init:start [00.694]set disp.dev2_output_type fail. using defval=0 [00.700]boot_gui_init:finish partno erro : can't find partition bootloader 54 bytes read in 0 ms [00.817]bmp_name=bootlogo.bmp size 38454 38454 bytes read in 2 ms (18.3 MiB/s) [00.881]LCD open finish [00.930]Loading Environment from SUNXI_FLASH... OK [00.952]out of usb burn from boot: not need burn key [00.958]Item0 (Map) magic is bad partno erro : can't find partition private [00.985]update bootcmd [00.998]change working_fdt 0x42a9eda0 to 0x42a7eda0 No reserved memory region found in source FDT [01.026]update dts noncached_alloc(): addr = 0x42c9b080 noncached_alloc(): addr = 0x42c9b0c0 noncached_alloc(): addr = 0x42c9b100 noncached_alloc(): addr = 0x42c9b940 geth_sys_init:634: get node 'gmac0' error geth_sys_init fail! [01.046]Board Net Initialization Failed [01.050]No ethernet found. Hit any key to stop autoboot: 0 [02.389]no vendor_boot partition is found Android's image name: d1s-evb1 Detect comp none [02.408] Starting kernel ... Linux version 5.4.61 (kunyao@AwExdroid89) (riscv64-unknown-linux-gnu-gcc (C-SKY RISCV Tools V1.8.4 B20200702) 8.1.0, GNU ld (GNU Binutils) 2.32) #7 PREEMPT Wed Dec 8 07:14:26 UTC 2021 Zone ranges: DMA32 [mem 0x0000000040000000-0x0000000043ffffff] Normal empty Movable zone start for each node Early memory node ranges node 0: [mem 0x0000000040000000-0x0000000043ffffff] Initmem setup node 0 [mem 0x0000000040000000-0x0000000043ffffff] On node 0 totalpages: 16384 DMA32 zone: 224 pages used for memmap DMA32 zone: 0 pages reserved DMA32 zone: 16384 pages, LIFO batch:3 elf_hwcap is 0x20112d pcpu-alloc: s0 r0 d32768 u32768 alloc=1*32768 pcpu-alloc: [0] 0 Built 1 zonelists, mobility grouping on. Total pages: 16160 Kernel command line: ubi.mtd=sys ubi.block=0,rootfs earlyprintk=sunxi-uart,0x02500000 clk_ignore_unused initcall_debug=0 console=ttyS0,115200 loglevel=8 root=/dev/ubiblock0_5 rootfstype=squashfs init=/pseudo_init partitions=mbr@ubi0_0:boot-resource@ubi0_1:env@ubi0_2:env-redund@ubi0_3:boot@ubi0_4:rootfs@ubi0_5:rootfs_data@ubi0_6:UDISK@ubi0_7: cma=0M snum= mac_addr= wifi_mac= bt_mac= specialstr= gpt=1 androidboot.hardware=sun20iw1p1 boot_type=5 androidboot.boot_type=5 gpt=1 uboot_message=2018.05-00022-g8848582aac(12/05/2021-08:2 Dentry cache hash table entries: 8192 (order: 4, 65536 bytes, linear) Inode-cache hash table entries: 4096 (order: 3, 32768 bytes, linear) Sorting __ex_table... mem auto-init: stack:off, heap alloc:off, heap free:off Memory: 56004K/65536K available (4151K kernel code, 400K rwdata, 1564K rodata, 140K init, 226K bss, 9532K reserved, 0K cma-reserved) SLUB: HWalign=64, Order=0-3, MinObjects=0, CPUs=1, Nodes=1 rcu: Preemptible hierarchical RCU implementation. Tasks RCU enabled. rcu: RCU calculated value of scheduler-enlistment delay is 10 jiffies. NR_IRQS: 0, nr_irqs: 0, preallocated irqs: 0 plic: mapped 200 interrupts with 1 handlers for 2 contexts. riscv_timer_init_dt: Registering clocksource cpuid [0] hartid [0] clocksource: riscv_clocksource: mask: 0xffffffffffffffff max_cycles: 0x588fe9dc0, max_idle_ns: 440795202592 ns sched_clock: 64 bits at 24MHz, resolution 41ns, wraps every 4398046511097ns riscv_timer_clockevent depends on broadcast, but no broadcast function available clocksource: timer: mask: 0xffffffff max_cycles: 0xffffffff, max_idle_ns: 79635851949 ns Calibrating delay loop (skipped), value calculated using timer frequency.. 48.00 BogoMIPS (lpj=240000) pid_max: default: 32768 minimum: 301 Mount-cache hash table entries: 512 (order: 0, 4096 bytes, linear) Mountpoint-cache hash table entries: 512 (order: 0, 4096 bytes, linear) ASID allocator initialised with 65536 entries rcu: Hierarchical SRCU implementation. devtmpfs: initialized random: get_random_u32 called from bucket_table_alloc.isra.27+0xfe/0x120 with crng_init=0 clocksource: jiffies: mask: 0xffffffff max_cycles: 0xffffffff, max_idle_ns: 19112604462750000 ns futex hash table entries: 256 (order: 0, 6144 bytes, linear) pinctrl core: initialized pinctrl subsystem NET: Registered protocol family 16 DMA: preallocated 256 KiB pool for atomic allocations cpuidle: using governor menu rtc_ccu: sunxi ccu init OK clock: sunxi ccu init OK clock: sunxi ccu init OK iommu: Default domain type: Translated sunxi iommu: irq = 4 SCSI subsystem initialized usbcore: registered new interface driver usbfs usbcore: registered new interface driver hub usbcore: registered new device driver usb Advanced Linux Sound Architecture Driver Initialized. pwm module init! g2d 5410000.g2d: Adding to iommu group 0 G2D: rcq version initialized.major:253 clocksource: Switched to clocksource riscv_clocksource sun8iw20-pinctrl 2000000.pinctrl: initialized sunXi PIO driver NET: Registered protocol family 2 tcp_listen_portaddr_hash hash table entries: 256 (order: 0, 4096 bytes, linear) TCP established hash table entries: 512 (order: 0, 4096 bytes, linear) TCP bind hash table entries: 512 (order: 0, 4096 bytes, linear) TCP: Hash tables configured (established 512 bind 512) UDP hash table entries: 256 (order: 1, 8192 bytes, linear) UDP-Lite hash table entries: 256 (order: 1, 8192 bytes, linear) NET: Registered protocol family 1 sun8iw20-pinctrl 2000000.pinctrl: 2000000.pinctrl supply vcc-pc not found, using dummy regulator spi spi0: spi0 supply spi not found, using dummy regulator sunxi_spi_resource_get()2151 - [spi0] SPI MASTER MODE sunxi_spi_resource_get()2198 - sample_mode:2 sample_delay:0 sunxi_spi_clk_init()2240 - [spi0] mclk 100000000 sunxi_spi_probe()2653 - [spi0]: driver probe succeed, base ffffffd004058000, irq 31 workingset: timestamp_bits=62 max_order=14 bucket_order=0 squashfs: version 4.0 (2009/01/31) Phillip Lougher ntfs: driver 2.1.32 [Flags: R/W]. io scheduler mq-deadline registered io scheduler kyber registered [DISP]disp_module_init disp 5000000.disp: Adding to iommu group 0 [DISP] disp_init,line:2386: smooth display screen:0 type:1 mode:4 display_fb_request,fb_id:0 Freeing logo buffer memory: 1500K disp_al_manager_apply ouput_type:1 sun8iw20-pinctrl 2000000.pinctrl: 2000000.pinctrl supply vcc-pd not found, using dummy regulator [DISP]disp_module_init finish sunxi_sid_init()551 - insmod ok pwm-regulator: supplied by regulator-dummy sun8iw20-pinctrl 2000000.pinctrl: 2000000.pinctrl supply vcc-pe not found, using dummy regulator uart uart0: get regulator failed uart uart0: uart0 supply uart not found, using dummy regulator uart0: ttyS0 at MMIO 0x2500000 (irq = 18, base_baud = 1500000) is a SUNXI sw_console_setup()1808 - console setup baud 115200 parity n bits 8, flow n printk: console [ttyS0] enabled misc dump reg init sun8iw20-pinctrl 2000000.pinctrl: 2000000.pinctrl supply vcc-pg not found, using dummy regulator sunxi-rfkill soc@3000000:rfkill@0: module version: v1.0.9 sunxi-rfkill soc@3000000:rfkill@0: get gpio chip_en failed sunxi-rfkill soc@3000000:rfkill@0: get gpio power_en failed sunxi-rfkill soc@3000000:rfkill@0: wlan_busnum (1) sunxi-rfkill soc@3000000:rfkill@0: Missing wlan_power. sunxi-rfkill soc@3000000:rfkill@0: wlan clock[0] (32k-fanout1) sunxi-rfkill soc@3000000:rfkill@0: wlan_regon gpio=138 assert=1 sunxi-rfkill soc@3000000:rfkill@0: wlan_hostwake gpio=139 assert=1 sunxi-rfkill soc@3000000:rfkill@0: wakeup source is enabled sunxi-rfkill soc@3000000:rfkill@0: Missing bt_power. sunxi-rfkill soc@3000000:rfkill@0: bt clock[0] (32k-fanout1) sunxi-rfkill soc@3000000:rfkill@0: bt_rst gpio=135 assert=0 [ADDR_MGT] addr_mgt_probe: module version: v1.0.10 [ADDR_MGT] addr_mgt_probe: success. sunxi-spinand: AW SPINand MTD Layer Version: 2.0 20201228 sunxi-spinand-phy: AW SPINand Phy Layer Version: 1.10 20200306 sunxi-spinand-phy: not detect any munufacture from id table sunxi-spinand-phy: get spi-nand Model from fdt fail sunxi-spinand-phy: get phy info from fdt fail sunxi-spinand-phy: not detect munufacture from fdt sunxi-spinand-phy: not detect any munufacture from id table sunxi-spinand-phy: get spi-nand Model from fdt fail sunxi-spinand-phy: get phy info from fdt fail sunxi-spinand-phy: not detect munufacture from fdt sunxi-spinand-phy: not match spinand: 4254df 0 ehci_hcd: USB 2.0 'Enhanced' Host Controller (EHCI) Driver sunxi-ehci: EHCI SUNXI driver get ehci1-controller wakeup-source is fail. sunxi ehci1-controller don't init wakeup source [sunxi-ehci1]: probe, pdev->name: 4200000.ehci1-controller, sunxi_ehci: 0xffffffe000646830, 0x:ffffffd00406f000, irq_no:31 sunxi-ehci 4200000.ehci1-controller: 4200000.ehci1-controller supply drvvbus not found, using dummy regulator sunxi-ehci 4200000.ehci1-controller: 4200000.ehci1-controller supply hci not found, using dummy regulator sunxi-ehci 4200000.ehci1-controller: EHCI Host Controller sunxi-ehci 4200000.ehci1-controller: new USB bus registered, assigned bus number 1 sunxi-ehci 4200000.ehci1-controller: irq 49, io mem 0x04200000 sunxi-ehci 4200000.ehci1-controller: USB 2.0 started, EHCI 1.00 hub 1-0:1.0: USB hub found hub 1-0:1.0: 1 port detected ohci_hcd: USB 1.1 'Open' Host Controller (OHCI) Driver sunxi-ohci: OHCI SUNXI driver get ohci1-controller wakeup-source is fail. sunxi ohci1-controller don't init wakeup source [sunxi-ohci1]: probe, pdev->name: 4200400.ohci1-controller, sunxi_ohci: 0xffffffe000646bf8 sunxi-ohci 4200400.ohci1-controller: 4200400.ohci1-controller supply drvvbus not found, using dummy regulator sunxi-ohci 4200400.ohci1-controller: 4200400.ohci1-controller supply hci not found, using dummy regulator sunxi-ohci 4200400.ohci1-controller: OHCI Host Controller sunxi-ohci 4200400.ohci1-controller: new USB bus registered, assigned bus number 2 sunxi-ohci 4200400.ohci1-controller: irq 50, io mem 0x04200400 hub 2-0:1.0: USB hub found hub 2-0:1.0: 1 port detected i2c /dev entries driver IR NEC protocol handler initialized sunxi cedar version 1.1 sunxi-cedar 1c0e000.ve: Adding to iommu group 0 VE: install start!!! VE: cedar-ve the get irq is 6 VE: install end!!! VE: sunxi_cedar_probe sunxi-mmc 4020000.sdmmc: SD/MMC/SDIO Host Controller Driver(v4.21 2021-11-18 10:02) sunxi-mmc 4020000.sdmmc: ***ctl-spec-caps*** 8 sunxi-mmc 4020000.sdmmc: No vmmc regulator found sunxi-mmc 4020000.sdmmc: No vqmmc regulator found sunxi-mmc 4020000.sdmmc: No vdmmc regulator found sunxi-mmc 4020000.sdmmc: No vd33sw regulator found sunxi-mmc 4020000.sdmmc: No vd18sw regulator found sunxi-mmc 4020000.sdmmc: No vq33sw regulator found sunxi-mmc 4020000.sdmmc: No vq18sw regulator found sunxi-mmc 4020000.sdmmc: Got CD GPIO sunxi-mmc 4020000.sdmmc: set cd-gpios as 24M fail sunxi-mmc 4020000.sdmmc: sdc set ios:clk 0Hz bm PP pm UP vdd 21 width 1 timing LEGACY(SDR12) dt B sunxi-mmc 4020000.sdmmc: no vqmmc,Check if there is regulator sunxi-mmc 4020000.sdmmc: sdc set ios:clk 400000Hz bm PP pm ON vdd 21 width 1 timing LEGACY(SDR12) dt B sunxi-mmc 4020000.sdmmc: sdc set ios:clk 0Hz bm PP pm OFF vdd 0 width 1 timing LEGACY(SDR12) dt B sunxi-mmc 4020000.sdmmc: detmode:gpio irq sunxi-mmc 4021000.sdmmc: SD/MMC/SDIO Host Controller Driver(v4.21 2021-11-18 10:02) sunxi-mmc 4021000.sdmmc: ***ctl-spec-caps*** 8 sunxi-mmc 4021000.sdmmc: No vmmc regulator found sunxi-mmc 4021000.sdmmc: No vqmmc regulator found sunxi-mmc 4021000.sdmmc: No vdmmc regulator found sunxi-mmc 4021000.sdmmc: No vd33sw regulator found sunxi-mmc 4021000.sdmmc: No vd18sw regulator found sunxi-mmc 4021000.sdmmc: No vq33sw regulator found sunxi-mmc 4021000.sdmmc: No vq18sw regulator found sunxi-mmc 4021000.sdmmc: Cann't get pin bias hs pinstate,check if needed sunxi-mmc 4021000.sdmmc: sdc set ios:clk 0Hz bm PP pm UP vdd 21 width 1 timing LEGACY(SDR12) dt B sunxi-mmc 4021000.sdmmc: no vqmmc,Check if there is regulator sunxi-mmc 4021000.sdmmc: sdc set ios:clk 400000Hz bm PP pm ON vdd 21 width 1 timing LEGACY(SDR12) dt B sunxi-mmc 4021000.sdmmc: detmode:manually by software sunxi-mmc 4021000.sdmmc: smc 1 p1 err, cmd 52, RTO !! ashmem: initialized sunxi-mmc 4021000.sdmmc: smc 1 p1 err, cmd 52, RTO !! sunxi-mmc 4021000.sdmmc: sdc set ios:clk 400000Hz bm PP pm ON vdd 21 width 1 timing LEGACY(SDR12) dt B exFAT: Version 1.3.0 sunxi-mmc 4021000.sdmmc: sdc set ios:clk 400000Hz bm PP pm ON vdd 21 width 1 timing LEGACY(SDR12) dt B sun8iw20-pinctrl 2000000.pinctrl: pin PF6 already requested by 2000000.pinctrl:166; cannot claim for 2034000.daudio sun8iw20-pinctrl 2000000.pinctrl: pin-166 (2034000.daudio) status -22 sun8iw20-pinctrl 2000000.pinctrl: could not request pin 166 (PF6) from group PF6 on device 2000000.pinctrl sunxi-mmc 4021000.sdmmc: smc 1 p1 err, cmd 5, RTO !! sunxi-daudio 2034000.daudio: Error applying setting, reverse things back sunxi-mmc 4021000.sdmmc: smc 1 p1 err, cmd 5, RTO !! sunxi-daudio: probe of 2034000.daudio failed with error -22 sunxi-mmc 4021000.sdmmc: smc 1 p1 err, cmd 5, RTO !! [AUDIOCODEC][sunxi_codec_parse_params][2412]:digital_vol:0, lineout_vol:26, mic1gain:31, mic2gain:31 pa_msleep:120, pa_level:1, pa_pwr_level:1 sunxi-mmc 4021000.sdmmc: smc 1 p1 err, cmd 5, RTO !! sunxi-mmc 4021000.sdmmc: sdc set ios:clk 0Hz bm PP pm OFF vdd 0 width 1 timing LEGACY(SDR12) dt B [AUDIOCODEC][sunxi_codec_parse_params][2448]:adcdrc_cfg:0, adchpf_cfg:1, dacdrc_cfg:0, dachpf:0 sun8iw20-pinctrl 2000000.pinctrl: 2000000.pinctrl supply vcc-pb not found, using dummy regulator [AUDIOCODEC][sunxi_internal_codec_probe][2609]:codec probe finished sid_rd_ver_reg()254 - ver >= 4, soc ver:5 [SNDCODEC][sunxi_card_init][583]:card init finished sunxi-codec-machine 2030340.sound: 2030000.codec <-> 203034c.dummy_cpudai mapping ok input: audiocodec sunxi Audio Jack as /devices/platform/soc@3000000/2030340.sound/sound/card0/input0 [SNDCODEC][sunxi_card_dev_probe][836]:register card finished NET: Registered protocol family 10 Segment Routing with IPv6 NET: Registered protocol family 17 [SNDCODEC][sunxi_hs_init_work][259]:resume-->report switch sunxi-i2c sunxi-i2c2: sunxi-i2c2 supply twi not found, using dummy regulator sunxi-i2c sunxi-i2c2: probe success sun8iw20-pinctrl 2000000.pinctrl: pin PF6 already requested by 2000000.pinctrl:166; cannot claim for 2034000.daudio sun8iw20-pinctrl 2000000.pinctrl: pin-166 (2034000.daudio) status -22 sun8iw20-pinctrl 2000000.pinctrl: could not request pin 166 (PF6) from group PF6 on device 2000000.pinctrl sunxi-daudio 2034000.daudio: Error applying setting, reverse things back sunxi-daudio: probe of 2034000.daudio failed with error -22 get ehci0-controller wakeup-source is fail. sunxi ehci0-controller don't init wakeup source [sunxi-ehci0]: probe, pdev->name: 4101000.ehci0-controller, sunxi_ehci: 0xffffffe0006460a0, 0x:ffffffd0040e3000, irq_no:2e [sunxi-ehci0]: Not init ehci0 get ohci0-controller wakeup-source is fail. sunxi ohci0-controller don't init wakeup source [sunxi-ohci0]: probe, pdev->name: 4101400.ohci0-controller, sunxi_ohci: 0xffffffe000646468 [sunxi-ohci0]: Not init ohci0 UBI error: cannot open mtd sys, error -2 UBI: block: can't open volume on ubi0_-1, err=-19 platform regulatory.0: Direct firmware load for regulatory.db failed with error -2 cfg80211: failed to load regulatory.db clk: Not disabling unused clocks ALSA device list: #0: audiocodec alloc_fd: slot 0 not NULL! /dev/root: Can't open blockdev VFS: Cannot open root device "ubiblock0_5" or unknown-block(0,0): error -6 Please append a correct "root=" boot option; here are the available partitions: Kernel panic - not syncing: VFS: Unable to mount root fs on unknown-block(0,0) CPU: 0 PID: 1 Comm: swapper Not tainted 5.4.61 #7 Call Trace: [<ffffffe00002512c>] walk_stackframe+0x0/0x98 [<ffffffe0000252e4>] show_stack+0x2a/0x34 [<ffffffe00041b038>] dump_stack+0x20/0x28 [<ffffffe0000296ec>] panic+0xec/0x272 [<ffffffe000000ef6>] mount_block_root+0x214/0x27a [<ffffffe000000fe2>] mount_root+0x86/0x90 [<ffffffe000001134>] prepare_namespace+0x148/0x152 [<ffffffe000000b58>] kernel_init_freeable+0x166/0x198 [<ffffffe00042bbec>] kernel_init+0x12/0xee [<ffffffe000023e98>] ret_from_exception+0x0/0xc ---[ end Kernel panic - not syncing: VFS: Unable to mount root fs on unknown-block(0,0) ]---以上为烧录和启动的log。
-
回复: F133评估版烧写固件后串口没有反应,求助发布在 MR Series
记录一下修改过程中踩的坑。
1. 新建方案过程中的命名规则,格式一定要跟原来sdk中的内容格式尽量一致,什么时候用"_"和什么时候用"-"要区分清楚。
2. 新建了方案后一定要记得重新执行
source build/envsetup.sh不然修改内容没办法更新。
3. target中的common是共用的,芯片一致的情况下其实不用重复新建这个文件。
4. 最最最重要的一点是一定要根据开发板去配置device中的文件,之前刚拿到sdk的时候就想当然觉得大家应该用的都是一样的串口,后来查阅芯片手册,对比device中的板级配置才发现其中的不一样,如这是芯片手册中的配置:

而下面的board文件的配置:

端口不一样,所以串口当然看不到东西了。
同理,其他配置也需要根据不同开发板的原理图改动。
https://bbs.aw-ol.com/topic/684/d1-tina-linux-如何修改console打印串口
顺便附上一个哪吒的修改例子 -
回复: F133评估版烧写固件后串口没有反应,求助发布在 MR Series
直接把代码拉下来之后,编译f133evb的选项,生成的镜像无法使用。(串口看不到烧录信息,一般应该有log,烧录软件可以正常烧录,完成后回车没有反应,从头到尾没有任何log信息从串口输出) ,这种情况是要修改什么地方呢。
之前用的是修改D1的方法,没有类似问题
-
在哪吒sdk中新建D1s方案的方法发布在 MR Series
1、在device/config/chips/d1/configs下新建文件夹命名为d1-d1sevb,将同文件夹下的nezha的内容复制过去,并按照参考文章修改文件内容。
链接文本2、package\allwinner\alsa-conf-aw\files\d1下新建文件夹d1-d1sevb,同样将同文件下nezha中的内容复制过去。
3、在target/allwinner下新建文件夹,命名为d1sevb,并将同文件夹下d1-nezha中的所有内容复制到d1sevb中,并修改文件名,及文件中的内容,使其指向d1sevb项目。
PRODUCT_NAME := d1_d1sevb
PRODUCT_DEVICE := d1-d1sevb
makefile中修改:
BOARD:=d1-d1sevb
BOARDNAME:=d1-d1sevb
TinaProducts.mk中修改:
PRODUCT_MAKEFILES := \
    $(LOCAL_DIR)/d1_d1sevb.mk
vendorsetup.sh中修改:
add_lunch_combo d1_d1sevb-tina4、根目录执行
souce build/environment setuplunch后可以看到有新增的编译target

选择d1sevb,编译生成镜像,pack打包后用PhoenixSuit烧录。
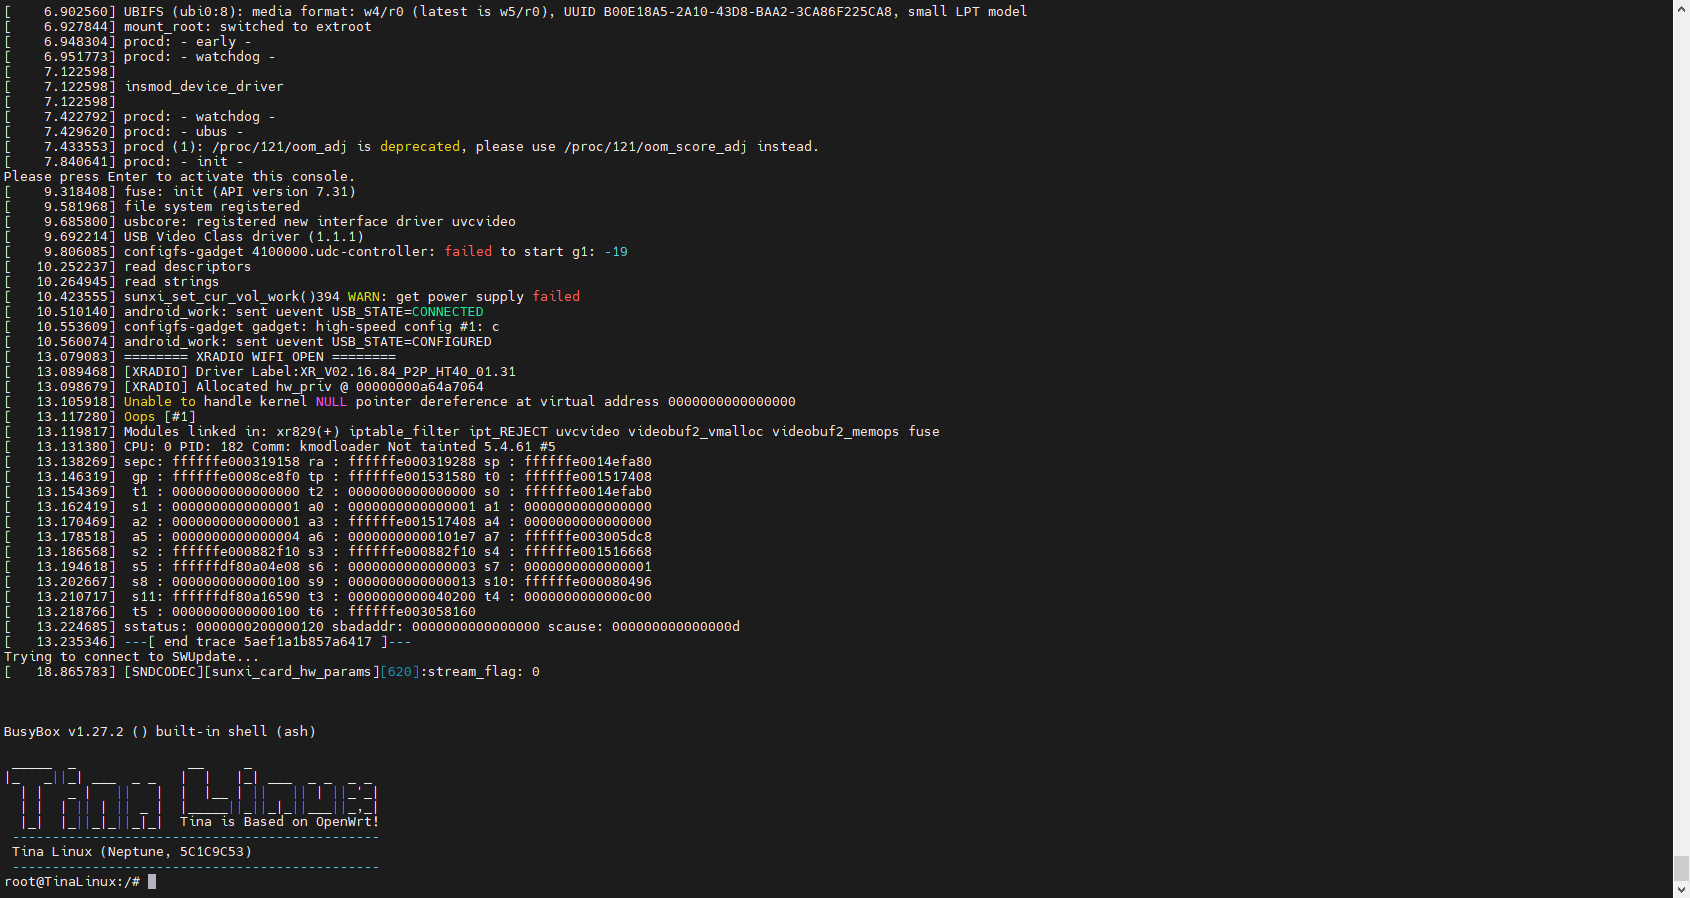
成功进入系统。
-
回复: F133评估版烧写固件后串口没有反应,求助发布在 MR Series
@xiaowenge 这个固件没有问题,看来是我编译镜像的问题了。我编出来的镜像能烧录进板子,但烧录过程中和烧录完成之后串口都处于卡死状态,莫非是我的sdk有问题?
-
回复: d1 sdk里 lichee/linux-5.4/drivers/video/fbdev/sunxi/lcd_fb/include.h 引用了riscv平台不存在的 <asm/memory.h>发布在 MR Series
同样遇到了这个问题,是在f133里面。第一次编译过程中有一些支持选项,选上貌似就不能正常编译。后来全部选择n以后编译倒是通过了,系统能不能正常起来还待验证。
-
F133评估版烧写固件后串口没有反应,求助发布在 MR Series
如题,烧写完f133的镜像后串口没有任何反应,有没有大佬能提供一个可以正常工作的固件,还有自己的固件不知道为什么选择了一些视频功能插件就没办法正常编译。
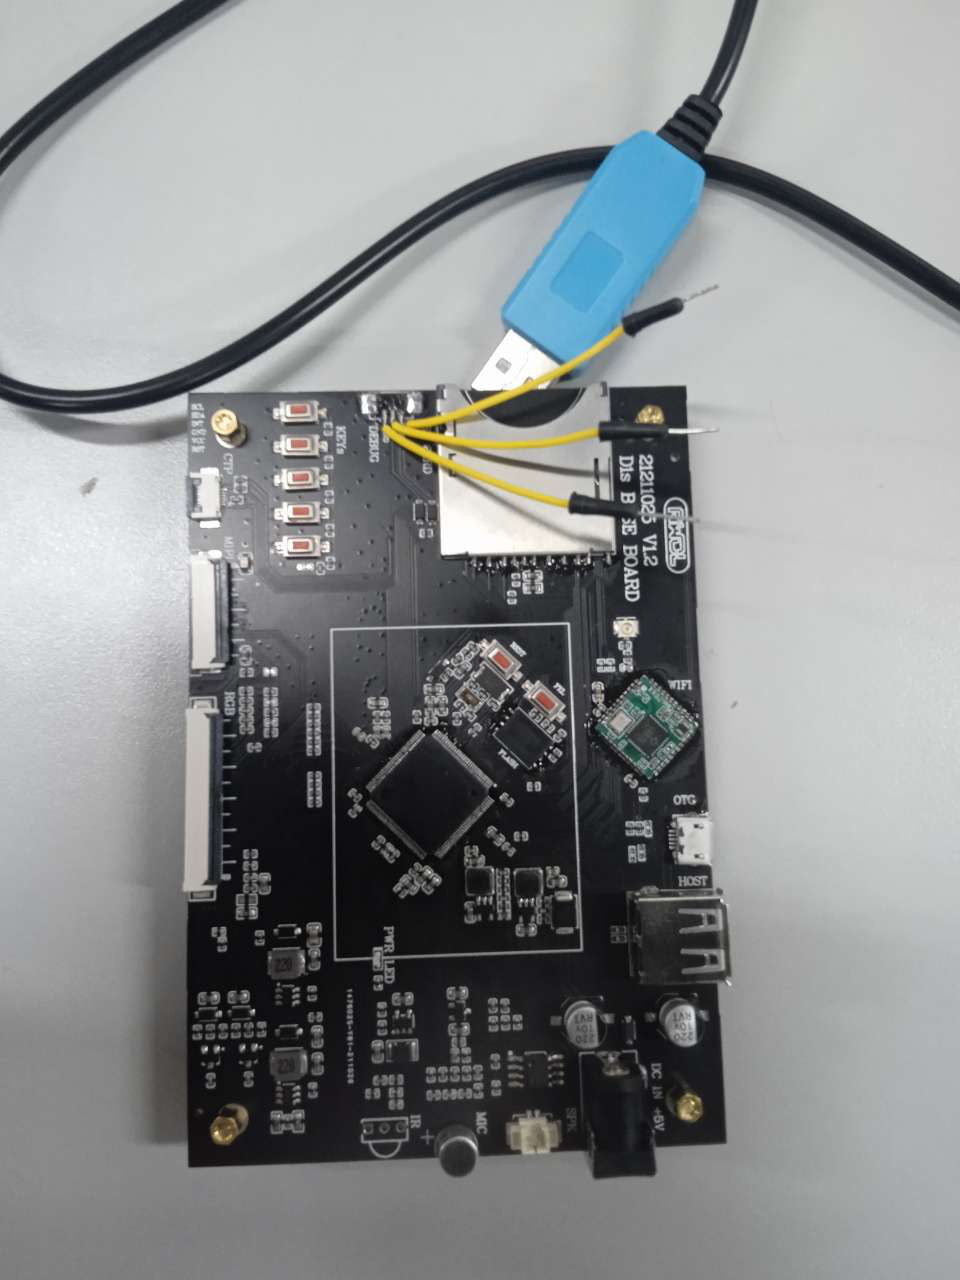
-
【资源汇总】2021年哪吒开发板第三期成果汇报发布在 MR Series
点亮技能 开发者 简介 D1s裸奔驱动LCD,并运行xboot的各种风骚APP tripod9 D1s的RGB裸奔显示,运行xboot各种app D1s开源项目合集 whycan 目前各种基于D1/D1s绘制的开源开发板 毫无PS痕迹的MQ小麻雀定妆照,一体化(All-in-One)设计 mangogeek 芒果派大佬设计基于D1s的Linux小板麻雀 通过USB共享使D1s上的tina联网(RNDIS Gadget) SdtEE 一根USB线达到供电、联网、调试(ssh)、文件传输(smb/nfs/scp)的目的 D1s 目前的一些玩法:跑Ubuntu rootfs,显示图片,播放音频 (转载) SdtEE 通过chroot在D1s上启动一个带apt的ubuntu,显示图片和播放音频 一键生成可定制的Debian rootfs,支持D1/D1s riscv64(转载) SdtEE 跑一个脚本生成直接可用的rootfs,无需更多设置 终于在D1哪吒上面把跑InfoNES framebuffer 模拟器跑起来了 memory frambuffer在D1上的使用 D1哪吒开发板开机运行ucgui demo memory ucGUI移植到D1上跑demo 【资料释放】D1哪吒阿里小程序SDK释放 DOT小文哥 阿里基于D1哪吒开发板适配的阿里小程序框架源码释放 大佬在D1开发板上移植魂斗罗游戏 sunxiang buildroot搭建哪吒D1开发环境详细步骤,并且在HDMI显示器上玩上了魂斗罗(基于QT5) 动手让LVGL8带的Music-Demo音乐响起来 xfdr0805 LVGL8 自带音乐播放器Demo在哪吒扩展板上实现 阿里JS轻应用框架在D1上适配 DOT小文哥 JS轻应用框架语音面板demo 在D1开发板上运行Dahdi和Asterisk IPPBX xiaowen IP电话交换系统的哪吒扩展板 给D1 SDK 添加一个简单的helloworld package tigger Tina下可编译的helloworld的Demo 又一款开源显示框架GUI-lite,在D1上试试效果 BedRock 非常简便的开源GUI,在D1上实现 Neza-D1开发板学习之红外发送与接收篇 xfdr0805 用哪吒IO来发射红外信号 使用OpenCV实时显示USB摄像头画面到屏幕上 IAMLIUBO 借助OpenCV在哪吒上实时显示摄像头画面 【模块第三弹】哪吒中的LEDC的驱动 BedRock 实现了控制LEDC的接口 挪威科技大学使用全志D1哪吒开发板开设操作系统课程 Michael Engel 挪威科技大学的Michael Engel教授就在操作系统的课程中介绍并使用了哪吒D1及玄铁C906,并在课件中详细展示了如何在哪吒上玩转MIT的xv6 OS -
AES算法D1芯片硬件CE模块补丁发布在 MR Series
AES算法走D1芯片硬件CE模块补丁,点击下载:
300-openssl_remove_afalg_rsa_hash.patch300-openssl_remove_afalg_rsa_hash.patch放到SDK对应路径中
tina-d1/package/libs/openssl/patches/根目录下执行
make -j编译完成
#### make completed successfully (01:38 (mm:ss)) ####重新打包烧写固件进行测试

 那么请问哪里能买到呢
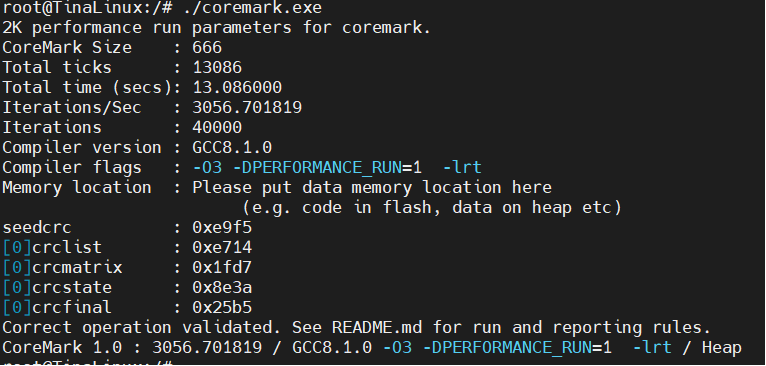

 )
)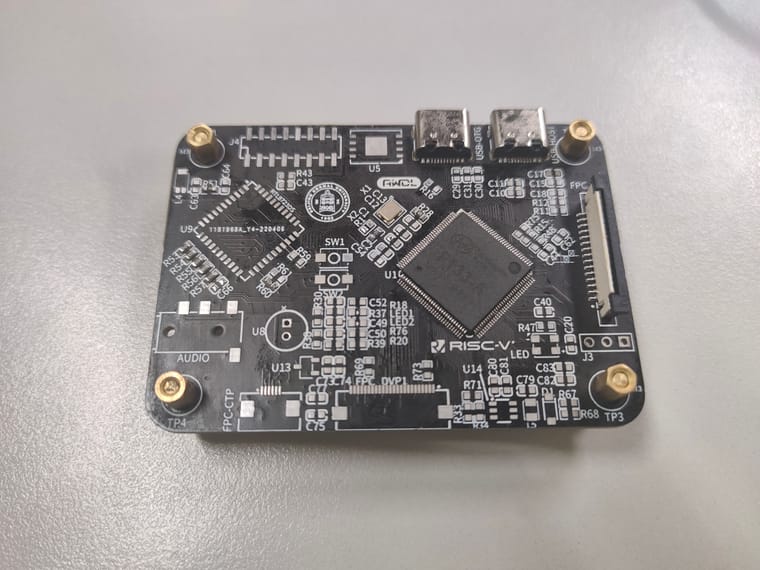
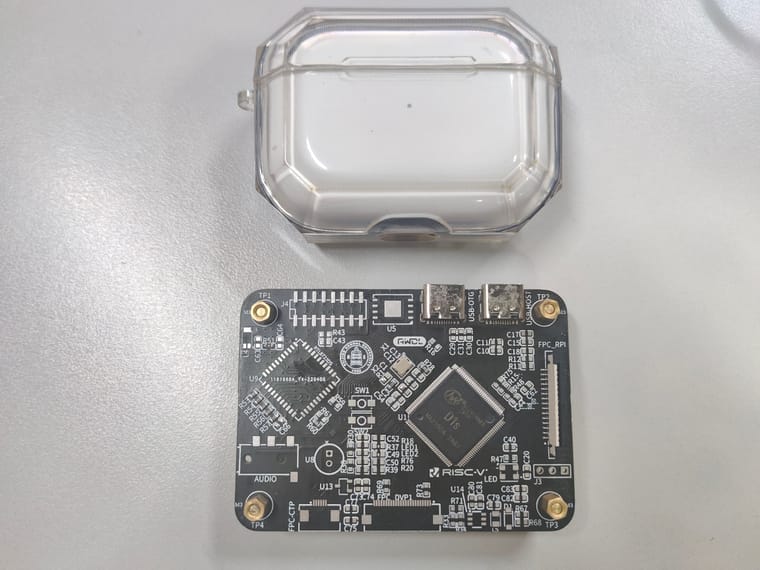

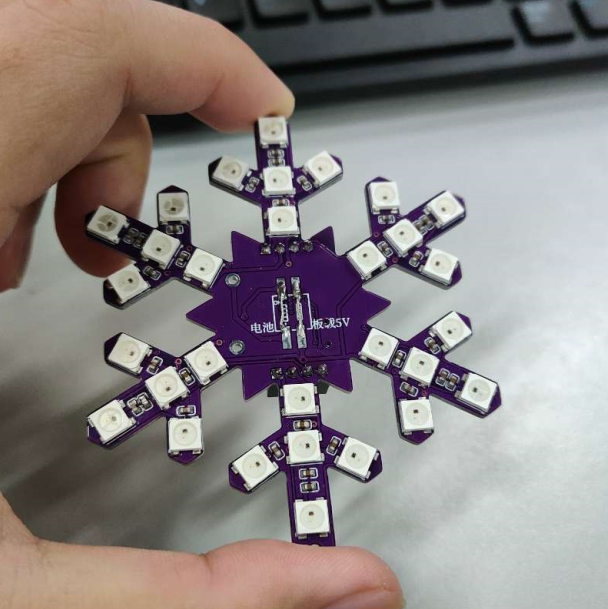
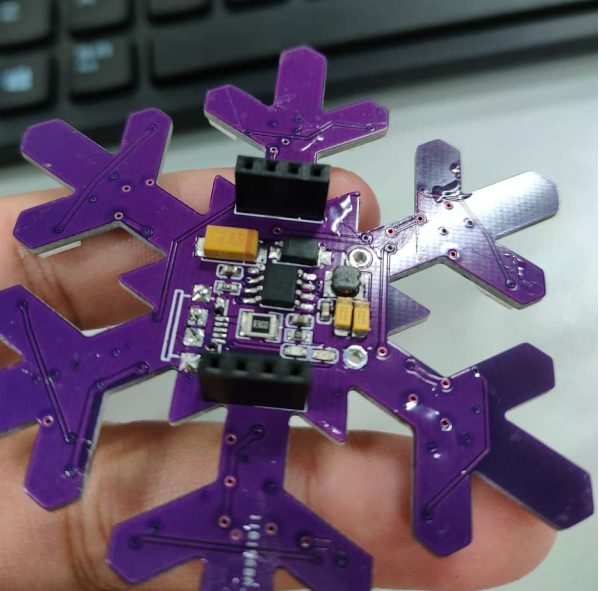


 。
。
 欢迎欢迎
欢迎欢迎 