@mhcsoft 升级下PhonixSuit试试
YuzukiTsuru 发布的帖子
-
编译下 D1s 的 Melis发布在 RTOS
先拉源码:
git clone https://github.com/Tina-Linux/d1s-melis.git然后下载工具链[https://github.com/Tina-Linux/d1s-melis/releases/tag/v1.0.0]丢到
prebuilt文件夹里。source melis-env.sh lunch make -j655350 pack就可以在out目录找到镜像文件了
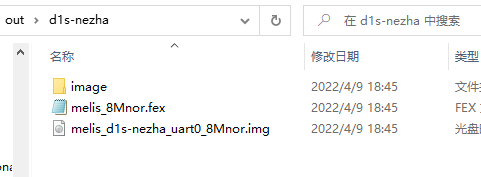
刷机

然后就毫不意外的启动了

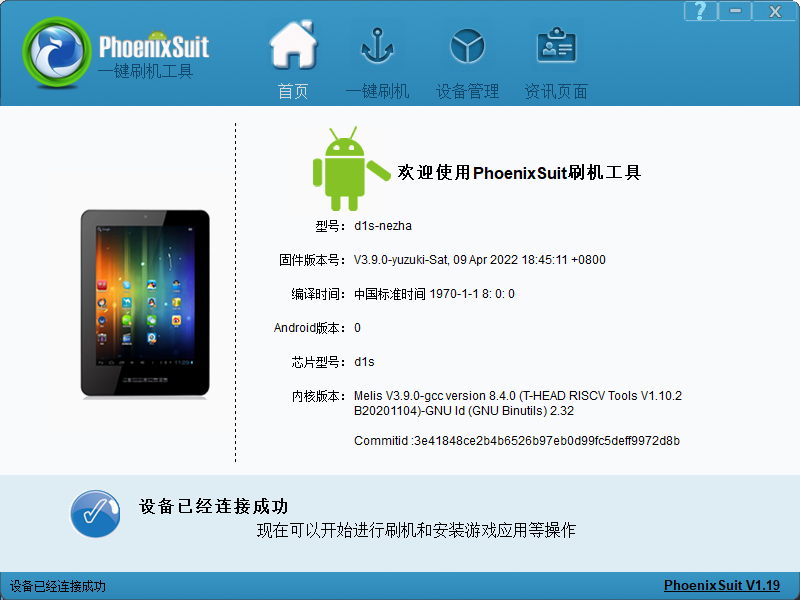
-
回复: 关于闭源文件的问题发布在 Linux
@masterlu
看样子应该是字符驱动的问题,有尝试过make clean清除编译出来的文件重新编译吗另外换工具链需要重新编译,要把之前的全部clean了
-
自制V831小相机适配 i80 LCD 显示屏发布在 其它全志芯片讨论区
V831没有RGB也没有MIPI,正好手上有几片i80 MCU屏幕可以用(320*480 3.5寸的,15块钱一片)
电路部分
屏幕部分:
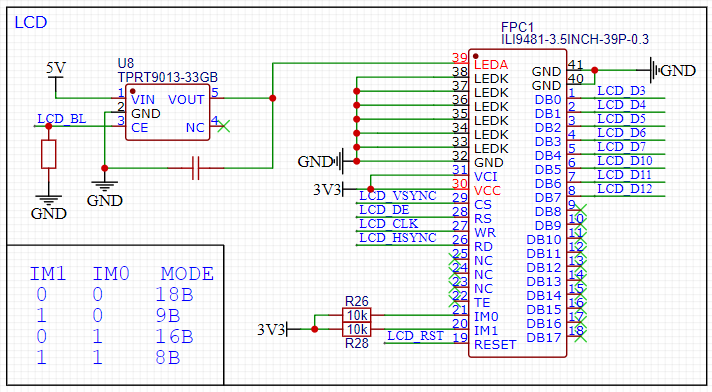
主控部分:
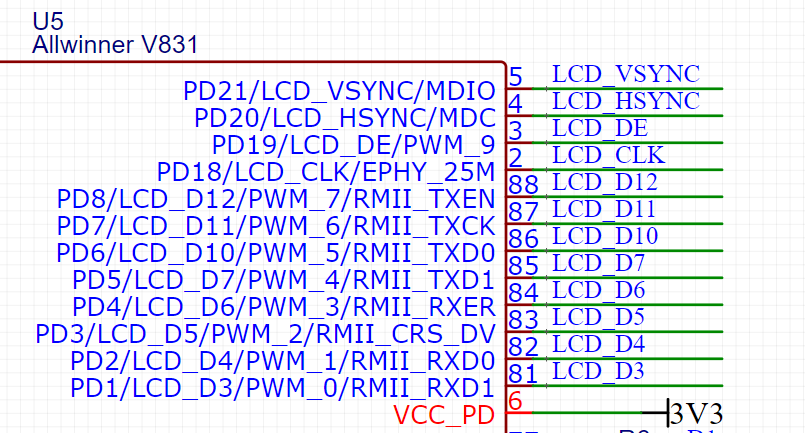

没啥好说的,照着Sipeed的抄就行了
配置设备树
lcd0: lcd0@01c0c000 {
			lcd_used            = <1>;

			lcd_driver_name     = "ili9481";

			lcd_x               = <320>;
			lcd_y               = <480>;
			lcd_width           = <108>;
			lcd_height          = <64>;
			lcd_dclk_freq       = <5>;

			lcd_pwm_used        = <0>;

			lcd_hbp             = <20>;
			lcd_ht              = <382>;
			lcd_hspw            = <2>;
			lcd_vbp             = <2>; // 320
			lcd_vt              = <486>; // 320
			lcd_vspw            = <2>;

			lcd_if              = <1>;
			lcd_frm             = <2>;
			lcd_cpu_mode        = <1>;
			lcd_cpu_te          = <0>;
			lcd_cpu_if	        = <14>;

			lcd_io_phase        = <0x0000>;
			lcdgamma4iep        = <22>;
			lcd_gamma_en        = <0>;
			lcd_cmap_en         = <0>;
			lcd_bright_curve_en = <0>;
			lcd_rb_swap         = <0>;

			lcd_gpio_0 = <&pio PH 5 1 0 3 0>; /* rst */
			lcd_gpio_1 = <&pio PD 21 1 0 3 0>; /* cs */
			lcd_bl_en = <&pio PH 6 1 0 3 1>;

			pinctrl-0 = <&rgb8_pins_a>;
			pinctrl-1 = <&rgb8_pins_b>;
		};
因为这里用的是
Kernel刷屏,所以就不配uboot的了驱动
然后找大佬鼠嫖驱动,放到
lichee/linux-4.9/drivers/video/fbdev/sunxi/disp2/disp/lcd/文件夹下。编辑
lichee/linux-4.9/drivers/video/fbdev/sunxi/disp2/disp/lcd/panels.c,找一个顺眼的地方加一下配置。#ifdef CONFIG_LCD_SUPPORT_ILI9481 &ili9481_panel, #endif编辑
lichee/linux-4.9/drivers/video/fbdev/sunxi/disp2/disp/lcd/panels.h,找一个顺眼的地方加一下配置。#ifdef CONFIG_LCD_SUPPORT_ILI9481 extern struct __lcd_panel ili9481_panel; #endif编辑
lichee/linux-4.9/drivers/video/fbdev/sunxi/disp2/disp/lcd/Kconfig,找一个顺眼的地方加一下配置。config LCD_SUPPORT_ILI9481 bool "LCD support ili9481 panel" default n ---help--- If you want to support ili9481 panel for display driver, select it.编辑
lichee/linux-4.9/drivers/video/fbdev/sunxi/disp2/disp/Makefile,找一个顺眼的地方加一下配置。disp-$(CONFIG_LCD_SUPPORT_ILI9481) += lcd/ili9481.o再打开
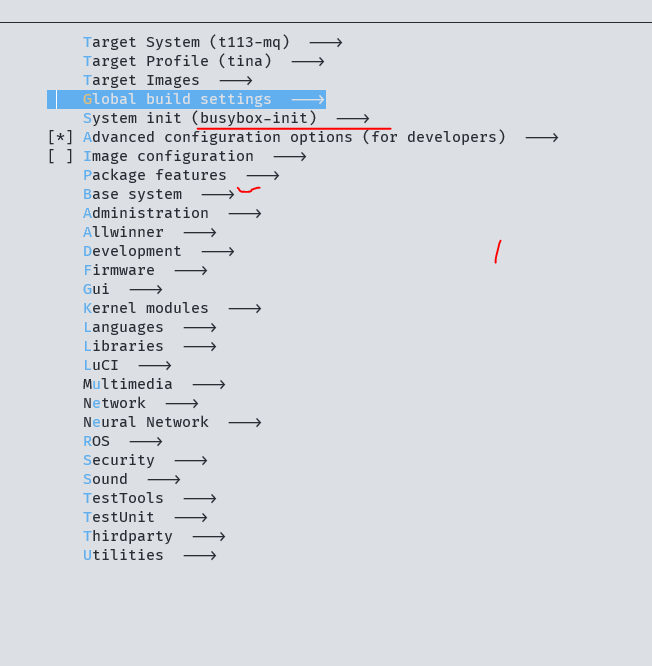
m kernel_menuconfigDevice Drivers ---> Graphics support ---> Frame buffer Devices ---> Video support for sunxi ---> LCD panels select ---> [*] LCD support ili9481 panel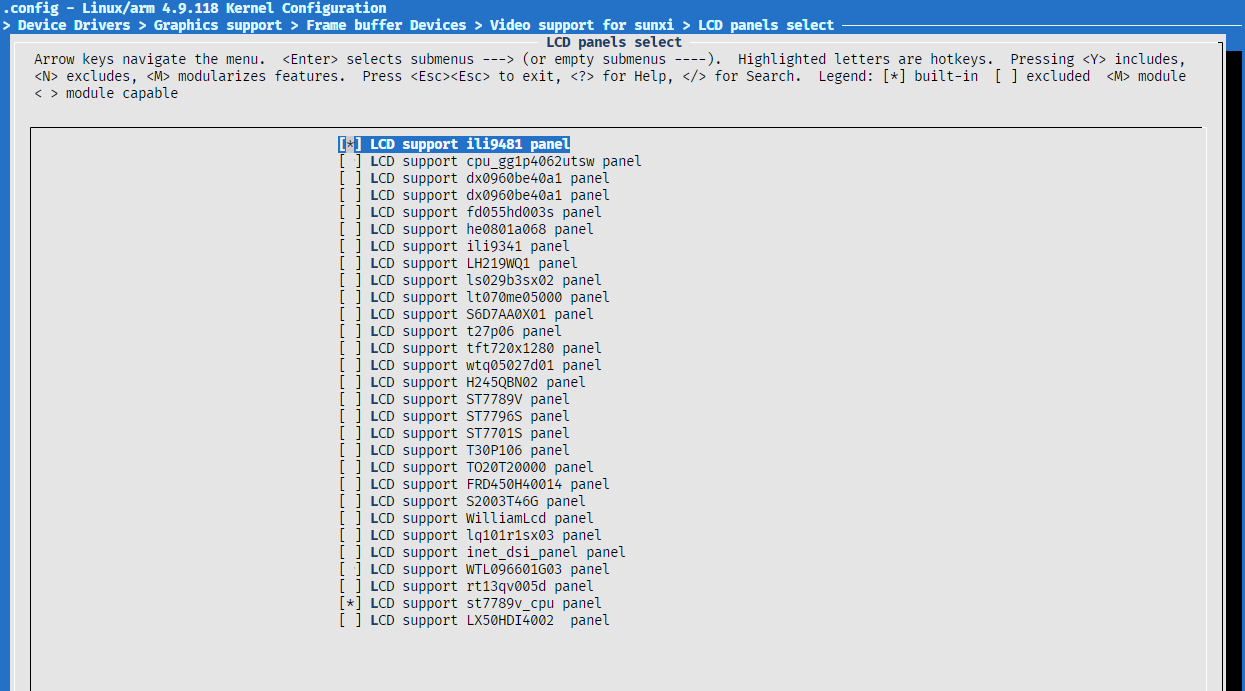
保存,编译kernel打包就好了。
启动系统
刷卡,启动系统,可以看到屏幕背光已经亮了。
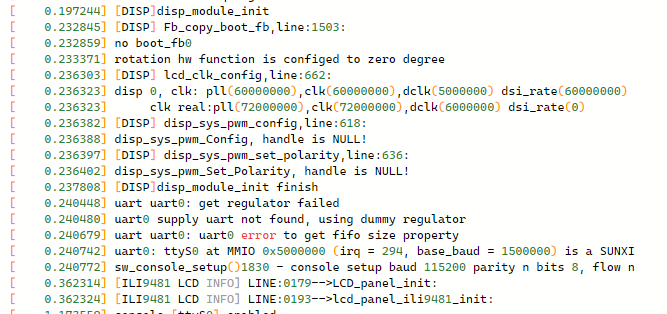
测试一下
echo 1 > sys/class/disp/disp/attr/colorbar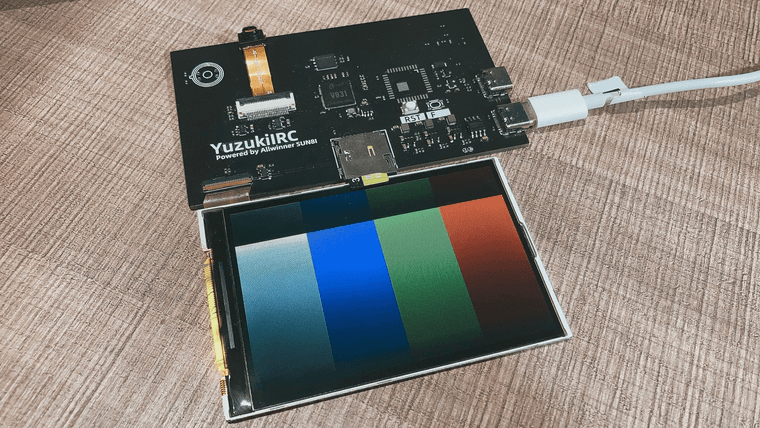
驱动和配置已经上传Github,自取
-
回复: 【萌新入门】如何编写一个应用程序,调用Tina Linux提供的GPIO驱动,实现某个GPIO脚的电平周期反转发布在 MR Series
有四个方法,第一个是使用sunxi-gpio提供的接口。这个接口使用比较方便,灵活,但是必须是sunxi平台的才能用。
另外一个方法是用<asm/gpio.h>提供的操作,先申请GPIO,然后绑定到一个功能上,再操作。有点像arduino的设置pinMode然后digitalwirte
还有一个方法是使用文件操作,export出gpio用echo操作高低电平
最后一个方法是内存映射,使用<dev/mem>的mmap直接操作对应的内存空间 -
回复: 请问sys_config.fex与board.dts是什么关系发布在 V Series
@yangzhenjiang optee可以杀了,dts里有一个optee的保留内存可以砍了,然后把optee从打包里删了
-
回复: 请问sys_config.fex与board.dts是什么关系发布在 V Series
最开始没有dts,用的是fex描述各种配置。后来有了设备树就分开了。现在fex大多数用于boot0的配置,基本不参与设备树,但是也参与部分。fex的优先级高于设备树
-
回复: 收到芒果大佬的库存 DVP与MIPI 双摄像头R11开发板发布在 A Series
@whycan 试了一下,好像没有用,还是
touch ./output/images/a.dtb     # 防止出现未编译dtb情况
rm ./output/images/*.dtb          # 删除设备树
make linux-rebuild -j8 && make
或者更绝的
rm -rf output/build/linux* rm -rf output/build/.linux* make -
回复: XR32 CSI验证发现有点问题,求大佬给个OV7670、GC0308 的demo我抄抄发布在 Wireless & Analog Series
@gregrgr gc0308的10脚的1.8v我拆了也是一样的
-
回复: D1S tina2.0SDK有办法升级TOOLCHAIN吗?发布在 MR Series
开核是不可能开核的,异构编程也挺难调试的,不过感觉以后肯定有RV+ARM这样的芯片出来。
内部的ARM核还是双核A7呢(((
工具链不建议升级,平头哥的新版工具链感觉编译都挺慢的(xx
如果实在想试试,可以用 https://github.com/YuzukiHD/Buildroot-YuzukiSBC 代替下,修改 https://github.com/YuzukiHD/Buildroot-YuzukiSBC/blob/master/buildroot/configs/awol_nezha_d1s_defconfig 里的
BR2_TOOLCHAIN_EXTERNAL_URL然后配置一下编译器属性就可以了。 -
回复: 谁跑过D1a的core_mark分数吗,我这里有T113的跑分,想来对比下发布在 MR Series
Linux TinaLinux 5.4.61 #265 PREEMPT Mon Apr 18 15:41:13 UTC 2022 riscv64 GNU/Linux
2K performance run parameters for coremark.
CoreMark Size    : 666
Total ticks      : 13456
Total time (secs): 13.456000
Iterations/Sec   : 2972.651605
Iterations       : 40000
Compiler version : GCC8.1.0
Compiler flags   : -O2   -lrt
Memory location  : Please put data memory location here
                        (e.g. code in flash, data on heap etc)
seedcrc          : 0xe9f5
[0]crclist       : 0xe714
[0]crcmatrix     : 0x1fd7
[0]crcstate      : 0x8e3a
[0]crcfinal      : 0x25b5
Correct operation validated. See README.md for run and reporting rules.
CoreMark 1.0 : 2972.651605 / GCC8.1.0 -O2   -lrt / Heap
MemoryPerf 不知道能不能在RV上跑,没测试
-
【开源硬件】YuzukiXR32板子开源了发布在 Wireless & Analog Series
开源地址:https://oshwhub.com/GloomyGhost/yuzukixr32f4
制作过程:
【开源直播】手把手教你用全志XR32芯片DIY一个自己的开发板(一:电路与PCB绘制)
https://bbs.aw-ol.com/topic/1052/share/2【开源直播】手把手教你用全志XR32芯片DIY一个自己的开发板(二:PCB焊接调试)
https://bbs.aw-ol.com/topic/1154/share/2 -
回复: XR32 CSI验证发现有点问题,求大佬给个OV7670、GC0308 的demo我抄抄发布在 Wireless & Analog Series
换了GC0308,也有问题,无法拍摄图像,但是初始化什么的都没问题。。
--Cam_Hardware_Reset---25----
[COMPONENT TRACK] GC0308_Csi_Init():224 end
GC0308 chip id = 0x9b
GC0308 Init Done
[GC0308] image_size 0
[COMPONENT WARN] Drv_GC0308_DeInit():615 GC0308 semaphore delete done, 0
--Cam_Hardware_Reset---25----
[COMPONENT TRACK] GC0308_Csi_Init():224 end
GC0308 chip id = 0x9b
GC0308 Init Done
[GC0308] image_size 0
[COMPONENT WARN] Drv_GC0308_DeInit():615 GC0308 semaphore delete done, 0
--Cam_Hardware_Reset---25----
[COMPONENT TRACK] GC0308_Csi_Init():224 end
GC0308 chip id = 0x9b
GC0308 Init Done
[GC0308] image_size 0
[COMPONENT WARN] Drv_GC0308_DeInit():615 GC0308 semaphore delete done, 0
程序
#include <stdio.h> #include <stdlib.h> #include <string.h> #include "driver/chip/hal_csi.h" #include "driver/chip/hal_dma.h" #include "driver/chip/hal_i2c.h" #include "driver/chip/hal_uart.h" #include "kernel/os/os.h" #include "driver/component/csi_camera/camera_csi.h" #include "driver/component/csi_camera/gc0308/drv_gc0308.h" #define IMAGE_BUFFSIZE 153600 #define CAM_RESET_PIN GPIO_PIN_13 #define CAM_RESET_PORT GPIO_PORT_A #define CAM_POWERDOWN_PIN GPIO_PIN_12 #define CAM_POWERDOWN_PORT GPIO_PORT_A uint8_t* image_buff; void Cam_Hardware_Reset(void) { printf("--%s---%d----\n", __func__, __LINE__); Drv_GC0308_Pwdn_Pin_Ctrl(GPIO_PIN_LOW); Drv_GC0308_Reset_Pin_Ctrl(GPIO_PIN_LOW); OS_MSleep(3); Drv_GC0308_Reset_Pin_Ctrl(GPIO_PIN_HIGH); OS_MSleep(100); } void Cam_PowerInit(void) { Cam_PowerCtrlCfg PowerCtrlcfg; PowerCtrlcfg.Cam_Pwdn_Port = CAM_POWERDOWN_PORT; PowerCtrlcfg.Cam_Reset_Port = CAM_RESET_PORT; PowerCtrlcfg.Cam_Pwdn_Pin = CAM_POWERDOWN_PIN; //开发板 PowerCtrlcfg.Cam_Reset_Pin = CAM_RESET_PIN; Drv_GC0308_PowerInit(&PowerCtrlcfg); Drv_GC0308_EnvironmentInit(); } int Cam_Init(uint8_t* imagebuf) { HAL_CSI_Moudle_Enalbe(CSI_DISABLE); if (Drv_GC0308_Init() == COMP_ERROR) return COMP_ERROR; else OS_MSleep(500); Drv_GC0308_Set_SaveImage_Buff(( uint32_t )imagebuf); HAL_CSI_Moudle_Enalbe(CSI_ENABLE); return COMP_OK; } int main(void) { uint32_t image_size = 0; image_buff = ( uint8_t* )malloc(IMAGE_BUFFSIZE); if (image_buff == NULL) { COMPONENT_WARN("image buff malloc error \r\n"); return COMP_ERROR; } memset(image_buff, 0, IMAGE_BUFFSIZE); while (1) { Cam_PowerInit(); Cam_Hardware_Reset(); Cam_Init(image_buff); Drv_GC0308_Capture_Enable(CSI_STILL_MODE, CSI_ENABLE); image_size = Drv_GC0308_Capture_Componemt(10000); printf("[GC0308] image_size %u\n", image_size); if (image_size == 320 * 240 * 2) { printf("[GC0308] image capture done\n"); break; } else { Drv_GC0308_DeInit(); } } Drv_GC0308_DeInit(); free(image_buff); return COMP_OK; } -
回复: 设备树board.dts问题咨询发布在 MR Series
tina-d1-open/device/config/chips/d1/configs/nezha目录下有一个board.dts
tina-d1-open/device/config/chips/d1/configs/nezha目录下的board.dts是tina-d1-open/device/config/chips/d1/configs/nezha/linux-5.4目录下的超链接
-
回复: T113 tina 使用spi nand flash启动报Kernel panic发布在 其它全志芯片讨论区
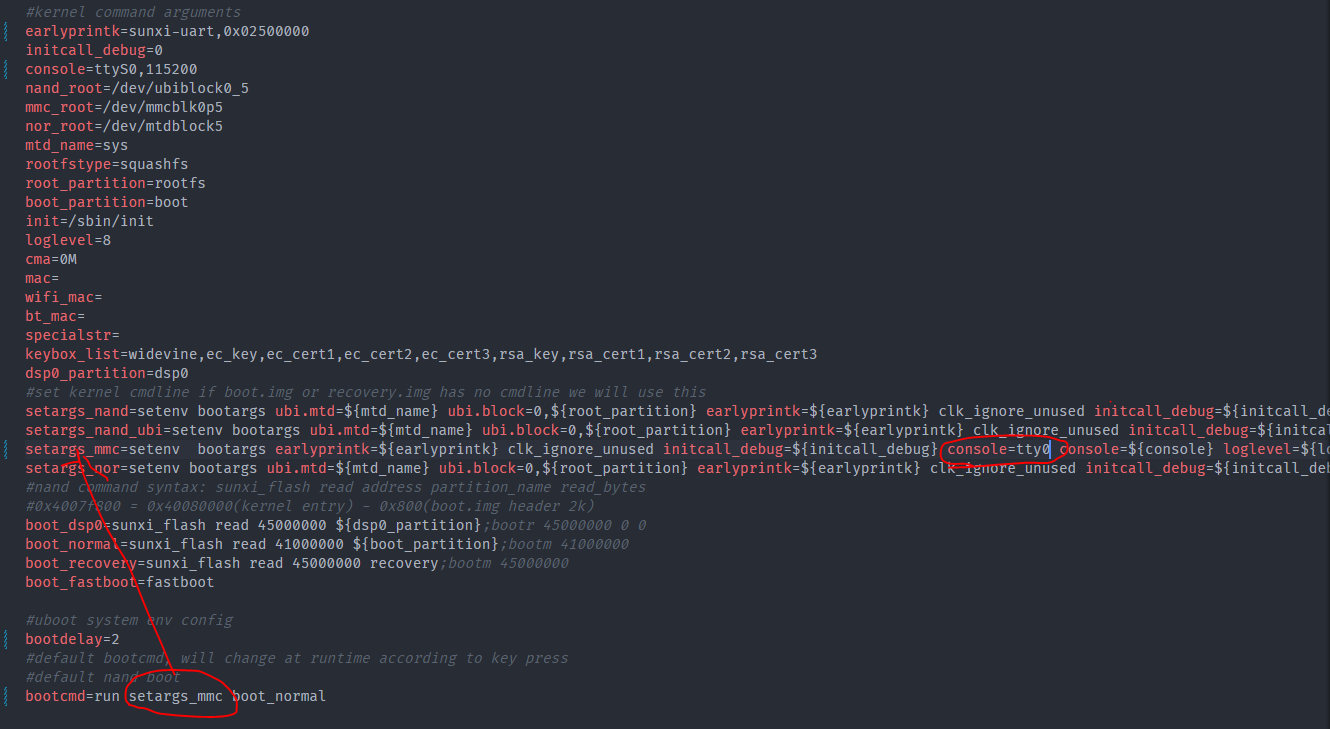
#kernel command arguments
earlyprintk=sunxi-uart,0x02500000
initcall_debug=0
console=ttyS0,115200
rootfstype=squashfs
init=/sbin/init
loglevel=8
cma=0M
mac=
wifi_mac=
bt_mac=
specialstr=
keybox_list=widevine,ec_key,ec_cert1,ec_cert2,ec_cert3,rsa_key,rsa_cert1,rsa_cert2,rsa_cert3
dsp0_partition=dsp0
setargs=earlyprintk=sunxi-uart,0x02500000 clk_ignore_unused initcall_debug=0 console=ttyS0,115200 loglevel=8 root=/dev/mtdblock3  init=/sbin/init partitions=ext4 cma=8M  gpt=1
boot_dsp0=sunxi_flash read 45000000 ${dsp0_partition};bootr 45000000 0 0
boot_normal=sunxi_flash read 41000000 ${boot_partition};bootm 41000000
boot_fastboot=fastboot
bootdelay=2
bootcmd=run setargs boot_normal
实在不行请联系FAE,我这边没有物料无法测试
-
回复: T113 tina 使用spi nand flash启动报Kernel panic发布在 其它全志芯片讨论区
T113默认的是ubi,之前没注意
#kernel command arguments earlyprintk=sunxi-uart,0x02500000 initcall_debug=0 console=ttyS0,115200 nand_root=/dev/mtdblock3 mmc_root=/dev/mmcblk0p5 nor_root=/dev/mtdblock5 mtd_name=sys rootfstype=squashfs root_partition=rootfs boot_partition=boot init=/sbin/init loglevel=8 cma=0M mac= wifi_mac= bt_mac= specialstr= keybox_list=widevine,ec_key,ec_cert1,ec_cert2,ec_cert3,rsa_key,rsa_cert1,rsa_cert2,rsa_cert3 dsp0_partition=dsp0 #set kernel cmdline if boot.img or recovery.img has no cmdline we will use this setargs_nand=setenv bootargs ubi.mtd=${mtd_name} ubi.block=0,${root_partition} earlyprintk=${earlyprintk} clk_ignore_unused initcall_debug=${initcall_debug} console=${console} loglevel=${loglevel} root=${nand_root} rootfstype=${rootfstype} init=${init} partitions=${partitions} cma=${cma} snum=${snum} mac_addr=${mac} wifi_mac=${wifi_mac} bt_mac=${bt_mac} specialstr=${specialstr} gpt=1 setargs_nand_ubi=setenv bootargs ubi.mtd=${mtd_name} ubi.block=0,${root_partition} earlyprintk=${earlyprintk} clk_ignore_unused initcall_debug=${initcall_debug} console=${console} loglevel=${loglevel} root=${nand_root} rootfstype=${rootfstype} init=${init} partitions=${partitions} cma=${cma} snum=${snum} mac_addr=${mac} wifi_mac=${wifi_mac} bt_mac=${bt_mac} specialstr=${specialstr} gpt=1 setargs_mmc=setenv bootargs earlyprintk=${earlyprintk} clk_ignore_unused initcall_debug=${initcall_debug} console=${console} loglevel=${loglevel} root=${mmc_root} init=${init} partitions=${partitions} cma=${cma} snum=${snum} mac_addr=${mac} wifi_mac=${wifi_mac} bt_mac=${bt_mac} specialstr=${specialstr} gpt=1 setargs_nor=setenv bootargs ubi.mtd=${mtd_name} ubi.block=0,${root_partition} earlyprintk=${earlyprintk} clk_ignore_unused initcall_debug=${initcall_debug} console=${console} loglevel=${loglevel} root=${nor_root} rootfstype=${rootfstype} init=${init} partitions=${partitions} cma=${cma} snum=${snum} mac_addr=${mac} wifi_mac=${wifi_mac} bt_mac=${bt_mac} specialstr=${specialstr} gpt=1 #nand command syntax: sunxi_flash read address partition_name read_bytes #0x4007f800 = 0x40080000(kernel entry) - 0x800(boot.img header 2k) boot_dsp0=sunxi_flash read 45000000 ${dsp0_partition};bootr 45000000 0 0 boot_normal=sunxi_flash read 41000000 ${boot_partition};bootm 41000000 boot_recovery=sunxi_flash read 45000000 recovery;bootm 45000000 boot_fastboot=fastboot #uboot system env config bootdelay=2 #default bootcmd, will change at runtime according to key press #default nand boot bootcmd=run setargs_nand boot_normal -
回复: 芒果派 麻雀 Dual T113使用Buildroot一键构建发布在 其它全志芯片讨论区
不要用PhoenixCard刷写镜像,用dd,win32imager,etcher刷
相关文档
https://yuzukihd.gloomyghost.com/Buildroot-YuzukiSBC/#/?id=flashing-firmware
-
回复: 芒果派 麻雀 Dual T113使用Buildroot一键构建发布在 其它全志芯片讨论区
测试镜像:
百度云:链接:https://pan.baidu.com/s/1dPSaKJQrOMy8X1Xs_604Dw 提取码:awol
奶牛快传:https://cowtransfer.com/s/76711e52ad304f 或 打开【奶牛快传】cowtransfer.com 使用传输口令:gl9jyq 提取;串口是PE2,PE3
-
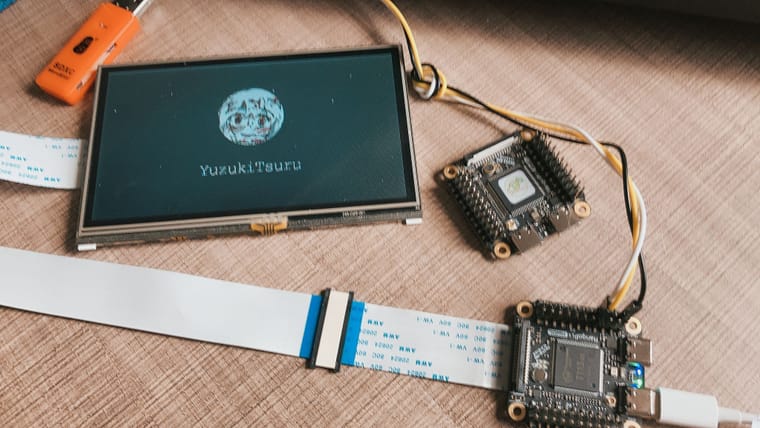
芒果派 麻雀 Dual T113使用Buildroot一键构建发布在 其它全志芯片讨论区
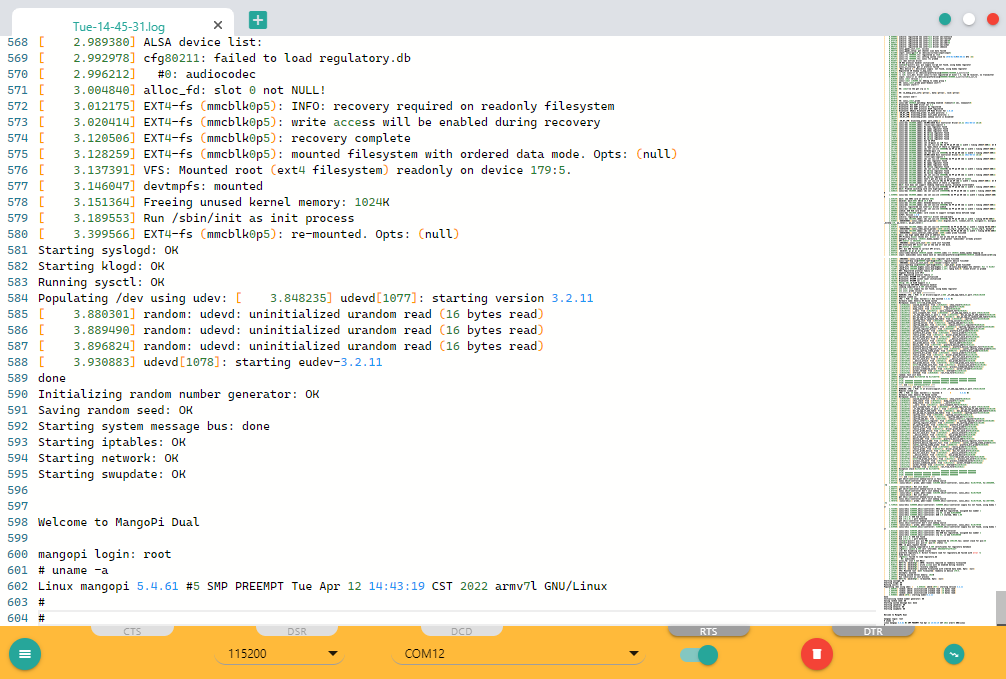
资源连接
项目地址:https://github.com/YuzukiHD/Buildroot-YuzukiSBC
同步更新国内镜像:https://gitee.com/GloomyGhost/Buildroot-YuzukiSBC
文档:https://yuzukihd.gloomyghost.com/Buildroot-YuzukiSBC/#/编译方法
- 下拉Buildroot
在主站和镜像站中选一个下载就可以了。git clone https://github.com/yuzukihd/Buildroot-YuzukiSBC # 主站 git clone https://gitee.com/GloomyGhost/Buildroot-YuzukiSBC # 镜像站 cd Buildroot-YuzukiSBC - 配置环境变量
Buildroot-YuzukiSBC 支持自动切换WSL2编译模式,支持WSL2与虚拟机。暂不支持WSL1source envsetup.sh lunch - 应用配置文件
make mangopi_mq_dual_defconfig - 编译
生成的镜像在output/images/文件夹里make
其他
Buildroot-YuzukiSBC截至发帖前支持的板子与芯片
Vender Device Chip U-Boot Linux Defconfig YuzukiHD YuzukiRuler F1C200s 2020.07 5.4.180 yuzukihd_yuzukiruler_defconfig YuzukiHD YuzukiCore F1 F1C200s 2020.07 5.4.180 yuzukihd_yuzukicore_f1_defconfig YuzukiHD YuzukiCK1N V3x 2022.01 5.4.180 yuzukihd_yuzukick1n_defconfig Sipeed lichee nano F1C100s 2020.07 5.4.180 sipeed_lichee_nano_defconfig Sipeed lichee zero V3s 2020.07 5.4.180 sipeed_lichee_zero_defconfig awol nezha D1-H tina,uboot 2018 tina,linux 2018 awol_nezha_defconfig awol nezha-d1s D1s tina,uboot 2018 tina,linux 2018 awol_nezha_d1s_defconfig mangopi mq D1s tina,uboot 2018 tina,linux 2018 mangopi_mq_defconfig mangopi mq dual T113 longan,uboot 2018 longan,linux 2018 mangopi_mq_dual_defconfig - 下拉Buildroot
-
回复: T113 tina 使用spi nand flash启动报Kernel panic发布在 其它全志芯片讨论区
默认是sd卡启动,修改env.cfg和sys_config.fex使用nand启动,主要是env.cfg,使用mtd设备
-
回复: T113 Tina SDK、Longan SDK、开发资料下载发布在 其它全志芯片讨论区
@suitjune Longan只有bootloader,kernel,自己适配rootfs比如debian,Ubuntu什么的,tina是完整的带有rootfs,而且是精简版本的rootfs。看你咋选了
-
YuzukiXR806 使用 FreeRTOS 开发运行Hello Demo发布在 Wireless & Analog Series
下载SDK
打开全志客户服务平台,找到XR806的SDK,翻到第二页找到v1.2.1版本。
一定要下载v1.2.1版本
一定要下载v1.2.1版本
一定要下载v1.2.1版本相关说明:
【严重警告】不要用全志客户服务平台Freertos v1.2.0版本编出来的固件烧到XR806开源鸿蒙开发板,否则板子会烧掉
https://bbs.aw-ol.com/topic/1124/share/1
然后拉取代码,拉代码之前务必确认正确添加了本机公钥。配置方法见https://www.bilibili.com/video/BV1gu411q7E8/

配置工具链
下载gcc-arm-none-eabi-8-2019-q3-update编译器,并解压。
~$ wget https://armkeil.blob.core.windows.net/developer/Files/downloads/gnu-rm/8-2019q3/RC1.1/gcc-arm-none-eabi-8-2019-q3-update-linux.tar.bz2
~$ tar -jvxf gcc-arm-none-eabi-8-2019-q3-update-linux.tar.bz2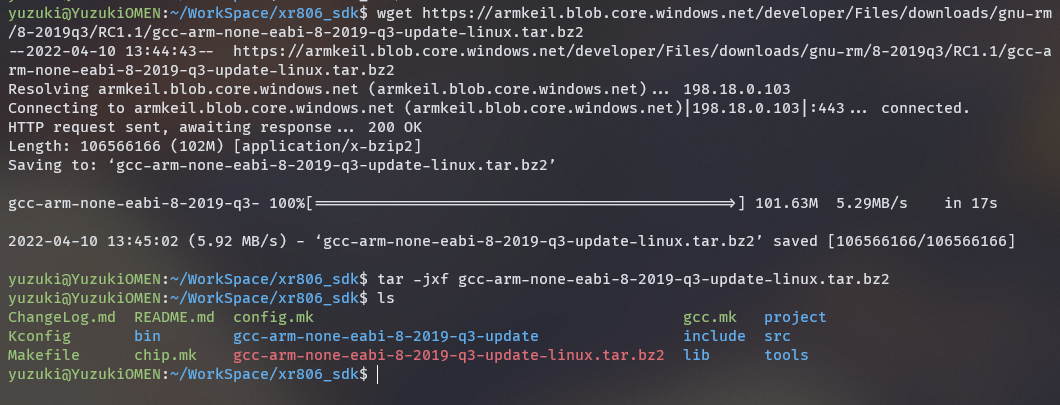
打开
gcc.mk文件,修改CC_DIR :=到工具链位置。修改前

修改后

编译Demo
make menuconfig然后进入这样的窗口
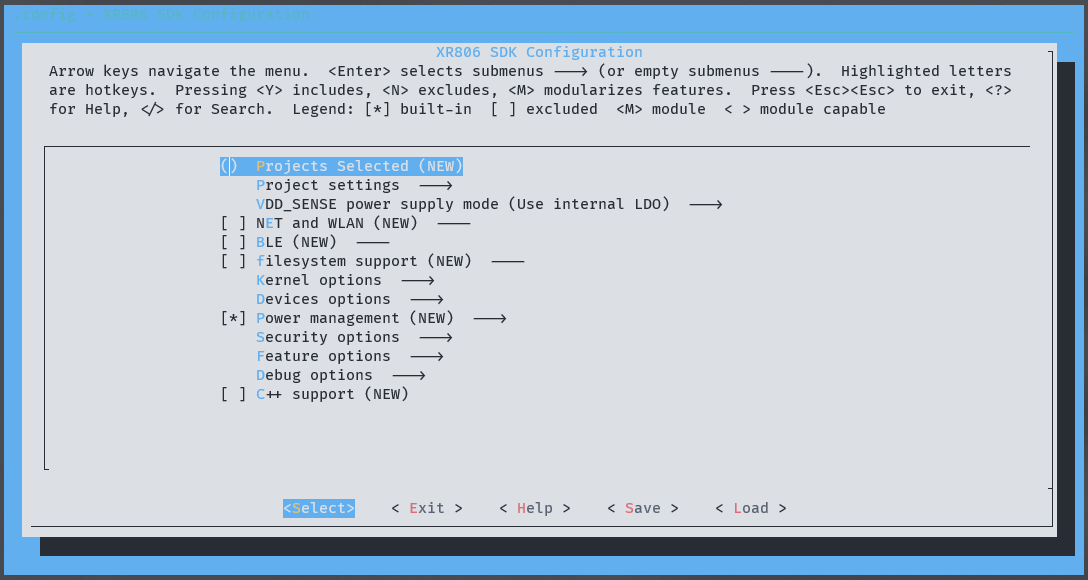
键盘方向键选择到Exit,回车

选择Yes,保存配置。
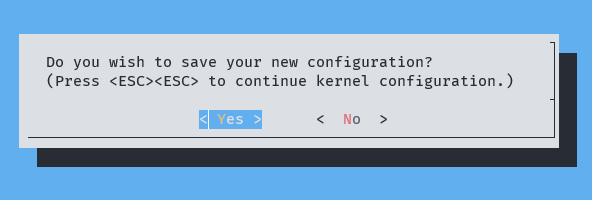
然后就可以编译demo了
make PRJ=demo/hello_demo制作镜像
进入上一步的demo目录下:
cd project/demo/hello_demo/gcc/执行
make image可以看到:
Flash Layout:
sec bin 0 boot_40M.bin      :	flash_offs: 0x00000000(   0K)	data_size: 0x00002F28(  12K)
sec bin 1 app.bin           :	flash_offs: 0x00004000(  16K)	data_size: 0x00004920(  19K)
sec bin 2 app_xip.bin       :	flash_offs: 0x00029800( 166K)	data_size: 0x000058D0(  23K)

generate image: xr_system.img
cp -t ../../../../out/ ../image/"xr806"/*.bin ../image/"xr806"/xr_system.img *.map
回到SDK根目录下可以看到out文件夹,进入后可见输出文件:

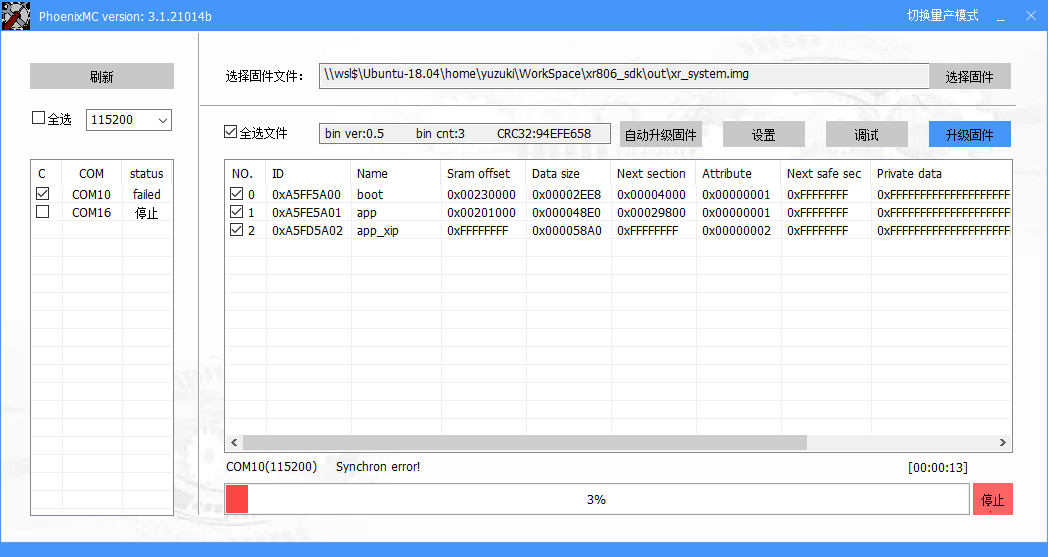
打开烧录软件PhoenixMC,选择编译出来的固件,选择COM口,选择115200
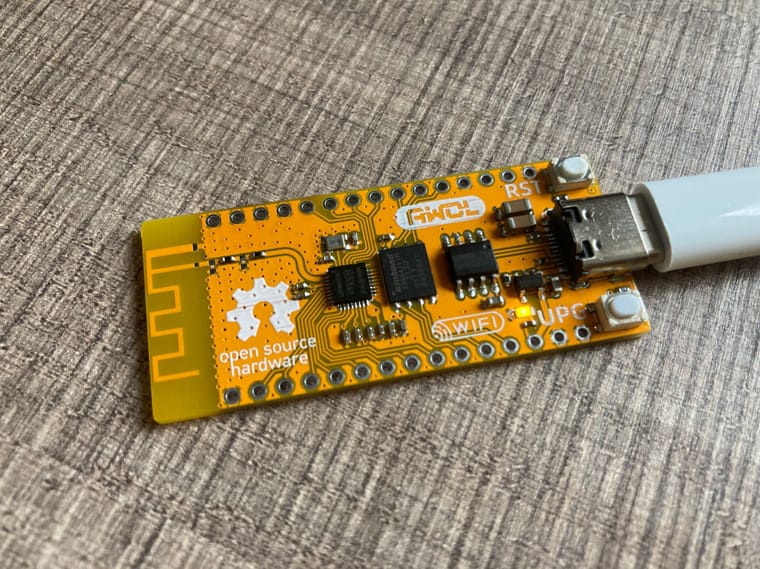
按住UPG键,点一下RST键让其进入下载模式
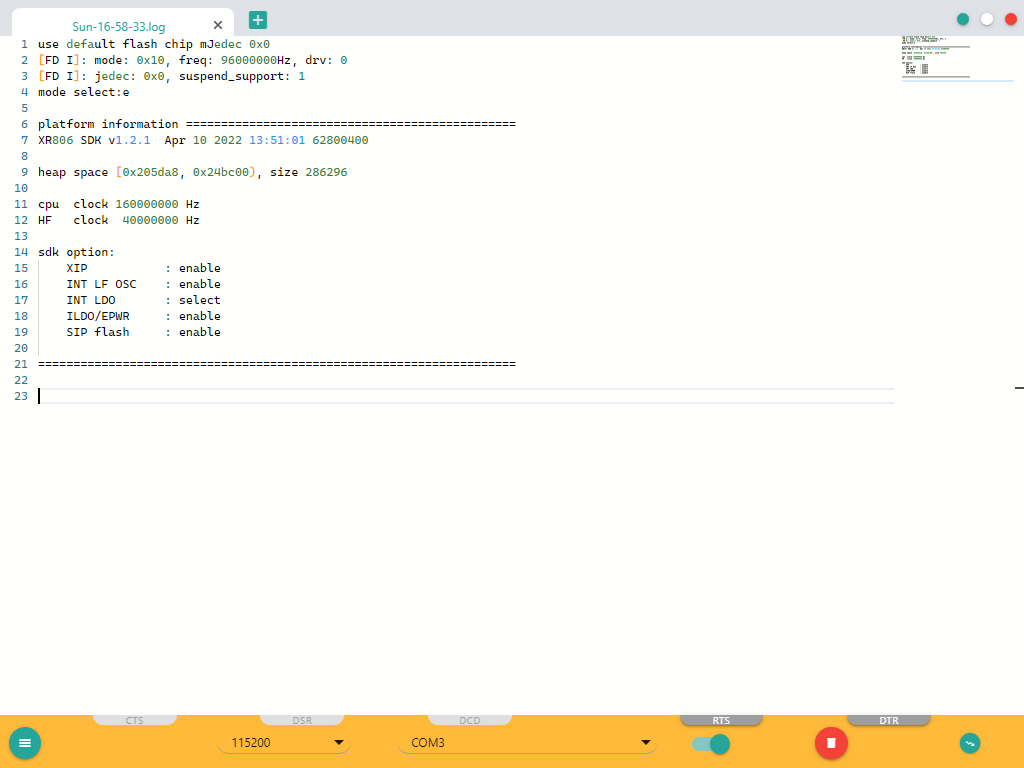
运行
-
XR32 CSI验证发现有点问题,求大佬给个OV7670、GC0308 的demo我抄抄发布在 Wireless & Analog Series
照着camera_demo里的改了,砍了wifi部分,然后把gc0308的驱动部分换成了OV7670,结果出现
[os E] OS_SemaphoreWait():110, handle 0修改后的SDK放到Github上了https://github.com/YuzukiHD/XR32SDK,项目是
project/example/camera报错
--Cam_Hardware_Reset---54----
[COMPONENT TRACK] Ov7670_Csi_Init():258 end
[os E] OS_SemaphoreWait():110, handle 0
[Ov7670] image_size 0
[os E] OS_SemaphoreDelete():89, handle 0
[COMPONENT WARN] Drv_Ov7670_DeInit():627 ov7670 semaphore delete error, -3
硬件
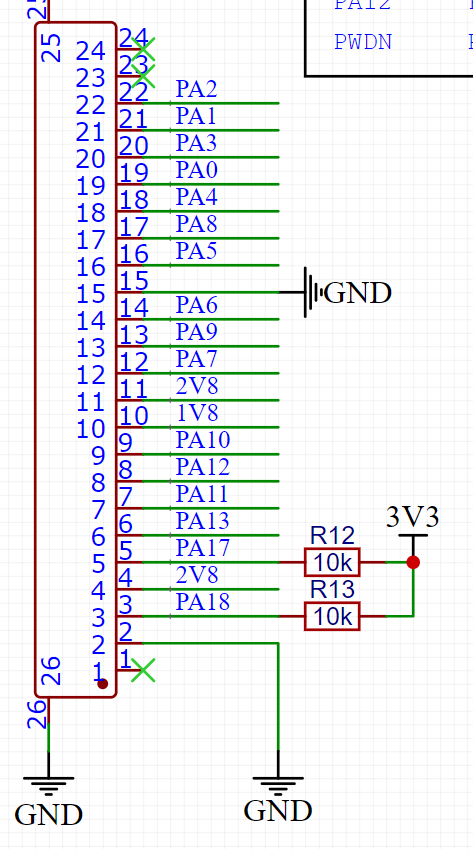
软件
#include <stdio.h>
#include <stdlib.h>
#include <string.h>

#include "driver/chip/hal_csi.h"
#include "driver/chip/hal_dma.h"
#include "driver/chip/hal_i2c.h"
#include "driver/chip/hal_uart.h"
#include "kernel/os/os.h"

#include "driver/component/csi_camera/camera_csi.h"
#include "driver/component/csi_camera/ov7670/drv_ov7670.h"

#define IMAGE_BUFFSIZE 153600

#define CAM_POWERDOWN_PIN GPIO_PIN_12
#define CAM_POWERDOWN_PORT GPIO_PORT_A

#define CAM_RESET_PIN GPIO_PIN_13
#define CAM_RESET_PORT GPIO_PORT_A

uint8_t* image_buff;

void Cam_Hardware_Reset(void) {
    printf("--%s---%d----\n", __func__, __LINE__);

    Drv_Ov7670_Pwdn_Pin_Ctrl(GPIO_PIN_LOW);
    Drv_Ov7670_Reset_Pin_Ctrl(GPIO_PIN_LOW);
    OS_MSleep(3);
    Drv_Ov7670_Reset_Pin_Ctrl(GPIO_PIN_HIGH);
    OS_MSleep(100);
}

void Cam_PowerInit(void) {
    Cam_PowerCtrlCfg PowerCtrlcfg;
    PowerCtrlcfg.Cam_Pwdn_Port = CAM_POWERDOWN_PORT;
    PowerCtrlcfg.Cam_Reset_Port = CAM_RESET_PORT;

    PowerCtrlcfg.Cam_Pwdn_Pin = CAM_POWERDOWN_PIN;
    PowerCtrlcfg.Cam_Reset_Pin = CAM_RESET_PIN;

    Drv_Ov7670_PowerInit(&PowerCtrlcfg);
}

int Cam_Init(uint8_t* imagebuf) {
    HAL_CSI_Moudle_Enalbe(CSI_DISABLE);
    if (Drv_Ov7670_Init() == COMP_ERROR)
        return COMP_ERROR;
    else
        OS_MSleep(500);

    Drv_Ov7670_Set_SaveImage_Buff(( uint32_t )imagebuf);
    HAL_CSI_Moudle_Enalbe(CSI_ENABLE);
    return COMP_OK;
}

int main(void) {
    uint32_t image_size = 0;

    image_buff = ( uint8_t* )malloc(IMAGE_BUFFSIZE);
    if (image_buff == NULL) {
        COMPONENT_WARN("image buff malloc error \r\n");
        return COMP_ERROR;
    }
    memset(image_buff, 0, IMAGE_BUFFSIZE);

    Cam_PowerInit();
    Cam_Hardware_Reset();

    if(Cam_Init(image_buff) == COMP_ERROR){
	printf("[Ov7670] CAM INIT ERROR\n");
    }

    Drv_Ov7670_Capture_Enable(CSI_STILL_MODE, CSI_ENABLE);
    image_size = Drv_Ov7670_Capture_Componemt(10000);
    printf("[Ov7670] image_size %u\n", image_size);

    Drv_Ov7670_DeInit();
    free(image_buff);

    return COMP_OK;
}


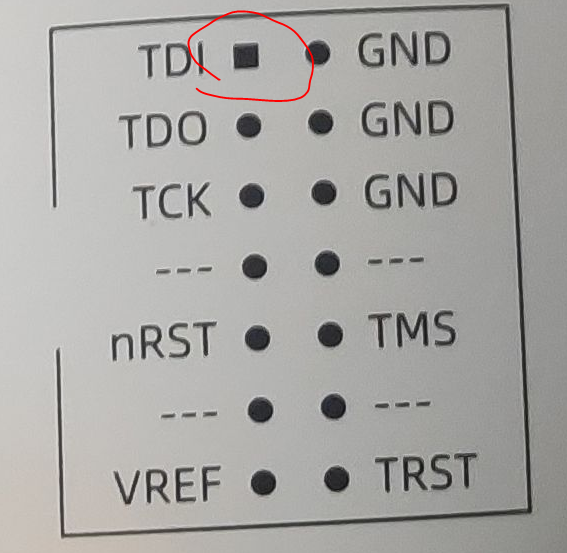
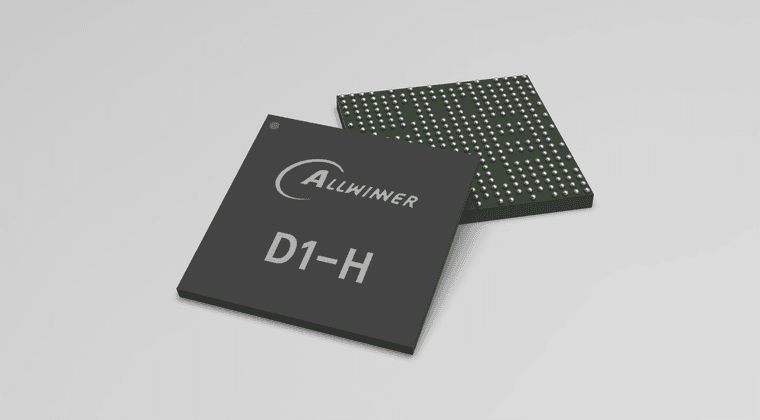
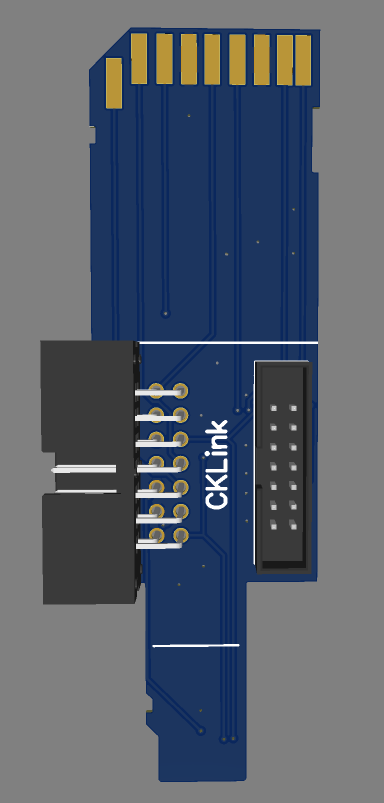
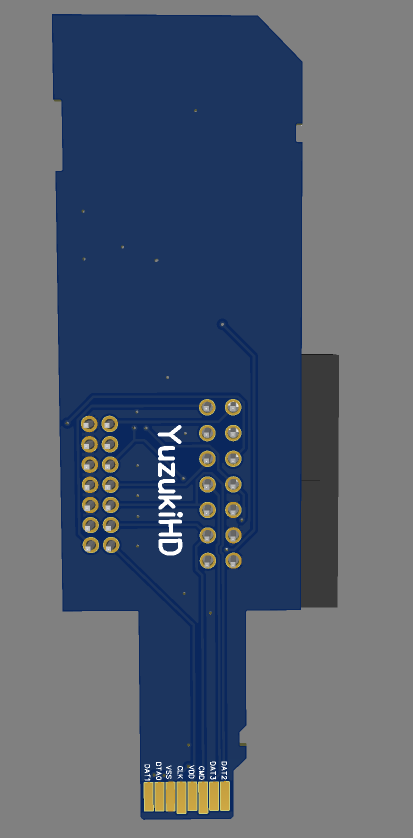
 的电平,启用lvds的时候就是用lvds,mipi是内置供电

![d5d710ea-0553-4c5b-a793-d3ee6e0984bb-GP0R1J9W5K4H7H[9CT{6]4O.jpg](/assets/uploads/files/1649314280024-d5d710ea-0553-4c5b-a793-d3ee6e0984bb-gp0r1j9w5k4h7h-9ct-6-4o.jpg)